Safely Removing Splinters and Skin Irritations Using Tweezers

When a Tiny Invader Causes Big Discomfort: Safely Removing a Splinter or Skin Irritation with Tweezers

Grabbing the right pair of tweezers and knowing the simple steps can make all the difference when a splinter or other minor skin irritation decides to make itself at home.

Understanding the Unwanted Guest

A splinter is essentially a tiny foreign body, often a sliver of wood, glass, or metal, that has pierced the skin. It can cause immediate pain, redness, and swelling, especially if it’s deep or if your skin is particularly sensitive. Sometimes, what feels like a splinter might be a small thorn, a tiny shard from a broken object, or even a hardened bit of dirt that’s become embedded. The key is that something foreign has entered the epidermal layers, and your body is reacting to it, often with inflammation. This can lead to an uncomfortable, reddened area that begs for attention.

Skin irritations can also mimic the feeling of a splinter. Think about a small, sharp seed pod that’s broken off on your skin, or even a tiny burr from certain plants. The goal remains the same: to remove the offending item without causing further damage or introducing infection. This isn’t a complex medical procedure, but it does require a bit of care and the right tools.

Choosing Your Weapon: The Mighty Tweezer

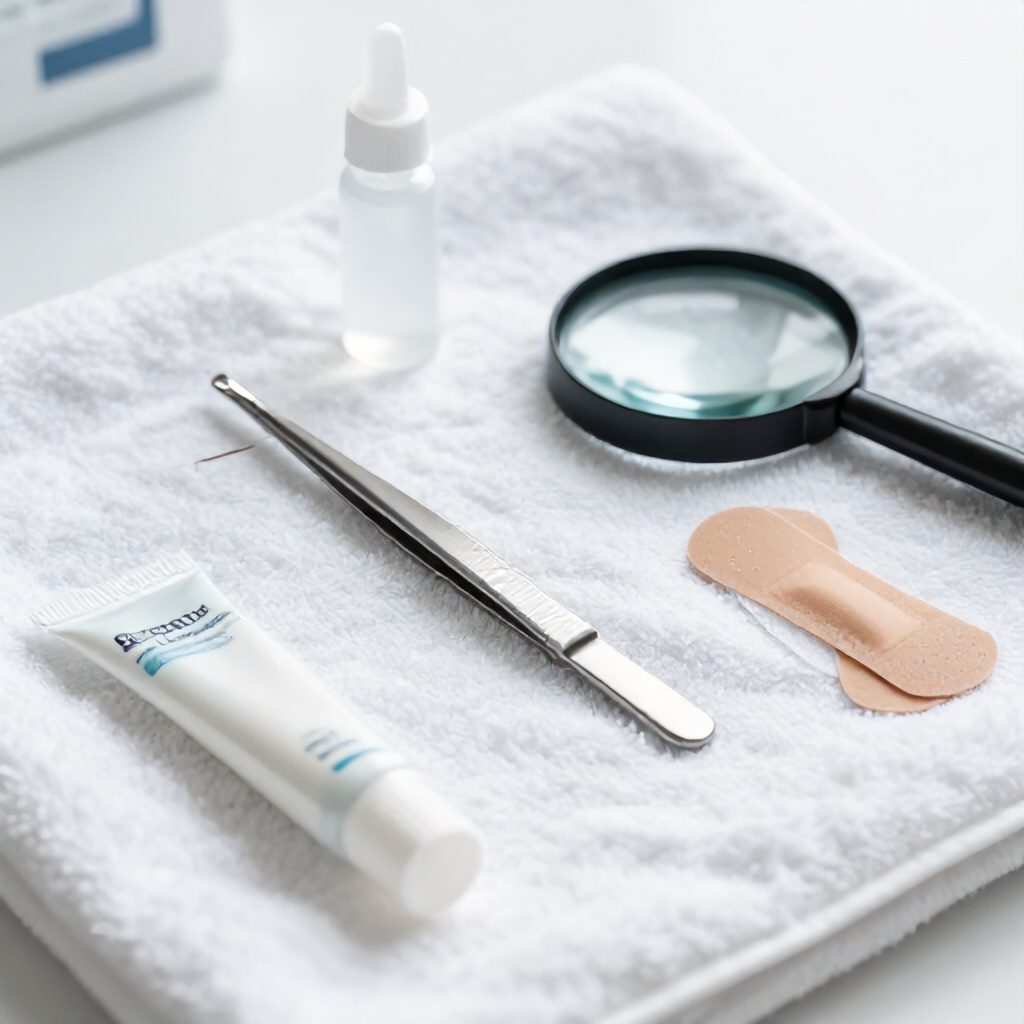
Not all tweezers are created equal when it comes to dealing with a stubborn splinter. You’ll want a pair that offers precision and a good grip. Metal tweezers are generally preferred over plastic ones for this task. Look for tweezers with fine, pointed tips. These allow you to get close to the skin and grasp even the smallest protruding part of the splinter. Slanted-tip tweezers can also be effective, especially if a good portion of the splinter is visible and you need to get a firm hold.

The material of the tweezers matters too. Stainless steel is a good choice because it’s durable, easy to clean, and less likely to harbor bacteria. Before you even think about touching your skin, ensure your chosen tweezers are spotlessly clean. This is a non-negotiable step in preventing infection. A quick wash with soap and water, followed by a rinse and thorough drying, is a good start. For extra peace of mind, you can sterilize them by wiping the tips with rubbing alcohol.

Preparation is Key: Setting the Stage for Success

Before you begin the actual splinter removal, a little preparation goes a long way. First, wash your hands thoroughly with soap and warm water. You don’t want to transfer any germs from your hands to the affected site. Next, gently clean the area around the splinter. Use mild soap and water, and pat it dry with a clean towel. Avoid scrubbing vigorously, as this could push the splinter deeper or cause more inflammation.

Sometimes, a warm compress can be helpful. Soaking the affected area in warm water for 5-10 minutes can soften the skin, making the splinter easier to grasp and potentially encouraging it to work its way closer to the surface. This is particularly useful if the splinter is deep or if the skin is feeling tight and resistant. A clean washcloth soaked in warm water works just fine. Just be sure to dry the area gently afterward.

The Gentle Extraction: Step-by-Step Removal

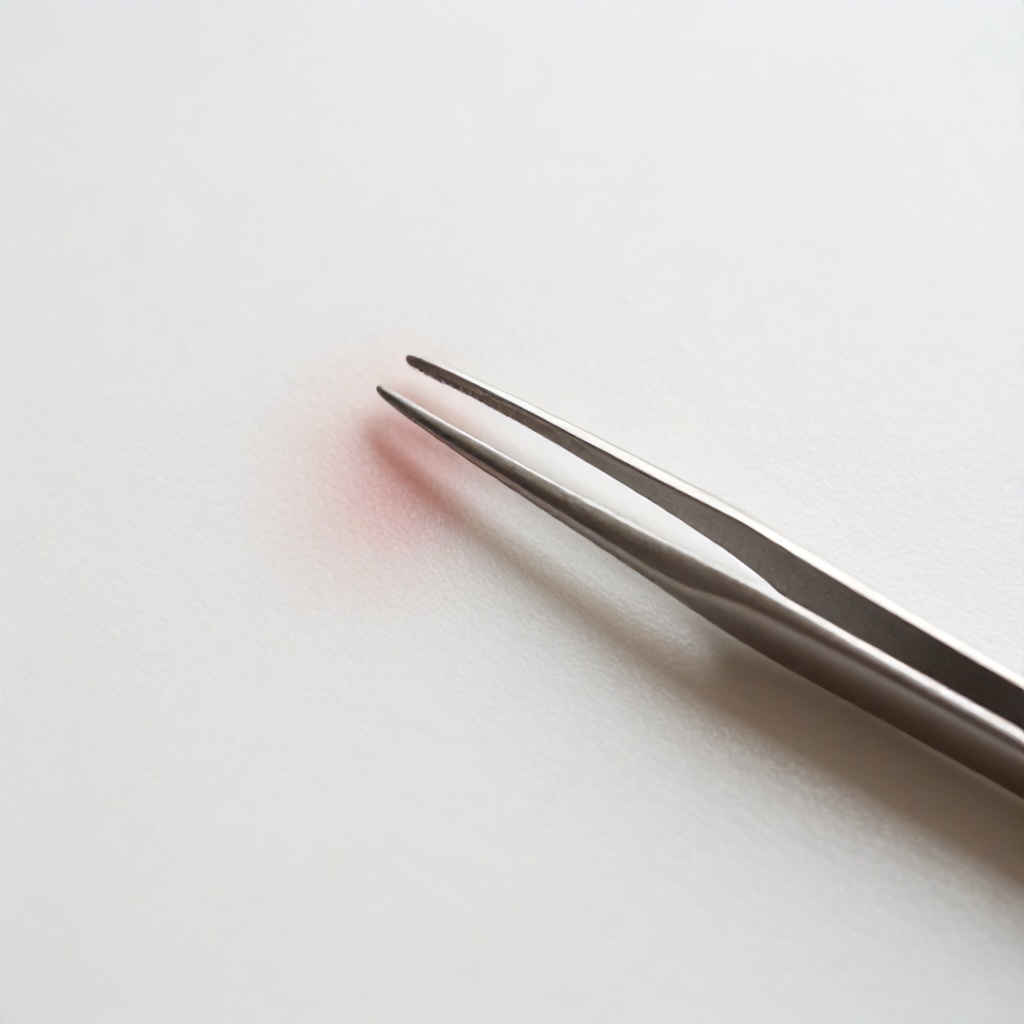
Now for the main event: the actual removal of the splinter. This is where your fine-tipped tweezers come into play. The most important rule here is to be gentle. You’re not trying to wrestle a large object; you’re carefully coaxing a tiny one out.

  1. Assess the Situation: Look closely at the splinter. Can you see an end sticking out? Is it parallel to the skin’s surface, or is it angled? This visual assessment will guide your approach.

  2. Grasp Firmly: Using your sterilized tweezers, carefully grasp the end of the splinter that is most accessible and protruding from the skin. Aim to get a firm grip without squeezing too hard, which could break the splinter.

  3. Pull in the Direction of Entry: This is a critical step. Try to pull the splinter out in the same direction it went in. If you pull against the grain, you risk breaking it, leaving a piece behind, or causing more tissue damage. Imagine you’re gently sliding it back out the way it came.

  4. Slow and Steady Wins the Race: Don’t yank or pull quickly. Apply steady, gentle pressure. If the splinter feels like it’s resisting significantly, stop. You might need to try a different angle or reconsider your approach.

  5. Check for Completeness: Once you think you’ve removed the splinter, examine it carefully to ensure the entire piece has come out. Also, inspect the wound site to make sure no fragments remain. If you can still see a piece, or if you’re unsure, it’s better to try again or seek professional help.

When Things Get Tricky: Deeper Splinters or Stubborn Irritations

Sometimes, a splinter is too deep to grasp with tweezers, or it’s broken off beneath the surface of the epidermis. In these cases, forcing it can do more harm than good. If you can’t easily see or grasp the splinter, or if it’s causing significant pain and inflammation, it might be time to consider other options.

One home remedy that some people find helpful for drawing out deeper splinters is the use of a paste. Baking soda mixed with a little water to form a thick paste can be applied to the affected area, covered with a bandage, and left for several hours or overnight. The idea is that the paste can help to draw the splinter to the surface. After removing the paste, the skin might be softer and the splinter more accessible for tweezers. However, this isn’t a guaranteed solution and should be approached with caution.

Another scenario is when the “splinter” is actually a more general skin irritation, like a small puncture wound from a thorn that has left behind plant material or caused a localized, reddened area. If the foreign body isn’t readily apparent, or if the skin is very inflamed, you might need to be patient. Sometimes, the body will naturally expel these minor invaders over time, especially if the area is kept clean.

Post-Removal Care: Healing and Preventing Infection

Once you’ve successfully removed the splinter or the offending irritant, the job isn’t quite done. Proper wound care is essential to promote healing and prevent infection. After extraction, gently wash the area again with soap and warm water.

Apply a small amount of antibiotic ointment. This helps to keep the wound moist, which can aid in healing, and provides an extra layer of protection against bacteria. Cover the wound with a clean bandage. This protects it from dirt and further irritation, especially if it’s in an area that’s prone to rubbing against clothing.

Keep the bandage clean and dry, and change it daily, or more often if it becomes wet or dirty. Monitor the area for signs of infection. These can include increasing redness, swelling, warmth, pus, or fever. If you notice any of these symptoms, it’s important to seek medical advice from a doctor or dermatologist.

When to Call in the Professionals

While most splinters and minor skin irritations can be handled at home, there are times when you should absolutely seek professional medical help. If the splinter is very deep, large, or lodged under a fingernail or toenail, it’s best left to a healthcare provider. Similarly, if the splinter is made of glass or metal and you’re concerned about it breaking, or if it’s causing severe pain, don’t hesitate to see a doctor.

Signs of infection, as mentioned earlier, are a clear indicator that you need medical attention. Also, if the wound is bleeding heavily and won’t stop with gentle pressure, or if you have underlying health conditions like diabetes or a compromised immune system, it’s wise to consult a healthcare professional. They have the tools and expertise to safely remove foreign bodies and manage any complications that may arise, ensuring proper wound care and minimizing the risk of further issues.

Remember, a minor injury like a splinter doesn’t have to become a major problem. With a little preparation, the right tools, and a gentle approach, you can effectively manage most situations and get back to enjoying your day, free from that annoying little intruder.

How to Safely Remove a Splinter From Your Foot at Home

Removing a splinter from the foot requires a calm approach, proper lighting, and the right set of tools to ensure the foreign object is extracted without causing further damage to the skin integrity. Most minor epidermal splinters can be managed at home if you follow a precise, hygienic process that prioritizes preventing infection and minimizing discomfort. When a foreign body penetrates the thick skin of the foot, the goal is to extract it cleanly while keeping the surrounding area undisturbed.

Preparation and Essential Tools

Before you attempt any manual extraction, gather your supplies in a well-lit area. You need a clean workspace, preferably near a window or under a bright desk lamp, to see the skin pore detail clearly. Proper visibility is the most significant factor in successful minor wound management. If you cannot see the object clearly, you risk pushing it deeper into the subcutaneous layer, which complicates the removal process significantly.

Assemble the following items on a clean towel:

  • High-quality tweezers with a fine, pointed tip.
  • A sewing needle or a specialized splinter probe.
  • Isopropyl alcohol or a similar antiseptic solution.
  • Antibiotic ointment.
  • Small adhesive bandages.
  • A magnifying glass if your vision needs assistance.

Sterilize your tools before touching your skin. Wipe the tips of the tweezers and the needle with a cotton ball soaked in alcohol. This simple step prevents bacteria from entering the puncture site, which is vital for maintaining skin health. Wash your hands thoroughly with soap and warm water for at least twenty seconds. Drying them with a clean paper towel ensures you have a firm grip on your tools, which is necessary for the tactile interaction required during the procedure.

Assessing the Splinter

Examine the site of the dermal penetration closely. If the splinter is protruding from the skin surface, extraction is usually straightforward. However, if the object is fully embedded, you must determine if it is accessible or if it requires professional podiatric first aid. If the area is red, swollen, or shows signs of pus, do not attempt to dig it out yourself. These are indicators of an existing infection that needs medical attention.

The skin on the foot is often thicker and tougher than skin elsewhere on the body. This density can make it difficult to see the exact angle of the embedded debris. Use the magnifying glass to inspect the entry point. Look for the direction the splinter entered. You want to pull it out at the exact same angle it went in to avoid breaking the object or tearing the surrounding tissue.

The Extraction Process

Start by cleaning the skin around the splinter with an alcohol pad. Do not scrub the area, as this might push the object deeper. Gently pat it dry. If the skin is very dry or calloused, soaking the foot in warm, soapy water for ten minutes can soften the epidermal layer. This makes the skin more pliable and easier to work with, reducing the resistance you might encounter during the removal.

  1. Position yourself so your foot is stable and well-supported.
  2. Use the sterilized needle to gently tease the skin open if the splinter is covered by a thin layer of dead skin.
  3. Do not gouge the skin. Work slowly to expose the end of the splinter.
  4. Once the end is visible, use the tweezers to grip the object firmly.
  5. Pull the splinter out slowly, maintaining the original angle of entry.
  6. If the splinter breaks, stop immediately and assess if the remaining piece is reachable.

Patience is your best tool here. If the splinter is deep, you might feel a slight pinch or pressure. This is normal. If you feel sharp, shooting pain, stop and re-evaluate. You may be pressing on a nerve or working too aggressively. Take a break, breathe, and try again only when you feel steady.

Managing the Wound After Extraction

Once the foreign object removal is complete, you will likely see a small, empty channel in the skin. This is a superficial injury that needs immediate care to prevent bacteria from settling in. Squeeze the area gently to encourage a tiny amount of bleeding, which helps flush out any remaining debris. This is a standard practice in minor surgical procedure protocols for small punctures.

Clean the area again with antiseptic. Apply a thin layer of antibiotic ointment to the site. This creates a barrier against dirt and germs while the skin begins its natural healing process. Cover the spot with a small bandage to protect it from friction, especially since the foot is constantly under pressure during walking. Change the bandage daily and keep the area clean and dry.

Troubleshooting Common Issues

Sometimes, the splinter is too deep or the skin is too thick to see clearly. If you find yourself struggling, do not force the issue. Repeatedly poking at the skin causes trauma and increases the risk of scarring or infection. If you cannot extract the object after a few attempts, it is time to stop. Cover the area and seek help from a healthcare professional.

Another common issue is the splinter breaking into smaller pieces. This often happens with wood or glass. If this occurs, do not panic. Use the tweezers to pick out the visible fragments. If you suspect tiny shards remain, keep the area clean and monitor it for a few days. Often, the body will naturally push small, non-reactive foreign bodies toward the surface over time. If the area becomes painful or inflamed, see a doctor.

When to Seek Professional Help

There are specific situations where home removal is not appropriate. If the splinter is located under a toenail, it is often too difficult to reach without causing significant damage to the nail bed. If the object is made of metal, glass, or a material that might shatter, professional tools are required to ensure the entire piece is removed. If you have diabetes or poor circulation, you should never attempt to remove splinters at home. These conditions make you highly susceptible to infections that can escalate quickly.

Watch for signs of infection in the days following the procedure. Increased redness, warmth, throbbing pain, or red streaks extending from the wound are red flags. If you notice these symptoms, contact a medical provider. Even a small puncture can lead to complications if not managed correctly, particularly on the foot where the skin is exposed to constant moisture and friction from socks and shoes.

Maintaining Foot Skin Integrity

Preventing future splinters is just as important as knowing how to remove them. Avoid walking barefoot in areas where debris is common, such as workshops, gardens, or unfinished construction sites. Wear sturdy shoes that provide a barrier between your skin and the ground. Regularly inspect your footwear for worn-out soles that might allow sharp objects to penetrate.

Foot skin care involves keeping the skin hydrated and free of excessive calluses. While some callousing is natural, thick, dry skin can hide embedded objects and make it harder to spot a splinter early. Use a pumice stone or a foot file to gently manage calluses, but do not over-exfoliate. Healthy, supple skin is more resilient and easier to inspect for any signs of foreign body penetration.

The Importance of Proper Lighting and Magnification

Many people fail at splinter removal simply because they cannot see what they are doing. The skin texture of the foot can be deceptive, with natural lines and creases that look like foreign objects. Using a magnifying glass or a high-powered LED light can make a world of difference. When you have a clear, magnified view, you can distinguish between a splinter and a simple scratch or a piece of dirt on the surface.

If you are working alone, try to position a mirror if you cannot reach your foot comfortably. Alternatively, ask a family member to hold the light for you. Having a second pair of eyes can help you stay steady and focused. The goal is to minimize the time spent working on the skin, which reduces the chance of irritation.

Understanding the Nature of Splinters

Different materials behave differently when embedded in the skin. Wood splinters are porous and can harbor bacteria, making them more likely to cause infection. Glass splinters are sharp and can easily break into smaller, harder-to-find pieces. Metal splinters, such as tiny slivers from a wire brush, can be very difficult to grip because they are often smooth and thin. Understanding the material helps you choose the right technique.

For example, if you are dealing with a wood splinter, you might need to be more careful about pulling it out in one piece to prevent it from splintering further. If you are dealing with a metal sliver, you might need a stronger grip with your tweezers. Always take a moment to identify what you are dealing with before you start the extraction process.

The Role of Hygiene in Minor Wound Management

Hygiene is the foundation of all minor wound management. Every tool you use must be clean. Every surface you touch should be sanitized. If you are using a needle to probe the skin, ensure it is a clean, unused needle. Never reuse a needle that has been used on another person or for another task. The risk of introducing a foreign pathogen into your bloodstream is not worth the convenience of using a tool that is already at hand.

After the procedure, keep the area covered for at least twenty-four hours. This allows the skin to begin closing the puncture site. If you are active, wear clean socks and comfortable shoes to prevent further irritation. If the bandage gets wet or dirty, change it immediately. Keeping the environment around the wound clean is the best way to ensure a quick and uncomplicated recovery.

Final Thoughts on Foot Care

Taking care of your feet is a daily practice. By being aware of your surroundings and keeping your skin in good condition, you can avoid many of the minor injuries that lead to splinter removal. When an accident does happen, stay calm and follow the steps outlined above. Precision, cleanliness, and patience are the keys to successful extraction. If you ever feel unsure or if the situation seems beyond your control, do not hesitate to seek professional help. Your health and the integrity of your skin are worth the extra effort.

Remember that the skin on your feet is the primary interface between your body and the ground. It takes a lot of abuse throughout the day. Treating it with care, even when dealing with something as small as a splinter, helps maintain your overall mobility and comfort. Keep your tools organized, keep your eyes on the details, and always prioritize safety over speed. This approach ensures that you can handle minor foot injuries effectively and get back to your daily activities with minimal disruption.

The process of removing a splinter is a practical skill that everyone should have in their home care repertoire. It is not about being a surgeon; it is about being prepared and methodical. By following these guidelines, you can manage minor epidermal splinters with confidence. Always keep your first aid kit stocked with the essentials, and never underestimate the value of a clean, well-lit, and calm environment when performing any type of minor wound management.

As you gain experience, you will find that the process becomes second nature. You will learn to recognize the signs of a splinter early, allowing for faster and easier removal. You will also become better at identifying when a situation requires professional intervention. This knowledge is a valuable part of maintaining your health and well-being, ensuring that you can address minor issues before they become major problems. Stay observant, stay clean, and take care of your feet.

Exit mobile version