Gentle Back Massage with Warm Towel and Soothing Steam Therapy

Melt Away Tension: Your Gentle Back Massage with Warm Towel and Soothing Steam

A gentle back massage combined with warm towel and soothing steam therapy is a wonderfully effective way to release muscle tension and promote deep relaxation right at home.

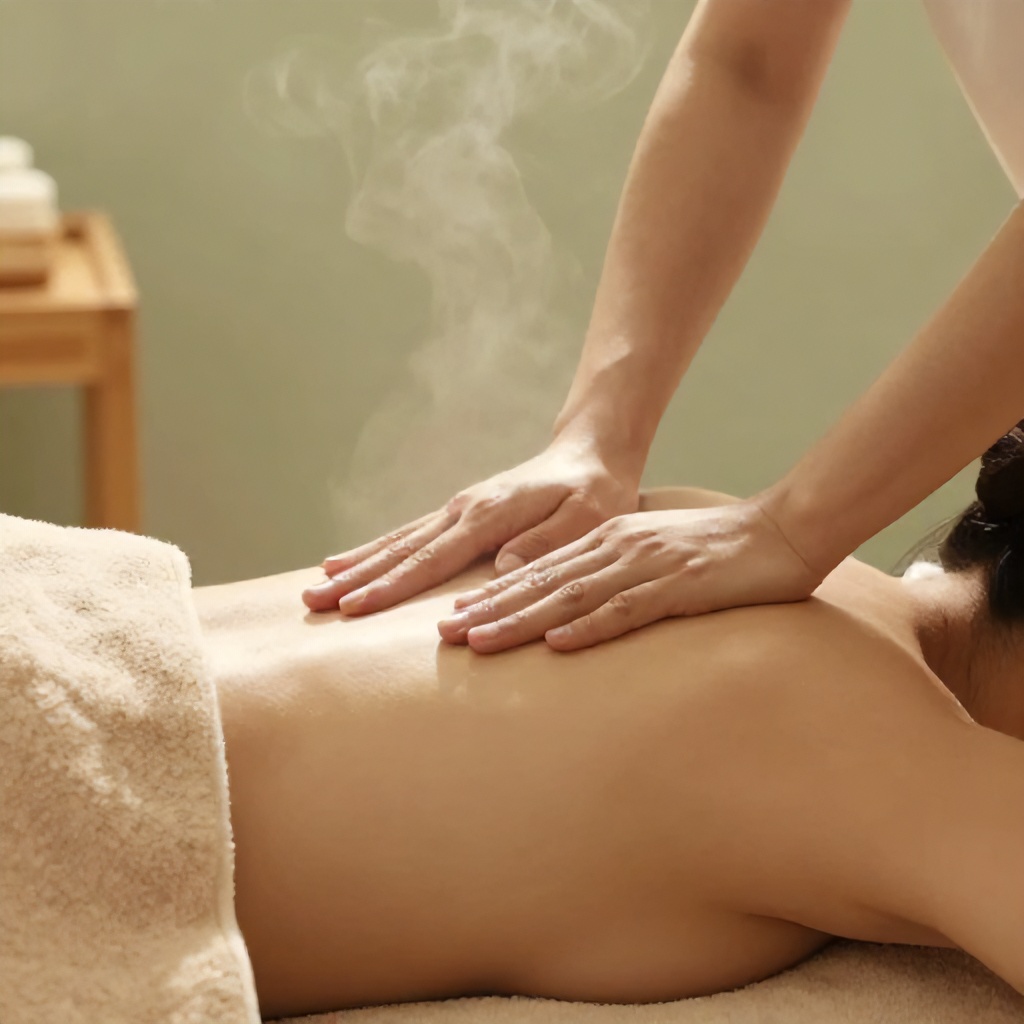
Imagine this: the day’s stresses are starting to feel like a heavy cloak draped over your shoulders, and your back aches with a dull, persistent thrum. You crave relief, a moment of pure comfort. This isn’t about a deep-tissue, pain-inducing session. It’s about embracing a softer approach, a nurturing ritual that whispers calm into tired muscles. We’re talking about the simple yet profoundly effective magic of a warm towel and gentle steam, combined with a tender back massage. It’s a spa treatment you can easily recreate, bringing a sense of wellness and tranquility into your own space.

The Power of Warmth and Gentle Contact

Why does warmth feel so good on an achy back? It’s all about physiology. Heat helps to increase blood flow to the muscles. This improved circulation delivers more oxygen and nutrients while helping to flush out metabolic waste products that can contribute to soreness and stiffness. Think of it as gently coaxing your muscles to let go. The warmth itself is inherently soothing, triggering a relaxation response in your nervous system.

And then there’s the gentle contact. When someone you trust offers a hand on your back, it’s more than just physical pressure. It’s a form of therapeutic touch that can signal safety and comfort. This gentle contact, especially when combined with warmth, can significantly reduce feelings of stress and anxiety, contributing to an overall sense of serenity. It’s a simple act of care that can have a profound impact on your mood and physical well-being.

Creating Your Home Spa Sanctuary

You don’t need a fancy spa to experience these benefits. With a few simple preparations, you can transform a corner of your home into a haven of relaxation. The key is to create a serene mood. This involves a few sensory elements.

Setting the Atmosphere

Start by dimming the lights. Soft lighting, perhaps from a few strategically placed lamps, is far more conducive to relaxation than bright overheads. Consider warm lighting, think soft orange hues or gentle gold hues that cast a warm glow. This visual warmth complements the physical warmth you’re about to introduce. You might even light a calming candle, choosing a scent like lavender or chamomile known for their relaxing properties. Ensure the room is a comfortable temperature – not too hot, not too cold. A quiet environment is essential; turn off phones, minimize distractions, and let the outside world fade away.

Gathering Your Supplies

For this gentle back massage, you’ll need a few key items:

  • A clean, soft towel. A textured towel can add a subtle sensory element, but softness is paramount.
  • A bowl or basin for warming the towel.
  • Warm water. Not scalding, but comfortably warm to the touch.
  • Optional: A few drops of a calming essential oil like lavender or chamomile, mixed into the water.
  • A comfortable surface to lie on – a bed, a comfortable mat on the floor, or even a supportive couch.
  • A partner or loved one to administer the massage. If you’re doing this solo, you can adapt some steps for self-massage, though the shared experience is particularly potent.

The Warm Towel Technique: A Gentle Embrace

The warm towel is the star of this show, providing direct, comforting heat. It’s a beautiful way to prepare the muscles for massage and to enhance the overall feeling of warmth and comfort.

Preparing the Warm Towel

  1. Fill your bowl or basin with comfortably warm water.
  2. Add a few drops of your chosen essential oil if using.
  3. Submerge your towel completely in the water.
  4. Wring out the towel thoroughly. You want it to be damp and warm, not dripping wet.
  5. Carefully fold the towel, keeping it warm. You might need to reheat it once or twice during the session to maintain optimal temperature.

The sensation of a warm, damp towel being placed on your back is incredibly soothing. It’s a gentle introduction to the therapy, allowing your skin to absorb the warmth and signal to your body that it’s time to relax.

Soothing Steam Therapy: A Breath of Fresh Air

While the warm towel provides direct heat, the gentle steam adds another layer of therapeutic benefit. The subtle vapor helps to open pores and can further relax the muscles, creating an even deeper sense of comfort and ease. This isn’t about a heavy, overwhelming steam; it’s a light, refreshing mist.

Incorporating the Steam

The warm towel itself will release a gentle steam as it sits on your back. The moisture evaporating from the towel creates a localized steam effect. If you want to enhance this, you can:

  • Ensure the towel is sufficiently damp (but not dripping).
  • Consider using a slightly larger towel that can cover a broader area of your back.
  • If you have a humidifier, running it on a low setting in the room can add a general sense of humid warmth.

The combination of heat and moisture from the towel is a simple yet effective form of heat therapy that works wonders for easing muscle stiffness. The gentle mist can feel incredibly calming, almost like a soft cloud settling over you.

The Gentle Back Massage Sequence

This massage is designed to be nurturing and relaxing, not intense. The focus is on broad, sweeping strokes and gentle pressure. The goal is to encourage relaxation, not to work out deep knots through force. Remember, the hand on back is a gesture of comfort.

Step-by-Step Relaxation

  1. Initial Warm Towel Application: Begin by placing the warm, damp towel over the entire back. Let it rest for 3-5 minutes. Encourage the person receiving the massage to take slow, deep breaths, inhaling the calming aroma if you’ve used essential oils. This initial application is all about settling in and allowing the warmth to penetrate.
  2. Towel Removal and Gentle Strokes: Gently remove the warm towel. Begin with long, effleurage strokes from the base of the spine up to the shoulders, and then sweeping outwards towards the sides. Use the palms of your hands and flat fingers. Keep your movements slow and deliberate. Apply only light to moderate pressure. The goal is to spread the warmth and begin to awaken the muscles.
  3. Shoulder and Neck Release: Gently cup your hands around the shoulders. Use your thumbs to make small, circular motions at the base of the neck and along the tops of the shoulders. This area often holds a lot of tension. Keep the pressure light and always ask for feedback if you’re unsure.
  4. Spine Glides: Place your hands flat on either side of the spine, avoiding direct pressure on the bone itself. Gently glide your hands upwards from the lower back towards the neck, then sweep outwards. Repeat this several times, focusing on the broad muscles of the back.
  5. Lower Back Comfort: For the lower back, use broad, sweeping strokes with the heels of your hands. You can also use gentle, circular motions with your palms. The warmth from your hands will further enhance the relaxation.
  6. Upper Back and Shoulder Blades: Work your way up to the upper back and around the shoulder blades. You can use your fingertips to make small circles or gentle kneading motions on the muscles surrounding the shoulder blades. Again, keep the pressure very gentle.
  7. Second Warm Towel Application: Re-warm your towel if necessary. Place it back over the entire back for another 3-5 minutes. This second application helps to maintain the warmth and deepen the relaxation achieved during the massage.
  8. Finishing Touches: Gently remove the towel. Finish with a few more long, sweeping strokes from the lower back to the shoulders. You can also lightly tap or “feather” the back with your fingertips to provide a gentle, stimulating finish.
  9. Rest and Hydration: Encourage the recipient to rest for at least 10-15 minutes after the massage. Offer a glass of water. This helps to rehydrate the body and allows the relaxation to fully integrate.

Throughout the massage, maintain a consistent, gentle rhythm. Your touch should feel reassuring and calming. The combination of the warm towel, the subtle steam, and your mindful hand on their back creates a powerful synergy for relaxation. This isn’t just about physical relief; it’s about creating a moment of connection and deep comfort.

Adapting for Self-Care

While a partner-led massage is wonderful, you can adapt many of these techniques for solo self-care. You won’t be able to reach your entire back as effectively, but you can still reap significant benefits.

  • Warm Towel Application: You can still apply a warm towel to your upper back and shoulders while lying down.
  • Self-Massage Tools: Consider using a massage ball or a foam roller to reach areas you can’t easily access with your hands.
  • Neck and Shoulder Rolls: Focus on self-massage for your neck and shoulders, using your own hands to apply gentle pressure and circular motions.
  • Stretching: Incorporate gentle stretches for your back and shoulders.

Even a few minutes of focused self-care, incorporating warmth and gentle movement, can make a difference in your day. The key is to be present with yourself and to approach the practice with kindness and patience.

Beyond the Massage: Sustaining the Serenity

The benefits of this gentle back massage with warm towel and steam therapy extend beyond the immediate session. By making it a regular practice, you can cultivate a greater sense of overall wellness and resilience to stress.

Think of this as a mini-retreat you can take whenever you need it. It’s a simple, accessible way to prioritize your comfort and well-being. The warmth, the gentle contact, the soothing steam – they all work together to create a profound sense of tranquility. It’s a reminder that sometimes, the most effective forms of healing are the simplest ones, requiring nothing more than a little warmth, a gentle touch, and a willingness to slow down and be present.

Morning Yoga Flow for Gradual Body Awakening and Mental Clarity

Gentle Morning Yoga Flow to Wake Up Your Body and Mind

A morning yoga flow is less about pushing hard and more about mindful movement. The aim is to gradually awaken the body, lubricate your joints, energize your spine, and bring a sense of mental clarity before the day’s demands begin. This sequence moves from quiet stillness into gentle spinal movement, then progresses to strength, balance, and grounding postures.

Practicing this flow regularly can significantly improve your mobility, posture, circulation, and mental focus. The key is to move slowly, breathe deeply through your nose, and allow each posture to naturally prepare you for the next one. This approach helps build awareness and prepares your body and mind for a more centered day.

1. Seated Meditation: Setting Your Foundation

Your practice begins with stillness. Seated meditation is a powerful way to shift your nervous system from a state of reactivity to one of calm awareness. It’s the perfect way to ground yourself before you start moving.

Alignment Tips for Seated Meditation

Sit comfortably in a cross-legged position or on a cushion, ensuring your spine is tall and your shoulders are relaxed. Rest your hands gently on your knees or in your lap. Lengthen through the crown of your head without creating any stiffness in your body. Keep your chin slightly tucked, which helps to keep the back of your neck long and open.

Stay in this position for a few minutes, simply observing your breath. This is also a great time to set an intention for your practice, or for the day ahead. What do you hope to cultivate? Peace? Energy? Patience?

2. Pigeon Pose: Releasing Hip Tension

Pigeon Pose is excellent for opening the hips and releasing stored tension, which is particularly beneficial if you spend a lot of time sitting. It’s a deep hip opener that can feel incredibly releasing.

Alignment Tips for Pigeon Pose

Focus on keeping your hips grounded and level. If your front hip is lifted, place a cushion or block underneath it for support. Lengthen your spine upwards before gently leaning forward over your front leg, or reaching your back leg towards your glute without forcing the knee. Keep your chest open, ribs gently drawn in, and shoulders relaxed away from your ears. Lightly engage your core to support your lower back. Keep your neck long, with your gaze soft and steady.

Hold this pose for several slow, deep breaths, then carefully switch sides to give your other hip the same attention.

3. Cobra Pose: Gentle Spinal Strength

Cobra Pose gently strengthens your spine and opens your chest, helping to counteract the effects of slouching and stiffness that can build up throughout the day. It’s a subtle yet effective posture.

Alignment Tips for Cobra Pose

Lie on your belly with your hands placed directly under your shoulders. Press lightly into your palms, and use the strength of your back muscles to lift your chest off the floor. Avoid relying solely on your arms. Keep your elbows bent and tucked in close to your ribs. Focus on lengthening through the front of your body without compressing your lower back. Feel a gentle lift and expansion.

4. Cat and Cow Flow: Energizing the Spine

Flowing between Cat and Cow poses is a fantastic way to warm up the spine and improve its overall mobility. This dynamic movement lubricates the spinal joints and encourages deep, conscious breathing.

Begin on your hands and knees, ensuring your wrists are under your shoulders and your knees are under your hips.

Cow Pose

Inhale as you drop your belly towards the mat, lift your chest and your tailbone towards the sky. Draw your shoulders away from your ears, creating space. Keep your neck long, with your gaze slightly forward or upward without straining.

Cat Pose

Exhale as you press the floor away with your hands, rounding your spine towards the ceiling. Draw your chin gently towards your chest and engage your core. Move slowly and deliberately, coordinating each part of the spinal rounding with your breath.

Continue to flow between these two poses for several rounds. This movement is excellent for releasing tension and creating spinal space.

5. Downward Facing Dog: Full Body Stretch

Downward-Facing Dog is a foundational pose that energizes the entire body while providing a deep stretch for your back, hamstrings, and shoulders. It’s a great posture for building strength and flexibility.

Alignment Tips for Downward Facing Dog

Lift your hips up and back, aiming to create a long, straight line from your hands to your hips. It’s perfectly okay to bend your knees slightly, especially if you have tight hamstrings, as this helps to maintain length in your spine. Press evenly through your palms and allow your head to relax between your arms. Focus on finding stability and length rather than trying to push your heels to the floor.

6. Three-Legged Dog Variation: Building Strength and Balance

This variation of Downward Dog builds strength, particularly in the arms and core, and significantly improves your balance. It adds an extra challenge and promotes greater body awareness.

Alignment Tips for Three-Legged Dog

From Downward-Facing Dog, inhale and lift one leg straight up behind you, keeping your hips as level as possible. Keep your standing leg strong and grounded. Engage your core to maintain stability. You can keep your toes pointed or flex your foot. Hold for a few breaths, then gently lower the leg and repeat on the other side.

7. Warrior II: Cultivating Strength and Focus

Warrior II is a powerful standing posture that builds strength in the legs and opens the hips and chest. It also cultivates mental focus and a sense of unwavering presence.

Alignment Tips for Warrior II

Step your feet wide apart. Turn your front foot out 90 degrees and your back foot in slightly. Align your front heel with the arch of your back foot. Bend your front knee directly over your ankle, ensuring it doesn’t go past your toes. Keep your torso stacked over your hips. Extend your arms out to the sides, parallel to the floor, with your gaze over your front fingertips. Feel strong and grounded.

8. Triangle Pose: Expanding and Lengthening

Triangle Pose is a wonderful counterpoint to the bent-knee strength of Warrior II. It lengthens the spine, stretches the hamstrings and hips, and opens the chest, helping to counteract slouching.

Alignment Tips for Triangle Pose

From Warrior II, straighten your front leg. Hinge at your front hip and reach your front hand forward, then lower it down to your shin, ankle, or a block. Extend your top arm straight up towards the ceiling. Keep both legs strong and engaged. Imagine creating a straight line between your hands. Gently draw your shoulder blades down and away from your ears, opening your chest towards the sky. Your gaze can be upwards, forwards, or down, depending on your neck comfort.

9. Child’s Pose: Resting and Releasing

After the standing poses, Child’s Pose offers a moment of deep rest and release. It’s a grounding posture that gently stretches the back and hips and calms the nervous system.

Alignment Tips for Child’s Pose

Kneel on the floor. Bring your big toes to touch and widen your knees to hip-width apart or wider. Sink your hips back towards your heels. Rest your forehead on the mat. You can extend your arms forward or bring them back alongside your body. Allow your entire body to relax and surrender into the pose. Focus on deep, even breaths.

10. Seated Forward Fold: Calming the Mind

This gentle forward fold is a calming posture that can help release tension in the back and hamstrings. It encourages introspection and helps to quiet the mind.

Alignment Tips for Seated Forward Fold

Sit with your legs extended straight out in front of you. You can place a cushion under your hips if this helps you sit more upright. Inhale to lengthen your spine. As you exhale, hinge at your hips and fold forward over your legs. Keep your back relatively long; it’s more important to fold from the hips than to force your head to your toes. You can rest your hands on your shins, ankles, or feet. Allow your shoulders to relax.

11. Seated Spinal Twist: Releasing Tension

A gentle spinal twist is a fantastic way to release tension held in the back and torso. It aids digestion and helps to create spinal space.

Alignment Tips for Seated Spinal Twist

Sit with your legs extended. Bend your right knee and place your right foot on the outside of your left thigh. Inhale to lengthen your spine. As you exhale, twist your torso to the right, bringing your left elbow to the outside of your right thigh, or hugging your knee. Keep your spine tall and twist from your core. Gaze over your right shoulder. Hold for a few breaths, then repeat on the other side.

12. Savasana (Corpse Pose): Integration and Rest

The practice concludes with Savasana, a vital pose for integration and deep rest. It allows your body and mind to absorb the benefits of your practice.

Alignment Tips for Savasana

Lie flat on your back with your legs extended and arms resting by your sides, palms facing up. Allow your feet to fall open naturally. Close your eyes and consciously release any tension from your body, starting from your toes and moving all the way up to your head. Simply allow yourself to be still and breathe naturally. Stay here for at least 5-10 minutes.

Bringing Your Morning Flow to Life

This morning yoga flow is designed to be a gentle yet effective way to awaken your body and sharpen your mental focus. Remember, the intention is key. Move with awareness, listen to your body, and adjust the poses as needed. Regular practice will enhance your mobility, improve your posture, boost circulation, and cultivate a greater sense of calm and clarity throughout your day.

Exit mobile version