Easy Oven Roasted Piri Piri Chicken Recipe for Weeknight Dinners

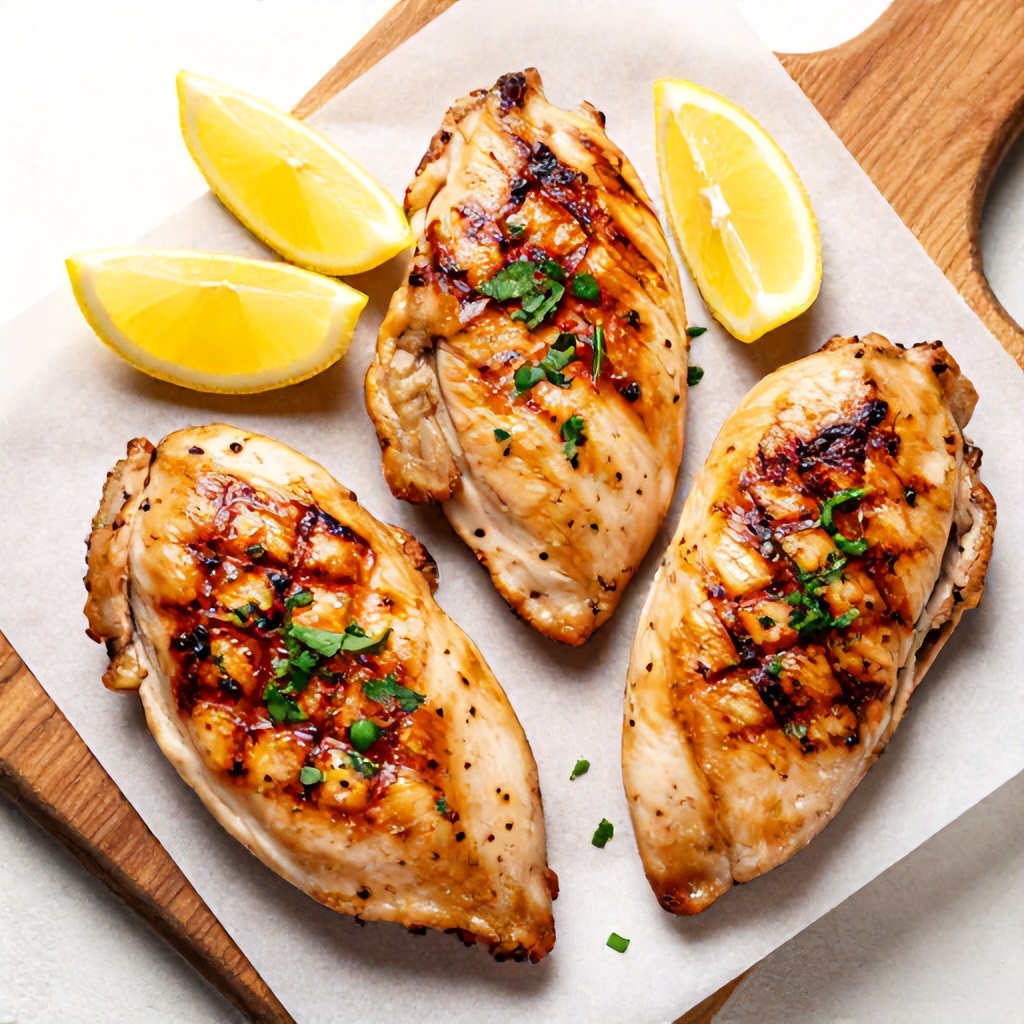
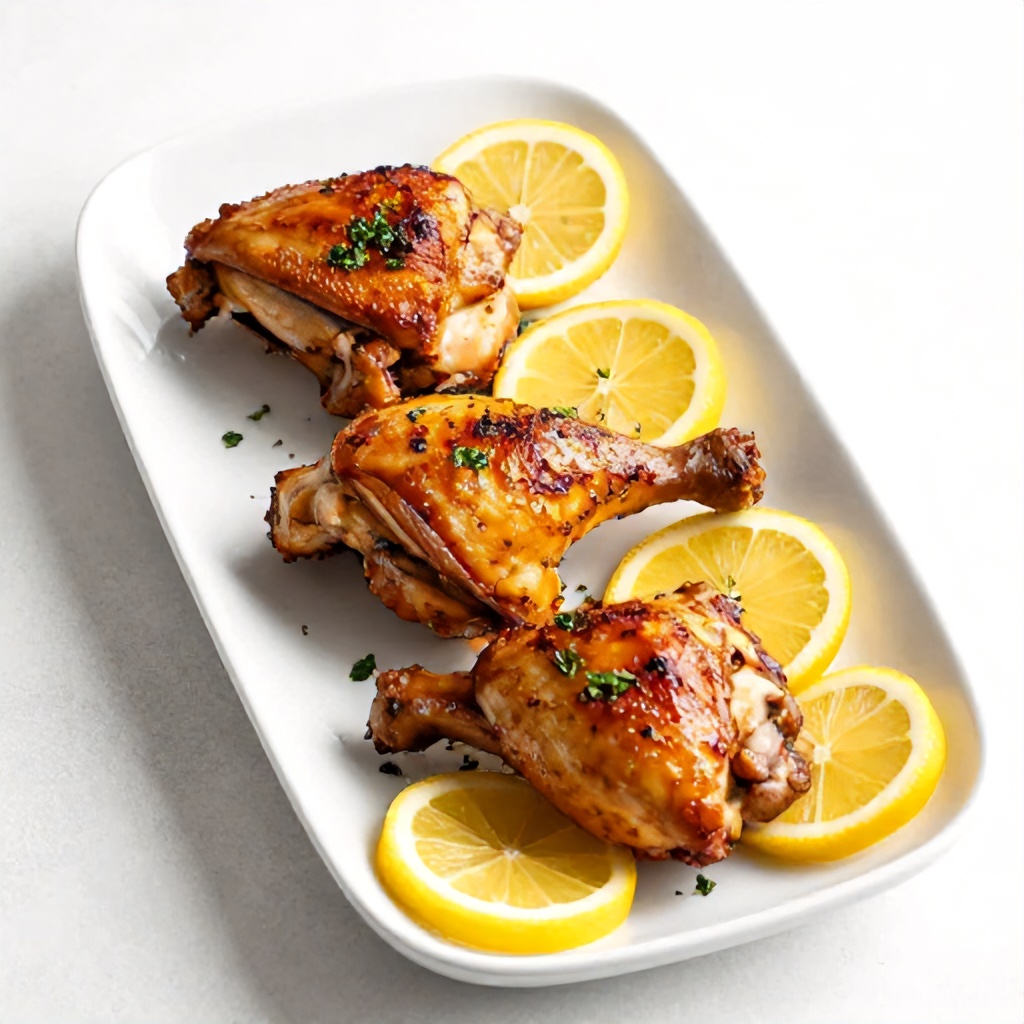
Oven Roasted Piri Piri Chicken for Busy Evenings

Piri piri chicken brings a bold, spicy, and tangy profile to your kitchen with minimal effort. This roasted chicken recipe relies on a vibrant marinade that balances fiery heat with deep, savory notes. While traditional South African and Portuguese-style chicken is often cooked over an open flame, this oven-roasted version delivers the same juicy results for your weeknight dinner ideas. By using a garlic-infused sauce and a blend of aromatic spices, you can transform simple poultry into an international comfort food staple.

Understanding Piri Piri Peppers

The heart of this dish lies in the African bird’s eye peppers. These small, potent chilies are native to Southern Africa and provide the signature kick that defines the spice profile of the meal. They are significantly hotter than a standard jalapeno, often ranking ten times higher on the Scoville scale. Despite the intensity, they carry a subtle, fruity undertone that pairs perfectly with citrus and vinegar.

Finding these peppers can sometimes be a challenge at standard grocery stores. If you cannot locate fresh or dried bird’s eye peppers, you can substitute them with Thai bird chilies or even a high-quality cayenne pepper powder. The goal is to capture that specific fiery heat without losing the complexity of the sauce. When handling these peppers, always use gloves to protect your skin and eyes from the concentrated oils.

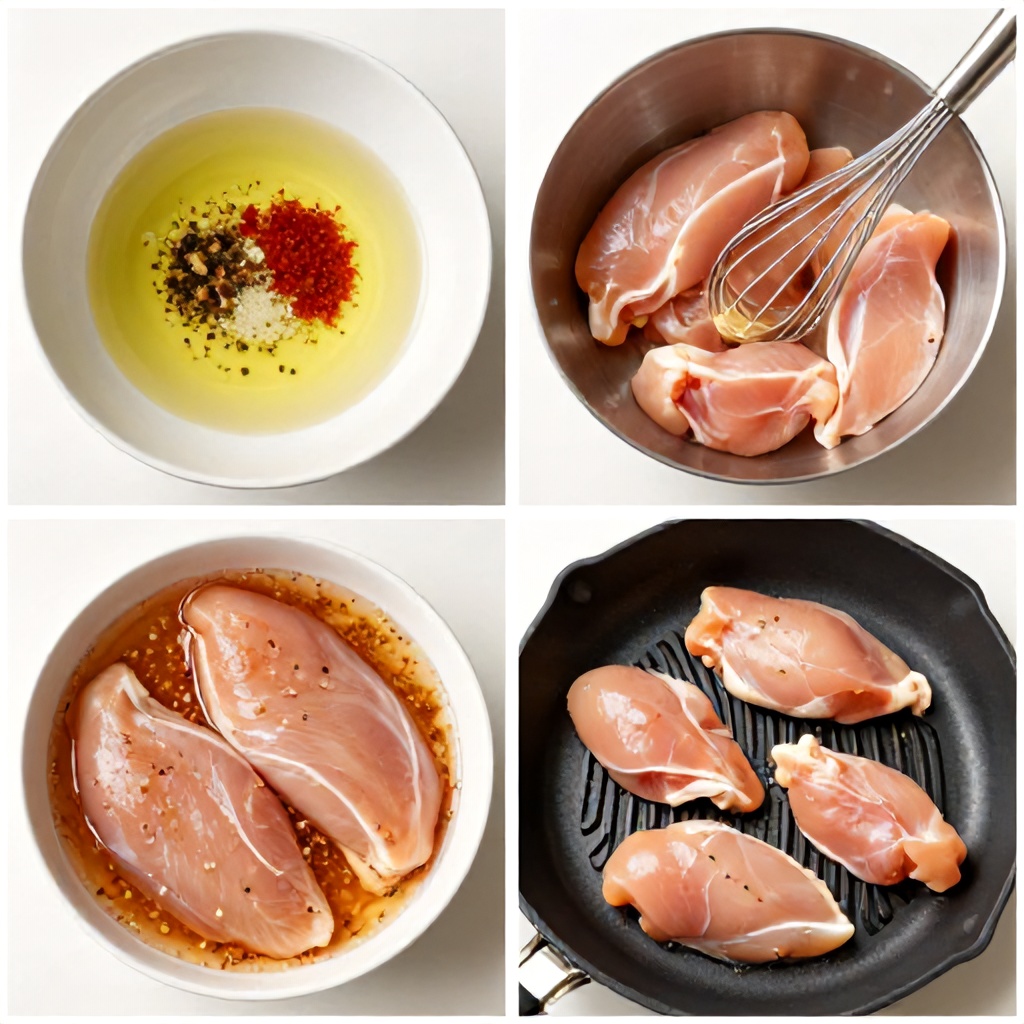
The Science of Meat Marination

Marinating is a fundamental home cooking technique that serves two purposes: flavor infusion and texture modification. When you submerge poultry in a mixture of acidic ingredients like vinegar or lemon juice, the acid begins to break down the proteins on the surface of the meat. This process allows the garlic-infused sauce and spices to penetrate deeper into the fibers of the chicken.

For the best results, aim for a marination time of at least three hours. If you are planning ahead, overnight marination is ideal. However, avoid exceeding 24 hours, as the acid can eventually break down the meat too much, resulting in a mushy texture rather than a tender bite.

Beyond texture, the marinade acts as a protective barrier during the roasting process. The oil in the mixture helps conduct heat evenly, while the sugars and spices create a beautiful, caramelized crust on the skin. This is why using a poultry marinade is essential for achieving that restaurant-quality finish at home.

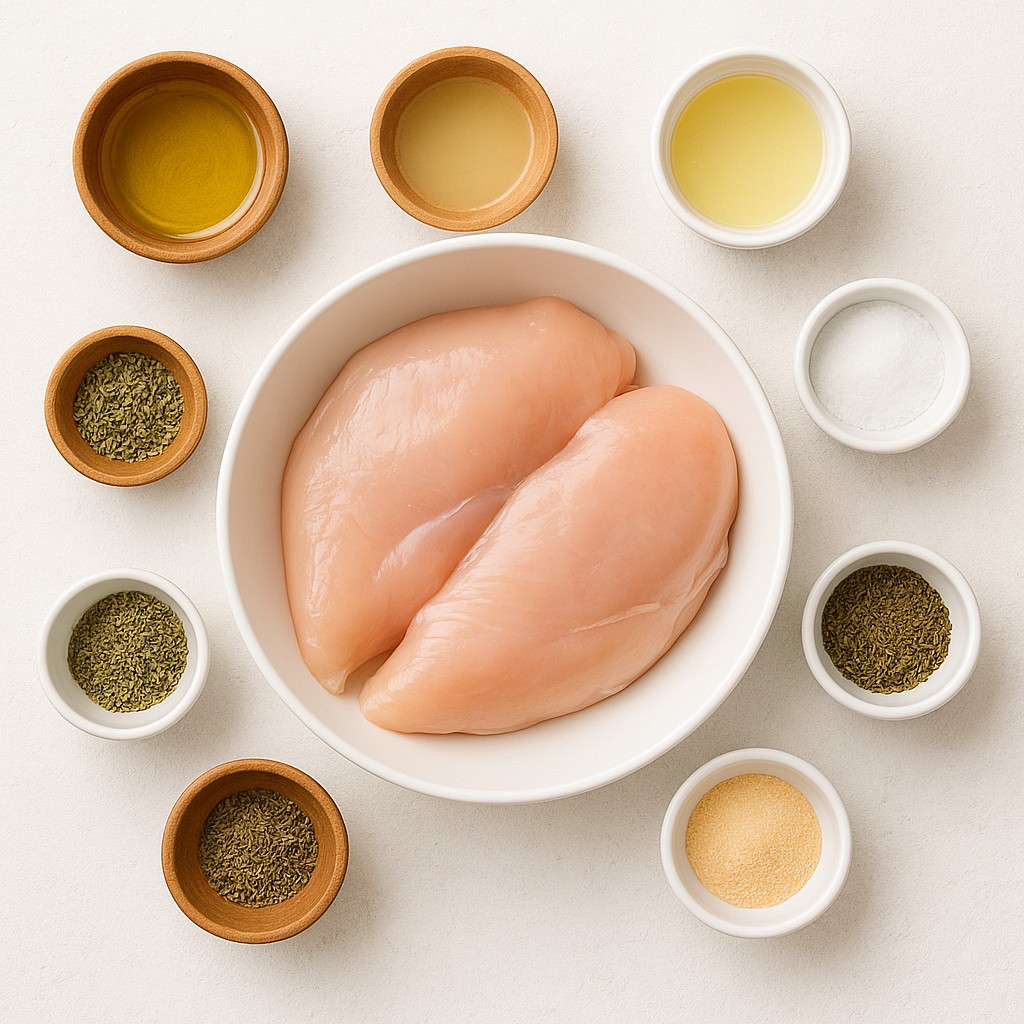
Essential Ingredients for Your Spice Profile

To build an authentic flavor, you need a balance of heat, acid, and earthiness. The following ingredients are staples in professional culinary recipe development for this dish:

  • African bird’s eye peppers or Thai chilies for the primary heat source.
  • Smoked paprika to provide a deep, woody aroma that mimics fire roasting.
  • Fresh garlic cloves, crushed or minced, to create the savory base.
  • Red wine vinegar or lemon juice to provide the necessary tang.
  • Olive oil or neutral vegetable oil to emulsify the sauce and keep the meat moist.
  • Cumin and dried oregano to add layers of warmth and herbal notes.

Tips for Perfect Oven-Roasted Poultry

Achieving the perfect texture requires attention to your cooking methods. While you might be tempted to use chicken breasts, I find that roasted chicken thighs and leg quarters are far superior for this recipe. These cuts have a higher fat content, which prevents them from drying out during the longer roasting time required to develop a crispy skin.

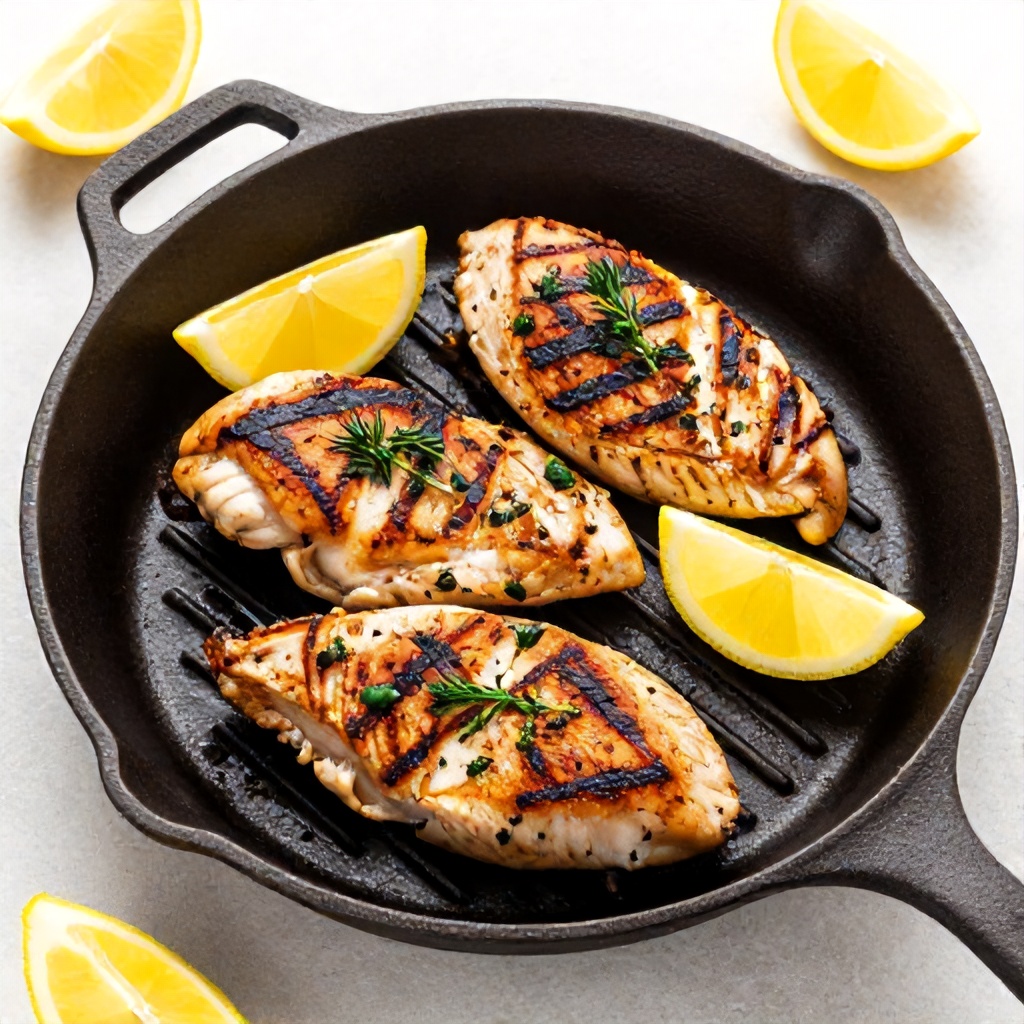
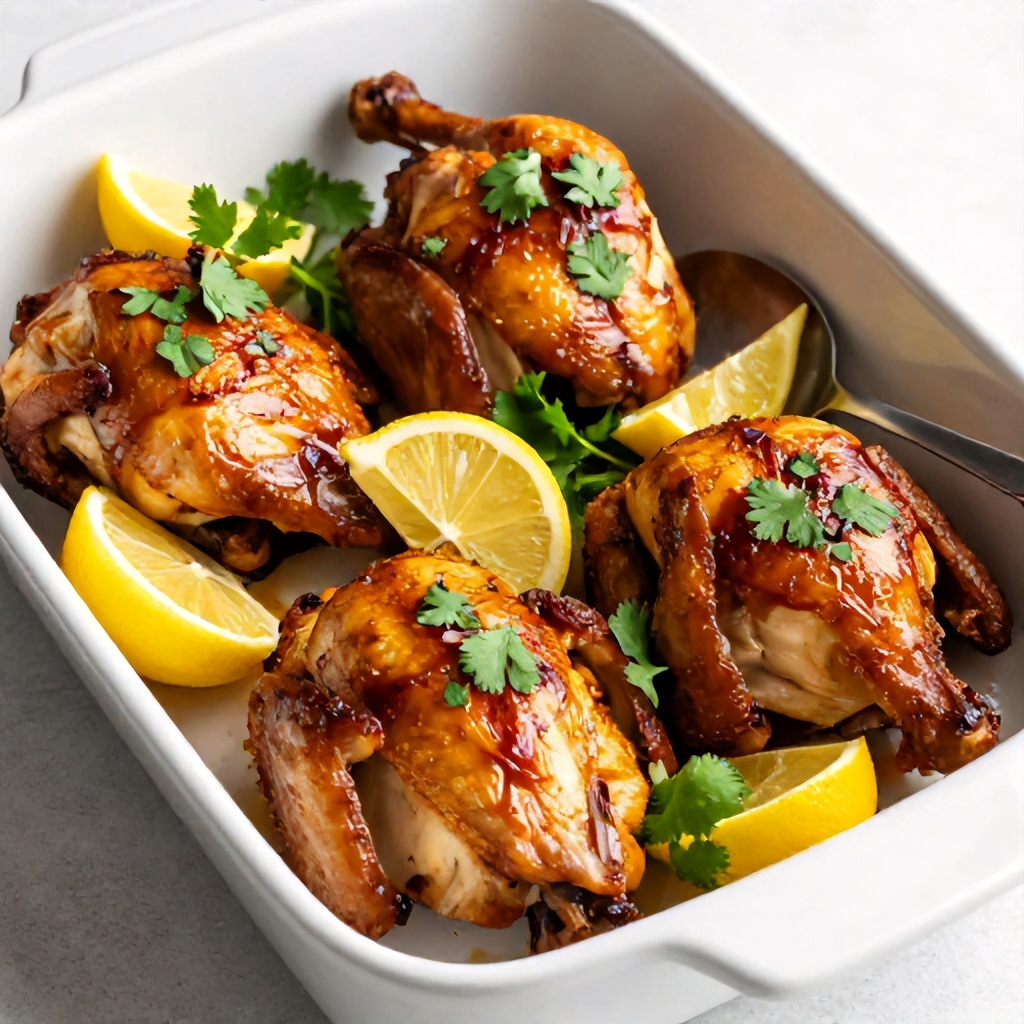
Never crowd your roasting pan. If the pieces of chicken are touching, they will steam rather than roast. Use a large enough baking sheet to ensure air can circulate around each piece, which is the secret to achieving that golden, crispy skin we all love.

If you prefer a charred appearance, you can finish the chicken under the broiler for the final two to three minutes of cooking. Watch it closely, as the sugars in the marinade can burn quickly. This extra step mimics the traditional charcoal-grilled experience of authentic South African cuisine.

Meal Planning and Make-Ahead Strategies

Incorporating this dish into your weekly meal planning is straightforward. You can prepare the marinade up to three days in advance and store it in the refrigerator. When you are ready to cook, simply toss the chicken in the sauce and let it sit while you handle other tasks. This approach makes the actual cooking process feel like a breeze on a busy Tuesday evening.

If you have leftovers, they are incredibly versatile. Shred the cold chicken over a salad, wrap it in a tortilla with fresh vegetables, or serve it alongside roasted root vegetables. The flavor often improves the next day as the spices have more time to meld with the meat.

Ingredient Substitutions and Variations

Home cooking is all about adapting to what you have in your pantry. If you are out of smoked paprika, standard sweet paprika mixed with a dash of liquid smoke can work in a pinch. For those who prefer a milder dish, simply reduce the number of peppers or remove the seeds entirely before blending the marinade.

You can also experiment with the acidity. While red wine vinegar is traditional, apple cider vinegar offers a slightly sweeter tang that pairs beautifully with the heat of the peppers. If you want to add a touch of sweetness to balance the fire, a teaspoon of honey or brown sugar in the marinade works wonders.

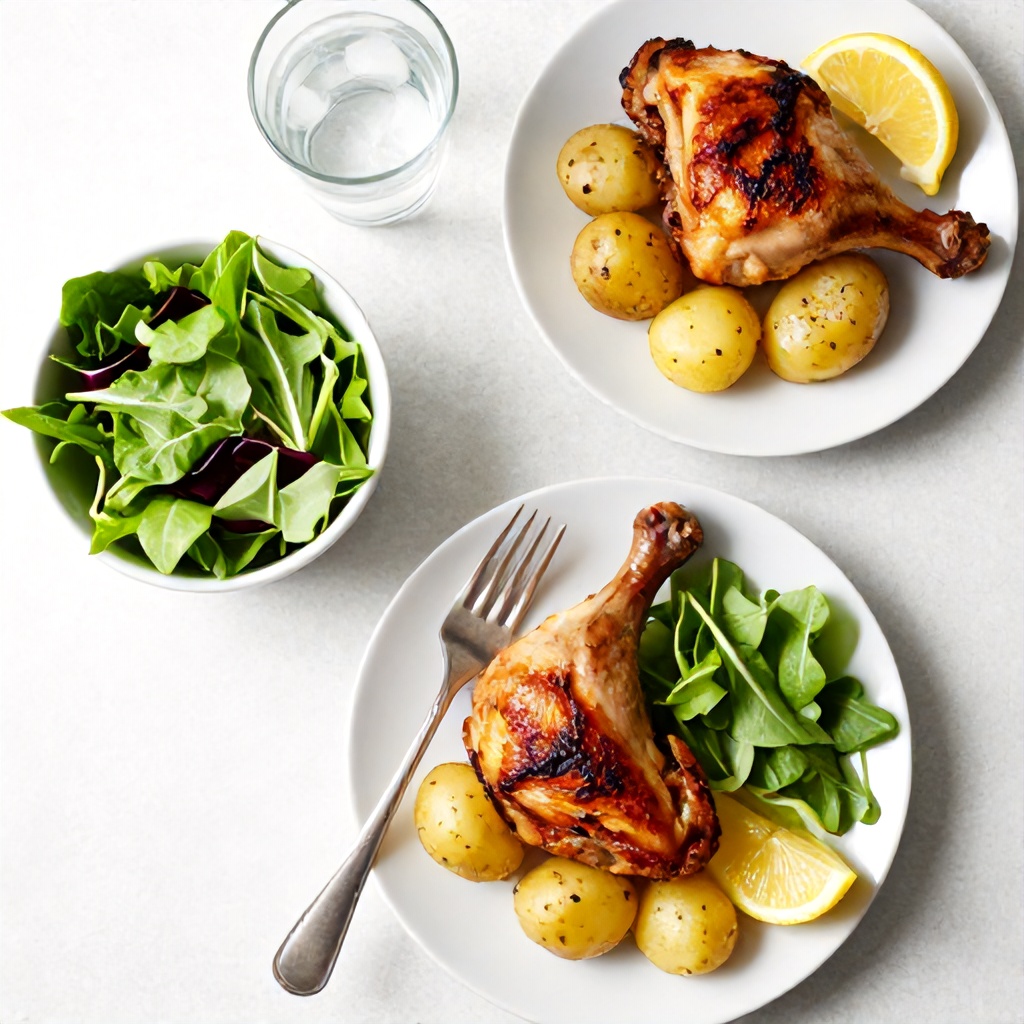
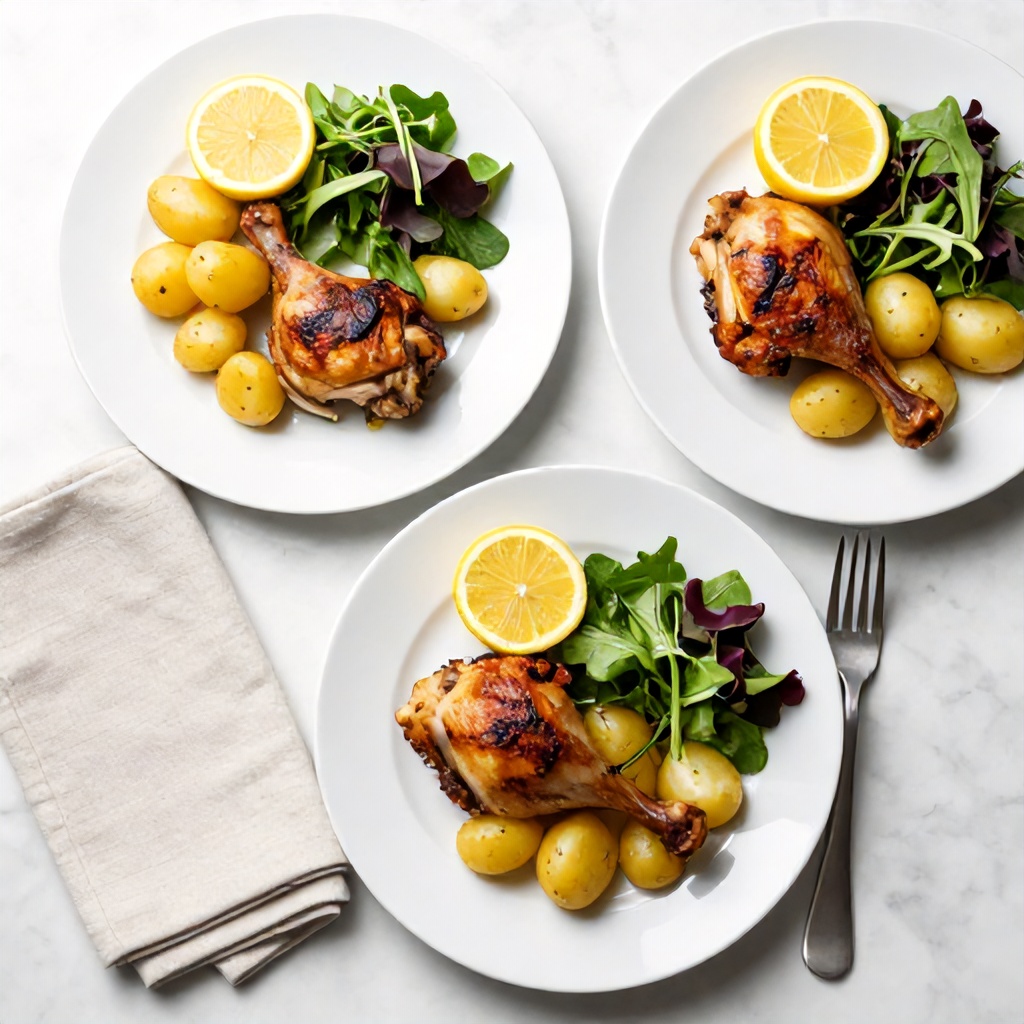
Serving Suggestions for a Complete Meal

Because this chicken is bold and spicy, it pairs best with cooling or neutral side dishes. Consider these options to round out your dinner:

  • Creamy coleslaw to cut through the heat of the peppers.
  • Fluffy jasmine rice or roasted potatoes to soak up the extra sauce from the pan.
  • A crisp cucumber and tomato salad with a light vinaigrette.
  • Warm pita bread or crusty sourdough to scoop up the garlic-infused juices.

Storage and Reheating Instructions

Proper kitchen storage instructions are vital for food safety and quality. Store any leftover chicken in an airtight container in the refrigerator for up to four days. If you need to keep it longer, you can freeze the cooked chicken for up to two months. When freezing, try to keep the meat submerged in a little bit of the pan juices to prevent freezer burn.

When reheating, avoid the microwave if possible, as it tends to make the chicken rubbery. Instead, place the chicken in a baking dish with a splash of water or chicken broth, cover it with foil, and heat it in a 350-degree oven until warmed through. This method keeps the meat tender and prevents the spices from drying out.

Refining Your Technique

Mastering this recipe is a great way to build confidence in the kitchen. By focusing on the balance of your spice profile and respecting the marination time, you are practicing core culinary skills that apply to many other dishes. Do not be afraid to taste your marinade before adding the raw chicken. If it feels too acidic, add a bit more oil. If it lacks depth, add a pinch more salt or smoked paprika.

This dish is a testament to how simple ingredients can create a complex, satisfying meal. It bridges the gap between everyday cooking and international comfort food, proving that you do not need a grill or a professional kitchen to enjoy bold, spicy, and tangy flavors. Whether you are cooking for a family or just prepping for your own lunches, this roasted chicken recipe is a reliable, delicious choice that deserves a permanent spot in your rotation.

Can I use chicken breasts instead of thighs?

Yes, but keep in mind that chicken breasts cook faster and have less fat. Reduce the roasting time by about 10 to 15 minutes and use a meat thermometer to ensure they reach 165 degrees Fahrenheit without drying out.

Is the sauce supposed to be very thick?

The consistency depends on how finely you blend the peppers and garlic. A slightly chunky sauce is perfectly fine and often provides a better texture when roasted. If you prefer a smoother sauce, use a high-speed blender to emulsify the oil and vinegar completely.

What if I cannot find African bird’s eye peppers?

Dried bird’s eye chilies are often available in the spice aisle of well-stocked grocery stores. If those are unavailable, a combination of crushed red pepper flakes and a dash of hot sauce can provide a similar, albeit slightly different, heat profile.

As you continue to refine your version of this recipe, remember that the best meals are those that you adjust to your own preferences. Perhaps you prefer more garlic, or maybe you enjoy a heavier hand with the smoked paprika. Every time you prepare this dish, you are learning more about how flavors interact, making you a more intuitive and capable home cook.

Keep your kitchen organized and your ingredients fresh. When you start with quality poultry and a well-balanced marinade, the oven does most of the heavy lifting. Enjoy the process of creating a meal that brings a little bit of international flair to your table, and take pride in the fact that you have mastered a classic, fiery, and comforting dish.

Mediterranean Quinoa Bowl Recipe with Roasted Chickpeas and Lemon Dressing

This Mediterranean quinoa bowl brings together fluffy quinoa, crispy roasted garbanzo beans, fresh spinach, sharp red onion, salty kalamata olives, and creamy feta cheese, all finished with a bright lemon vinaigrette and cooling tzatziki sauce. It serves as a perfect example of how Mediterranean cuisine relies on wholesome ingredients to create a satisfying, nutrient-dense bowl that keeps you full for hours. Because it holds up well in the fridge, this dish is a staple for anyone looking to simplify their healthy meal prep routine without sacrificing the complex flavor profile that makes plant-based protein so enjoyable.

Why This Bowl Works for Your Weekly Routine

Finding reliable gluten-free vegetarian meals that actually taste like a treat can be a challenge. Most people struggle with the mid-week slump where energy levels dip and the temptation to order takeout becomes overwhelming. This recipe solves that by focusing on balanced nutrition. You get a steady release of energy from the complex carbohydrates in the quinoa, while the roasted chickpeas provide the necessary plant-based protein to keep your muscles happy.

If you are new to cooking quinoa, think of it like pasta. You want to cook it until the little germ separates from the seed, creating a tiny white ring. Always rinse your quinoa under cold water before boiling to remove the natural coating called saponin, which can sometimes taste bitter.

Beyond the macros, this bowl is a masterclass in texture. You have the soft, nutty bite of the grain, the crunch of the roasted garbanzo beans, and the snap of fresh produce like cucumbers and cherry tomatoes. It is vegetable-forward, meaning you are getting a massive dose of dietary fiber in every bite. When you eat this way, your digestion stays on track and your blood sugar remains stable throughout the afternoon.

The Essential Ingredients

Great food starts with quality pantry staples. You do not need a professional kitchen to pull this off. Most of these items are likely already sitting in your cupboards or can be grabbed at any local grocery store.

  • Quinoa: The foundation of your meal. It is a complete protein, meaning it contains all nine essential amino acids.
  • Chickpeas: These are the stars of the show. When roasted, they transform from soft legumes into crunchy, savory nuggets.
  • Fresh Produce: Baby spinach, crisp cucumbers, and sweet cherry tomatoes provide the vitamins and hydration needed for a clean eating lifestyle.
  • Flavor Boosters: Kalamata olives and feta cheese bring the signature Mediterranean tang that makes this dish feel like a restaurant meal.
  • Dressings: A homemade lemon vinaigrette and a dollop of tzatziki sauce tie everything together with a bright, acidic finish.

Mastering the Roasted Chickpea

Many people find roasted chickpeas intimidating, but the process is quite simple. The secret is moisture control. After rinsing your canned beans, pat them completely dry with a clean kitchen towel. If they are wet, they will steam instead of crisping up in the oven. Toss them in a high-quality olive oil and your favorite culinary herbs—think smoked paprika, cumin, or dried oregano. Spread them in a single layer on a baking sheet so they have room to breathe. If they are crowded, they will turn mushy rather than crunchy.

Step-by-Step Preparation

  1. Start by cooking the quinoa. Combine one cup of dry quinoa with two cups of water or vegetable broth. Bring it to a boil, then drop the heat to low and cover. Let it simmer for fifteen minutes. Once the water is absorbed, remove it from the heat and let it sit with the lid on for another five minutes. Fluff it with a fork.
  2. While the quinoa cooks, prepare the chickpeas. Preheat your oven to 400 degrees Fahrenheit. Toss the dried chickpeas with olive oil, salt, and spices. Roast them for twenty to twenty-five minutes, shaking the pan halfway through to ensure even browning.
  3. Chop your vegetables while the oven does the heavy lifting. Dice the cucumbers and red onion into uniform pieces so you get a bit of everything in every forkful.
  4. Whisk the lemon vinaigrette in a small jar. Combine olive oil, fresh lemon juice, a splash of apple cider vinegar, Dijon mustard, and a touch of honey. Shake it vigorously until it emulsifies into a creamy, tangy dressing.
  5. Assemble the bowls by layering a base of spinach, followed by a scoop of quinoa, the roasted chickpeas, and your chopped vegetables. Top with olives and feta, then drizzle generously with the vinaigrette and a large spoonful of tzatziki.

Be careful not to overdress the bowls if you are prepping them for later in the week. Store the dressing in a separate small container and add it right before you eat. This prevents the spinach from wilting and keeps the quinoa from becoming soggy.

Customizing Your Mediterranean Experience

One of the best things about Mediterranean diet recipes is their flexibility. If you do not have spinach, use arugula or massaged kale. If you are not a fan of feta, goat cheese or even a sprinkle of nutritional yeast can provide that savory, salty kick. For those who want more protein, grilled chicken or hard-boiled eggs work beautifully alongside the chickpeas.

This bowl is inherently macro-friendly, making it easy to adjust if you are tracking your intake. You can increase the portion of vegetables to lower the calorie density or add extra chickpeas if you need more protein after a workout. It is a versatile template that adapts to your specific needs without requiring a total overhaul of your grocery list.

Why Meal Prep Matters

Healthy lunch ideas often fail because we wait until we are starving to decide what to eat. By prepping the components of this bowl on a Sunday, you remove the decision fatigue that leads to poor choices. Cook a large batch of quinoa, roast two cans of chickpeas, and chop your veggies. Store them in separate containers in the fridge. When lunch time arrives, you simply assemble your bowl in under two minutes.

This method of food preparation is not just about saving time. It is about creating a sustainable habit. When you have a delicious, nutrient-dense bowl waiting for you, you are far less likely to spend money on processed snacks or fast food. It is a small investment of time on the weekend that pays dividends in how you feel throughout the work week.

Frequently Asked Questions

Can I use frozen vegetables in this bowl?

While fresh produce is preferred for the best crunch, you can certainly use frozen vegetables if that is what you have. Just make sure to thaw and drain them thoroughly before adding them to the bowl to avoid excess water.

How long will these bowls stay fresh in the fridge?

Stored in airtight containers, these components will stay fresh for up to four days. Keep the dressing separate to maintain the best texture for the greens and the roasted chickpeas.

Is this recipe suitable for a vegan diet?

Yes, simply omit the feta cheese or swap it for a plant-based feta alternative. Ensure your tzatziki is made with a dairy-free yogurt base, such as coconut or almond yogurt, to keep it strictly vegan.

The Power of Fresh Herbs

Never underestimate the impact of fresh herbs. While dried spices are great for the roasting process, fresh parsley, dill, or mint added at the end of the assembly process brings a brightness that dried herbs simply cannot match. These culinary herbs are packed with antioxidants and provide a clean, aromatic finish that makes the entire dish feel elevated. If you have a windowsill, growing a small pot of parsley or mint is a fantastic way to ensure you always have these flavor-boosters on hand.

The combination of the lemon vinaigrette and the cooling tzatziki sauce creates a flavor profile that is both zesty and soothing. The acidity of the lemon cuts through the richness of the feta, while the yogurt-based tzatziki provides a creamy mouthfeel that balances the earthiness of the quinoa. It is a sophisticated interplay of tastes that feels far more complex than the time it takes to prepare.

As you continue to explore Mediterranean cuisine, you will find that these bowls are just the beginning. The principles of using whole grains, healthy fats, and plenty of vegetables can be applied to countless other meals. Whether you are looking for a quick dinner or a reliable lunch, this Mediterranean quinoa bowl is a foundational recipe that deserves a permanent spot in your rotation.

Remember that healthy eating is not about perfection. It is about consistency. By choosing meals that are packed with fiber, protein, and fresh ingredients, you are fueling your body in a way that supports your long-term wellness. Enjoy the process of mixing and matching these ingredients, and do not be afraid to experiment with different spices or seasonal vegetables as the year progresses.

Easy Grilled Chicken Breast Recipe for Simple Dinners and Meal Prep

Easy Grilled Chicken Breast for Simple Dinners and Meal Prep

The secret to achieving tender and juicy chicken every single time lies in a combination of proper marination and controlled heat. Whether you are looking for quick dinner solutions or reliable high-protein meal prep, mastering the art of the boneless skinless chicken breast is a fundamental skill for any home cook. This recipe relies on basic pantry staple ingredients to create a flavorful, versatile protein that fits perfectly into gluten-free dinner ideas and dairy-free protein sources alike.

Over the last few weeks, we have made chicken on the grill a few times and it got me thinking about how often people struggle with dry, rubbery meat. I have never shared my go-to recipe for simple grilled chicken breasts until now. While I love experimenting with complex sauces, everyone needs a basic, reliable grilled chicken recipe in their back pocket. With a simple marinade made from items you likely already have in your kitchen and a quick grilling time, this chicken is incredibly flavorful and versatile. Say goodbye to dry and bland poultry, and hello to a lean protein that actually tastes good.

Why You Will Love This Recipe

Consistency is the biggest challenge when working with lean meats. This method ensures you get perfectly tender and moist results without needing fancy equipment. It is a highly versatile recipe that can be served in countless ways. You might pair it with grilled sweet potatoes or roasted broccoli for a balanced plate. It works beautifully in salads, wraps, or tossed into pasta primavera. Because it is so neutral yet savory, it adapts to whatever side dishes you happen to have on hand.

If you are into meal planning, this is a lifesaver. Making a large batch of this grilled chicken allows you to have a ready-to-eat protein source throughout the week. It saves you from the mid-week scramble when you are tired and tempted to order takeout. The process is straightforward, requiring minimal cleanup and very little active time in the kitchen.

Ingredients Needed

  • Boneless skinless chicken breasts: Aim for about 1 to 1 1/4 pounds. Using boneless cuts significantly reduces cooking time and makes for easy slicing once the meat is rested.
  • Lemon juice: This acidic marinade component is essential. It helps with meat tenderization by breaking down tough fibers while adding a bright, tangy flavor profile.
  • Olive oil: A healthy fat that coats the meat, preventing it from sticking to the grates and helping to conduct heat for a beautiful, golden-brown sear.
  • Poultry seasoning blend: Garlic powder, dried thyme, and dried oregano provide a classic, earthy base.
  • Salt and black pepper: The most important pantry staples for enhancing the natural flavor of the meat.

How to Make Easy Grilled Chicken Breast

  1. Make the marinade: Whisk together the lemon juice, olive oil, garlic powder, thyme, oregano, salt, and pepper in a small bowl. Ensure the salt is fully dissolved so it distributes evenly across the chicken.
  2. Marinate the chicken: Place your chicken in a shallow glass dish or a sealable plastic bag. Pour the marinade over the chicken, ensuring that every surface is well coated. Place the chicken in the refrigerator and let it sit for at least one hour. If you have the time, let it marinate for up to 12 hours for even deeper flavor penetration.
  3. Grill: When you are ready to cook, remove the chicken from the marinade, shaking off any excess liquid. Heat up your outdoor grill or a stovetop grill pan. Once the surface is hot, add the chicken. Grill for approximately five minutes on each side, flipping with grill-safe tongs. You will know the chicken is done when the internal temperature reaches 165°F.

The Science of Healthy Grilling Techniques

Understanding why we use an acidic marinade is key to improving your culinary techniques. Acid, such as lemon juice or vinegar, begins to denature the proteins on the surface of the meat. This process makes the chicken more tender and allows the herbs and spices to adhere better. However, do not leave the chicken in the acid for more than 24 hours, or the texture can become mushy rather than firm and juicy.

Healthy cooking methods often get a bad reputation for being flavorless, but grilling is the exception. By using high heat, you create a Maillard reaction—the chemical process that gives browned food its distinctive flavor. This is why a good sear is so important. It locks in moisture and provides a savory crust that makes the chicken taste like it came from a restaurant kitchen.

Meal Planning and Storage Tips

Food preparation is the cornerstone of healthy eating habits. When you grill a large batch of chicken, store it in an airtight container in the refrigerator for up to four days. If you find yourself with extra, you can freeze the cooked chicken for up to three months. To reheat, simply slice it and warm it gently in a pan with a splash of water or broth to keep it from drying out.

For those who struggle with meal planning, try shredding the leftovers. Shredded grilled chicken is perfect for tacos, grain bowls, or a quick chicken salad. By having this lean protein ready, you ensure that your lunches and dinners are always packed with the nutrients your body needs to stay energized.

Grilled Chicken FAQ’s

Can I make this chicken without a grill?

Certainly! If you don’t have an outdoor grill or indoor grill pan, you can still prepare this chicken using your stovetop or oven. While these methods won’t have the smoky flavor of grilling, they’ll still yield a tasty and juicy chicken breast. Stovetop: On the stovetop, heat a skillet (I prefer to use a cast iron pan) and cook the chicken, adjusting the cooking time as necessary. Oven: Preheat your oven to 400°F. Add oil to a cast iron skillet and turn heat on medium/medium-high heat. Add chicken breasts to the skillet and sear for 4-5 minutes on each side. Move the skillet from the stovetop to the oven to finish cooking if the breasts are particularly thick.

How long should I marinate chicken?

The longer you marinate the chicken, the more flavorful it will be. If possible, try to let the chicken marinate for at least 1 hour, but if you have more time, let it marinate for 12 hours. If you’re pressed for time, even 30 minutes of marinating can make a difference in the flavor of your chicken breast.

Pro Tip: Always use a meat thermometer. It is the only way to ensure your chicken is safe to eat without overcooking it. Aim for 165°F at the thickest part of the breast.

Safety Warning: Never reuse the marinade that held raw chicken unless you boil it thoroughly first. It is safer to discard the leftover marinade or make a fresh batch for basting.

Expanding Your Flavor Profiles

Once you master this base recipe, you can start experimenting with different flavor profiles. If you want a Mediterranean vibe, add a teaspoon of dried basil and a pinch of red pepper flakes to the marinade. For a more southwestern flavor, swap the thyme and oregano for cumin and chili powder. The beauty of this recipe is its flexibility. Because the base is so simple, it acts as a blank canvas for whatever spices you have in your pantry.

Consider the quality of your olive oil as well. A high-quality extra virgin olive oil adds a subtle fruitiness that complements the lemon juice perfectly. If you are strictly dairy-free, this recipe is already safe for you, as it relies on oil rather than butter for fat. It is also naturally gluten-free, provided your seasonings are certified gluten-free, making it a safe bet for guests with dietary restrictions.

The Importance of Resting the Meat

Many home cooks make the mistake of slicing into their chicken the second it comes off the grill. This is a mistake. Resting your meat for five to ten minutes allows the juices to redistribute throughout the fibers. If you cut too soon, all that moisture runs out onto the cutting board, leaving you with dry meat. Patience is a virtue in the kitchen, and in this case, it pays off with a much better dining experience.

When you are ready to serve, slice the chicken against the grain. This shortens the muscle fibers, making each bite feel more tender. This technique is especially helpful if you are serving the chicken to children or anyone who might find tougher meat difficult to chew. It is a small detail that makes a massive difference in the final presentation and texture of your meal.

Integrating Chicken into Your Lifestyle

Incorporating this recipe into your weekly routine is about more than just food; it is about building sustainable habits. When you have a reliable, healthy protein source ready, you are less likely to rely on processed snacks or high-sodium convenience foods. This grilled chicken is a cornerstone of a balanced diet, providing the amino acids necessary for muscle repair and satiety.

Think about your upcoming week. If you know you have a busy Tuesday, grill a double batch on Sunday. Use half for dinner that night and save the other half for Tuesday’s lunch. This kind of intentional food preparation reduces mental fatigue and ensures that you are fueling your body with high-quality ingredients. It is a simple shift that creates a ripple effect of positive health outcomes over time.

Troubleshooting Common Issues

If your chicken is sticking to the grill, it usually means one of two things: the grill is not hot enough, or the meat is not ready to be flipped. Never force the chicken off the grates. If it is sticking, give it another minute or two. As the proteins sear, the meat will naturally release from the metal. If you are using a stovetop grill pan, make sure to lightly oil the pan before heating to create a non-stick surface.

If you find that your chicken is browning too quickly on the outside but remains raw in the middle, your heat is too high. Lower the flame to medium. This allows the heat to penetrate the center of the breast without burning the exterior. Remember that chicken breasts vary in thickness. If you have a particularly thick breast, consider pounding it to an even thickness with a meat mallet before marinating. This ensures that the entire piece cooks at the same rate, preventing the thinner edges from drying out while the center catches up.

Final Thoughts on Simple Cooking

Cooking does not have to be an elaborate production to be delicious. By focusing on high-quality ingredients and basic techniques, you can create meals that are both healthy and satisfying. This grilled chicken breast recipe is a testament to the idea that simple is often better. It provides a reliable foundation for your weekly meals, allowing you to spend less time in the kitchen and more time enjoying your food with family and friends.

As you continue to refine your skills, remember that every kitchen is different. Your grill might run hotter than mine, or your stove might have different heat settings. Use this recipe as a guide, but trust your senses. Look for the golden-brown sear, listen for the sizzle, and use your thermometer to confirm the internal temperature. With a little practice, you will be able to grill the perfect chicken breast without even thinking about it.

Exit mobile version