How to Safely Remove Small Yellow Objects Embedded in Skin

When You Find a Tiny Yellow Thing Stuck in Your Skin

You’ve spotted it. A small, yellowish object peeking out from your skin, and the urge to get it out is immediate and strong. This isn’t just about a minor annoyance; it’s about understanding what it might be and how to safely remove it, especially when it’s small and embedded. This is where your trusty pair of tweezers might come into play, but caution is key for effective extraction.

What Could That Little Yellow Blob Be?

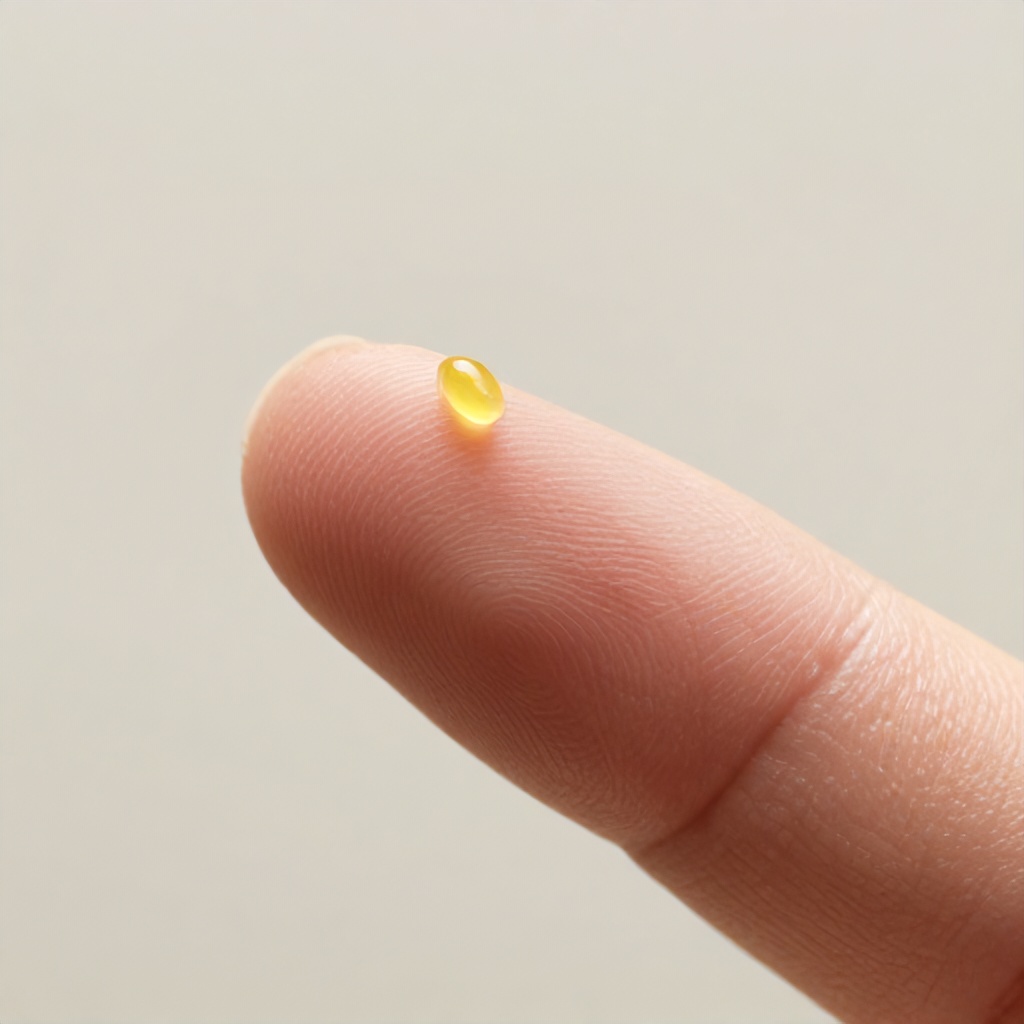
That little yellow intruder could be a few different things. Often, it’s a splinter, but not the usual woody kind. Sometimes, it’s a tiny piece of plastic, glass, or even a bit of dried sap from a plant. Less commonly, it might be a small calcification or a tiny cyst that has surfaced. The color and texture can offer clues. A waxy yellow might suggest something organic, while a more translucent or hard yellow could point to a synthetic material.

Understanding the potential culprit helps determine the best approach for its removal. Is it something that will break apart easily? Is it likely to cause infection if left behind? These are important questions to consider before you even reach for your grasping tool.

Common Culprits and Their Characteristics

Splinters are probably the most frequent offenders. While we often think of wood, splinters can be made of fiberglass, plastic, or even metal fragments. These can cause significant skin irritation if they remain lodged.

Tiny seeds or plant matter can also get embedded, especially if you’ve been gardening or handling plants without gloves. These might appear as small, dark yellow or brown specks.

Occasionally, what looks like a foreign body is actually a small, hardened collection of sebum or keratin, a type of milia or a tiny cyst that has become visible just under the epidermis. These are generally harmless but can be unsightly and sometimes uncomfortable.

If you’ve been working with certain materials, like insulation or even some types of craft supplies, tiny fragments of those could be the source of your yellow object.

When to Reach for the Tweezers

The decision to use tweezers for extraction is a big one. It depends on the size, depth, and nature of the embedded object. If the object is sitting just at the surface of the skin, clearly visible, and looks like it can be easily grasped without digging, tweezers are a good first-line option. Think of a tiny splinter that’s sticking out just enough to snag on fabric.

For anything deeply embedded, or if the object is very fragile and likely to break into smaller pieces, it’s usually best to seek professional help. Attempting to dig out a deep foreign body can cause more damage, introduce infection, and make it harder for a medical professional to remove later.

A magnified view can be incredibly helpful here. Using a magnifying glass or a strong light source can help you assess the situation more accurately. If you can see a clear edge to grasp, and it doesn’t look like it’s deeply rooted in the tissue, then proceeding with tweezers might be appropriate.

Assessing the Situation: A Quick Checklist

Before you start, take a moment to evaluate:

  • How deep is the object? Can you see a clear end to grasp?
  • What is the object made of? Does it look like it will shatter easily?
  • Is the area red, swollen, or showing signs of infection (pus, increased pain)? If so, stop and seek medical advice.
  • How large is the object? Tiny, superficial objects are candidates for home removal.

Preparing for a Delicate Procedure

If you’ve decided tweezers are the way to go, preparation is key to a successful and safe extraction. This isn’t a race; it’s a delicate procedure that requires patience and cleanliness. The goal is to remove the foreign material without causing further injury or infection.

First, wash your hands thoroughly with soap and water. This is non-negotiable. You don’t want to introduce new germs into the tiny wound you’re about to create or manipulate.

Next, clean the area around the foreign body. Use mild soap and water, or an antiseptic wipe. Gently pat the area dry with a clean towel or sterile gauze. Good lighting is essential. Position yourself so you have a clear, well-lit view of the affected skin.

Sterilize your tweezers. This is another critical step. You can do this by wiping the tips with rubbing alcohol or by holding them briefly over a flame (allowing them to cool completely before use, of course). Clean, sharp-pointed tweezers are best for precision removal.

Gathering Your Supplies

Having everything you need at hand will make the process smoother:

  • Clean, pointed tweezers
  • Soap and water
  • Antiseptic wipes or rubbing alcohol
  • Clean cloth or sterile gauze
  • Magnifying glass (optional, but highly recommended)
  • Good lighting
  • Antibiotic ointment
  • Bandage

The Art of Tweezing: Step-by-Step Extraction

Now for the actual extraction. Take a deep breath. This requires a steady hand and a calm approach. Remember, you are aiming for precision removal, not forceful pulling.

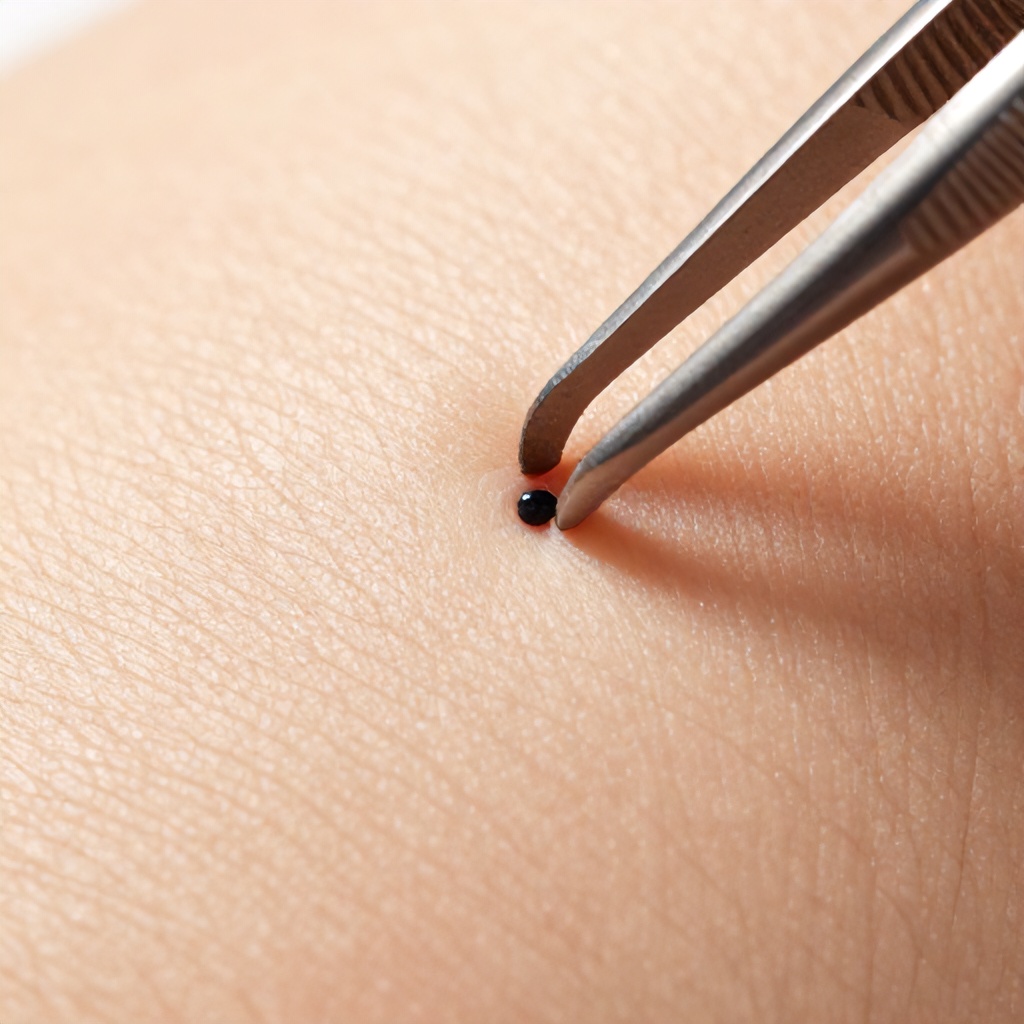
  1. Get a Good Grip: Using your sterilized, pointed tweezers, gently grasp the visible end of the yellowish object. Try to get as close to the skin surface as possible without pinching the skin itself.
  2. Pull Gently and Steadily: Once you have a secure grip, pull the object out slowly and steadily. Follow the angle at which it entered the skin. Avoid yanking or twisting, as this can break the object or cause unnecessary tissue damage.
  3. Assess the Removal: Once the object is out, examine it to ensure you’ve removed the entire piece. If it looks like a fragment is still embedded, do not continue digging. It’s time to seek professional medical help.
  4. Clean the Wound: After successful extraction, gently clean the area again with soap and water or an antiseptic.
  5. Apply Antibiotic Ointment: A thin layer of antibiotic ointment can help prevent infection and promote healing for this minor wound care.
  6. Cover and Protect: Apply a sterile bandage to protect the small wound. Change the bandage daily or if it becomes wet or dirty.

If you feel any significant resistance or pain during the process, stop. Forcing the issue can lead to a skin injury that’s worse than the original problem.

When to Call in the Professionals

There are definite times when home extraction with tweezers is not the best course of action. If the object is deeply embedded, if it’s causing severe pain, or if you suspect it might be something more serious than a simple splinter, it’s time to consult a doctor or visit an urgent care clinic. This is particularly true for anything that looks like it could be a piece of glass or metal, or if the area shows signs of infection.

Signs of infection include increasing redness, swelling, warmth, pus, or fever. If you notice any of these, do not attempt further home treatment. A healthcare professional has the sterile tools and expertise for safe foreign body extraction and can manage any complications.

Dermatologists are specialists in skin conditions and procedures. They are well-equipped to handle difficult foreign body removal, especially if it involves the epidermis or deeper subcutaneous layers. They can also diagnose what the object might be if you’re unsure.

Red Flags for Professional Help

  • The object is very deep or cannot be easily grasped.
  • The area is extremely painful.
  • There are signs of infection (redness, swelling, pus, warmth, fever).
  • You suspect the object is fragile and might break.
  • The object is near the eye or in a sensitive area.
  • You have underlying health conditions like diabetes or a compromised immune system.
  • You are unsure about the nature of the object.

Aftercare for a Minor Skin Injury

Even after a successful extraction, proper wound management is important. Keep the area clean and dry. Watch for any signs of infection as the skin heals. If you notice any unusual redness, swelling, or discharge, contact your doctor.

Most minor embedded objects, once removed, heal without issue. The key is to have approached the situation with cleanliness and care. For larger or deeper foreign material, or if you had to resort to more invasive measures, follow your healthcare provider’s specific aftercare instructions carefully.

Remember, your skin is a remarkable barrier. When it’s breached by a foreign body, your body’s natural response is to try and expel it or wall it off. Helping it along with a gentle, clean extraction can often be the best approach for quick and effective recovery from this type of skin irritation.

Close-up Skin Blemish Removal Using Tweezers: A Clinical View

Close-up Skin Blemish Removal Using Tweezers: A Detailed Clinical View

Using tweezers for close-up skin blemish removal, while seemingly straightforward, requires a nuanced understanding of skin anatomy and potential risks to avoid causing more harm than good.

Understanding the Blemish

Before even thinking about tweezers, it’s essential to identify what kind of blemish you’re dealing with. Not all skin imperfections are created equal, and attempting to remove the wrong type can lead to infection, scarring, or increased inflammation. We’re primarily talking about superficial blockages within the hair follicle or sebaceous gland. These can include closed comedones (whiteheads), open comedones (blackheads), and sometimes even small, superficial pustules. Ingrown hairs, where a hair curls back into the skin, are another common target for extraction.

Blackheads, for instance, are open pores clogged with sebum and dead skin cells. The dark appearance isn’t dirt; it’s the oxidation of the material exposed to air. Whiteheads are closed pores with the same buildup, but the lack of air exposure keeps them white or flesh-colored. Pustules are inflamed lesions, often with a visible pus-filled head, indicating a more active infection. Ingrown hairs are particularly tricky, as the hair itself is trapped beneath the skin’s surface.

Sebaceous filaments are often mistaken for blackheads. These are natural structures within pores that help transport sebum to the skin’s surface. They appear as tiny, grayish or yellowish dots and are normal. Attempting to “remove” them with tweezers can damage the pore lining.

When Tweezers Might Be Considered

In a clinical setting, dermatologists and estheticians might use specialized tools, including fine-tipped tweezers, as part of a professional extraction process. This is usually reserved for specific types of blemishes that are ripe for removal and where manual pressure alone could cause damage. Think of a very stubborn, non-inflamed blackhead that hasn’t responded to other acne treatment or a clearly visible, superficial ingrown hair.

The key here is “ripe.” A blemish that is ready for extraction will often have a visible head, indicating that the blockage is close to the surface. Trying to force extraction on a deep, inflamed pimple or a blemish that isn’t ready is a recipe for disaster. It can push the contents deeper, leading to more significant inflammation, infection, and potentially a permanent mark on the skin. This is why professional guidance is so important in skincare.

The Risks of DIY Tweezing

The temptation to grab tweezers from the bathroom cabinet for a quick zit removal is strong, but the risks are significant. When performed at home without proper sterilization, lighting, and technique, tweezer use can lead to:

  • Infection: Non-sterile tweezers can introduce bacteria into the open pore or skin, leading to pustules, cellulitis, or even abscesses.
  • Scarring: Aggressive squeezing or digging with tweezers can damage the dermis, the deeper layer of skin, resulting in permanent indentations or raised scars.
  • Hyperpigmentation: Inflammation and trauma to the skin can trigger post-inflammatory hyperpigmentation (dark spots) or hypopigmentation (light spots).
  • Increased Inflammation: Rather than removing the blemish, you can push the contents deeper or rupture the follicle wall, making the area more red, swollen, and painful.
  • Broken Capillaries: The delicate skin around the blemish can be easily damaged, leading to visible, broken blood vessels that are difficult to treat.
  • Spreading Bacteria: If you have an active breakout, using unsterilized tweezers can spread bacteria to other areas of your face, causing new blemishes to form.

These are not minor inconveniences; they are potential long-term skin concerns that can be far more difficult and costly to address than the original blemish. This is why dermatological procedures are performed with extreme care and sterile equipment.

Professional Extraction Techniques

In a professional setting, the approach to blemish removal using tools is meticulous. It’s less about “popping” and more about controlled extraction. Here’s a general overview of how it might be approached in a cosmetic treatment or dermatological setting:

Preparation is Key

The skin is thoroughly cleansed to remove all surface debris and makeup. Often, a gentle exfoliant or a warm compress is used to soften the skin and open the pores slightly, making extraction easier and less traumatic. This is a far cry from a quick mirror inspection in a poorly lit bathroom.

Tool Selection and Sterilization

Professionals use specialized extraction tools, which may include comedone extractors (loop or spoon-shaped devices designed to apply gentle pressure around the blemish) or very fine-tipped, medical-grade tweezers. All instruments are rigorously sterilized using autoclaves or medical-grade disinfectants. This step is non-negotiable for preventing infection.

The Extraction Process

The goal is to apply precise, controlled pressure around the blemish to encourage the release of the blockage. For comedones, the tool is positioned to gently press on the surrounding skin, coaxing the plug out. If tweezers are used, it’s typically to grasp a very superficial, exposed hair shaft or a small, protruding element of a comedone. The movement is slow, deliberate, and guided by visual cues and the client’s feedback. If the blemish doesn’t yield easily, it’s left alone.

For ingrown hair removal, the process involves carefully exposing the trapped hair. This might involve a sterile needle to gently lift the skin flap covering the hair, allowing it to be grasped with fine-tipped tweezers and gently pulled out in the direction of hair growth. The aim is to release the hair without causing significant trauma to the follicle or surrounding skin.

Post-Extraction Care

After extraction, the area is typically treated with an antiseptic solution to further minimize the risk of infection. A soothing agent, such as a calming serum or a light, non-comedogenic moisturizer, is applied to reduce redness and promote healing. Clients are often advised on how to care for the skin at home to prevent further breakouts and support recovery.

DIY Tweezing: When to Absolutely Avoid

There are certain types of blemishes and situations where using tweezers at home is a definite no-go:

  • Inflamed Pimples: Any blemish that is red, swollen, and painful, especially if it doesn’t have a clear head, should be left alone. Tweezing these will only worsen the inflammation and increase the risk of scarring.
  • Deep Cysts: These are large, painful lumps beneath the skin’s surface. They require professional dermatological intervention and should never be squeezed or poked at home.
  • Any Sign of Infection: If the area around the blemish is hot, red, and increasingly painful, it might indicate a developing infection. Tweezing will spread it.
  • Moles or Skin Tags: These are growths that should only be removed by a medical professional. Attempting to remove them with tweezers can lead to bleeding, infection, and potentially misdiagnosis of a more serious condition.
  • When You Can’t See Clearly: If you’re struggling to get a good view of the blemish or the surrounding skin, don’t proceed. Poor lighting and magnification are major contributors to DIY damage.

Alternatives to Tweezing for Blemish Removal

Fortunately, there are many effective and safer ways to manage skin imperfections without resorting to risky DIY extraction. A consistent and targeted skincare routine is your best defense.

Key Skincare Ingredients and Practices

For general pore cleansing and managing minor blockages, consider incorporating these into your routine:

  • Salicylic Acid (BHA): This oil-soluble acid can penetrate into pores to dissolve sebum and dead skin cells, making it excellent for blackhead removal and preventing future clogs.
  • Benzoyl Peroxide: Effective at killing acne-causing bacteria and reducing inflammation.
  • Retinoids (Retinol, Adapalene): These vitamin A derivatives speed up cell turnover, preventing dead skin cells from clogging pores and helping to clear existing blemishes.
  • Gentle Exfoliation: Chemical exfoliants (AHAs like glycolic acid, and BHAs like salicylic acid) are generally safer and more effective than harsh physical scrubs for pore cleansing.
  • Clay Masks: These can help absorb excess oil and draw impurities from the pores.
  • Proper Facial Cleansing: Washing your face twice daily with a gentle cleanser removes excess oil, dirt, and makeup that can contribute to blemishes.

These methods, when used consistently, promote healthier skin and can significantly reduce the need for manual extraction. They work on a cellular level to improve skin texture and clarity over time.

Seeking Professional Help

If you frequently struggle with stubborn blemishes, deep cysts, or recurring ingrown hairs, it’s always best to consult a dermatologist or a licensed esthetician. They can accurately diagnose the cause of your skin concerns and recommend appropriate treatments. This might include prescription medications, professional facials, or in-office procedures like chemical peels or microdermabrasion, which offer a form of micro-exfoliation that can improve skin texture and pore appearance.

These professionals have the knowledge, sterile equipment, and specialized tools to perform extractions safely and effectively, minimizing the risk of complications. They can also offer personalized advice for your specific skin type and concerns, ensuring you achieve the best possible results for your beauty treatment and overall skin health.

Ultimately, while the idea of a quick fix with tweezers might be appealing, understanding the potential damage it can cause is crucial. Prioritizing skin health through proper care and seeking professional guidance when needed is the most effective path to clear, healthy skin.

Exit mobile version