Acne Treatment Before and After: Visual Proof of Clear Skin

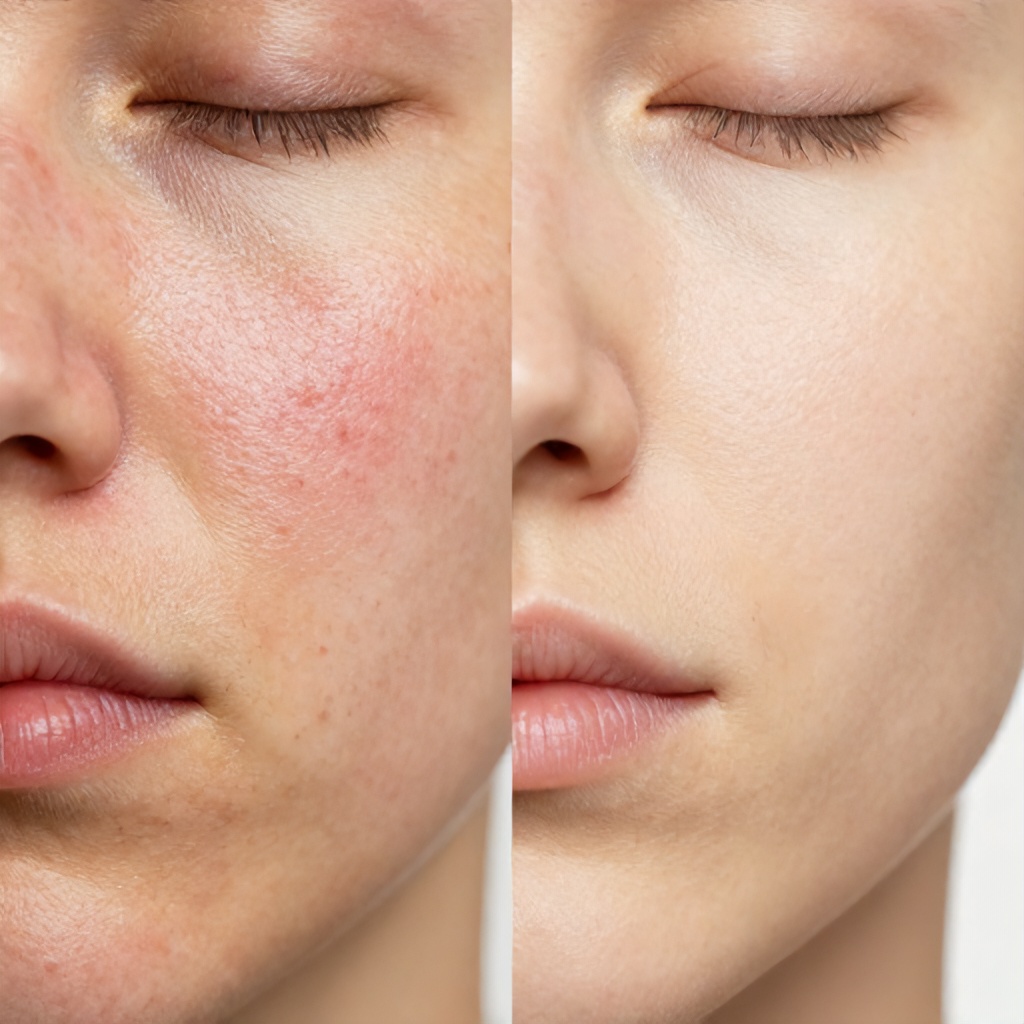
Acne treatment before and after comparisons offer compelling visual proof of how effective a targeted skincare regimen can be, revealing significant skin transformation from congested skin to a clear complexion. These side-by-side comparisons often highlight the journey from inflamed skin riddled with breakouts and blemishes to smooth, healthy skin with improved skin texture.

Understanding Acne: What’s Happening Under Your Skin?

Acne is more than just a few pimples; it’s a common skin condition that affects millions, stemming from a complex interplay of factors beneath the skin’s surface. Understanding these underlying mechanisms is the first step toward finding an effective dermatological solution. When we talk about clear skin, we’re aiming to address these root causes directly.

The Root Causes of Breakouts

Several factors contribute to the development of acne. Primarily, it begins when hair follicles become clogged with oil (sebum) and dead skin cells. Our skin naturally produces sebum to keep it moisturized, but sometimes glands produce too much. This excess oil, combined with dead skin cells, creates a perfect environment for bacteria, particularly Propionibacterium acnes (P. acnes), to multiply rapidly. This bacterial growth then triggers skin inflammation, leading to redness and swelling. Hormonal fluctuations, especially during puberty, menstruation, or pregnancy, can also increase sebum production, intensifying the problem. Genetics play a role too; if your parents had acne, you’re more likely to experience it. Stress doesn’t directly cause acne, but it can worsen existing breakouts by influencing hormone levels.

Types of Acne and What They Look Like

Acne manifests in various forms, each requiring a slightly different approach to treatment. Understanding what you’re dealing with can guide your choice of skincare product.

  • Blackheads and Whiteheads (Comedones): These are non-inflammatory lesions. Blackheads are open clogged pores where the surface melanin oxidizes, making them appear dark. Whiteheads are closed clogged pores, appearing as small, flesh-colored bumps.
  • Papules: Small, red, tender bumps that lack a white head. These indicate mild inflammation.
  • Pustules: Similar to papules but with a visible center of pus. These are often what people refer to as “pimples.”
  • Nodules: Large, solid, painful lumps deep within the skin. They result from severe inflammation and can persist for weeks or months.
  • Cysts: Large, painful, pus-filled lesions deep under the skin. Cysts are the most severe form of acne and can lead to significant scarring.

Each type contributes to congested skin and requires a targeted acne treatment plan to achieve truly blemish-free skin.

The Power of Before and After: Seeing Real Skin Transformation

Few things are as motivating as seeing tangible results, and this is where before and after photos shine. They provide undeniable evidence of progress and inspire hope for those struggling with persistent skin issues.

Why Visual Evidence Matters

Before and after results offer a powerful narrative of skin health improvement. They allow individuals to track the effectiveness of their skincare regimen over time, noting changes that might be subtle day-to-day but dramatic when viewed side-by-side. For many, these images are not just about aesthetics; they represent a journey towards greater confidence and comfort in their own skin. They validate the effort and patience invested in consistent acne treatment. When you’re feeling discouraged by slow progress, looking back at where you started can be an incredible boost. It reminds you that the visible improvement is real, even if it feels gradual.

What to Look For in a Side-by-side Comparison

When evaluating before and after photos, look beyond just the absence of large blemishes. A successful skin transformation involves several key indicators:

  • Reduced Redness and Inflammation: The “before” photo often shows widespread redness, particularly around active breakouts. The “after” should display a significant reduction in overall facial skin redness and irritation.
  • Fewer Active Breakouts: This is the most obvious change. Count the number of active pimples, papules, or pustules. The “after” should show a dramatic decrease.
  • Improved Skin Texture: Congested skin often looks uneven and bumpy. Look for smoother skin in the “after” picture, with a more refined and even surface.
  • Fading of Post-Inflammatory Marks: Acne often leaves behind red or dark spots (post-inflammatory erythema or hyperpigmentation). The “after” should show these marks fading, contributing to a more uniform clear complexion.
  • Reduced Pore Size: While pores can’t truly shrink, effective treatment can make them appear smaller by keeping them clean and unclogged.
  • Overall Radiance: Healthy skin has a natural glow. The “after” photo should reflect a more vibrant and healthy appearance.

These detailed observations help confirm that the acne treatment has truly worked to restore skin health.

Effective Acne Treatment Options and Their Impact

The path to blemish-free skin involves a range of treatment options, from over-the-counter topical solutions to prescription medications and professional procedures. The right choice depends on the severity and type of acne.

Topical Treatments: Your First Line of Defense

For mild to moderate acne, topical treatments are often the first recommendation. These products are applied directly to the facial skin and work to target specific issues like excess oil, bacteria, and clogged pores.

  • Benzoyl Peroxide: This ingredient is a powerful antibacterial agent. It kills acne-causing bacteria and helps to shed dead skin cells from pores. Before and after results often show a reduction in inflammatory lesions (papules and pustules) and overall redness. It’s widely available in various strengths and forms, from washes to creams.
  • Salicylic Acid: A beta-hydroxy acid (BHA), salicylic acid is oil-soluble, meaning it can penetrate deep into pores to dissolve sebum and dead skin cells. It’s excellent for treating blackheads and whiteheads and preventing new clogged pores. Visible improvement includes smoother skin texture and fewer non-inflammatory bumps.
  • Retinoids (Retinol, Tretinoin, Adapalene): These vitamin A derivatives are incredibly effective at normalizing cell turnover, preventing follicles from becoming clogged. They also have anti-inflammatory properties. Topical retinoids are often a cornerstone of an acne treatment regimen, leading to significant skin transformation over several months. You might see a glass dropper bottle for some retinoid serums. The “before” might show widespread congestion, while the “after” reveals a much clearer, more even facial complexion.

Consistent application of these topical treatments is crucial for seeing the desired before and after results.

Oral Medications: When Topicals Aren’t Enough

When topical treatments don’t provide sufficient improvement, or for more severe, widespread acne, dermatologists may prescribe oral medications.

  • Antibiotics: Oral antibiotics work by reducing acne-causing bacteria and decreasing inflammation throughout the body. They are typically used for a limited time to get severe breakouts under control, often alongside topical treatments. Before and after photos often show a dramatic reduction in skin inflammation and painful cystic lesions.
  • Isotretinoin (formerly Accutane): This powerful medication is reserved for severe, persistent cystic acne that hasn’t responded to other treatments. It works by significantly reducing oil gland size and sebum production, preventing clogged pores, and reducing inflammation. The skin transformation from isotretinoin is often profound, leading to long-term blemish-free skin for many individuals. However, it comes with significant side effects and requires close medical supervision.
  • Hormonal Therapies: For women whose acne is linked to hormonal fluctuations, oral contraceptives or anti-androgen medications can be effective. They work by regulating hormones that contribute to excess sebum production. Over several months, these treatments can lead to a clearer complexion and fewer hormonal breakouts.

These systemic treatments target acne from within, often providing a more comprehensive solution for widespread or deeply rooted issues.

In-Office Procedures: Professional Help for Persistent Acne

For stubborn acne or to address acne scars and marks, dermatologists offer various in-office procedures that can dramatically enhance before and after results.

  • Chemical Peels: A chemical solution is applied to the skin to exfoliate the top layers, reducing clogged pores, improving skin texture, and fading post-inflammatory marks. A series of peels can lead to noticeably smoother skin and a more even facial complexion.
  • Laser and Light Therapies: These treatments can target acne-causing bacteria, reduce oil production, and minimize redness and inflammation. Certain lasers also help improve the appearance of acne scars. The visible improvement can be substantial, especially for persistent redness and uneven texture.
  • Acne Extractions: A dermatologist can safely remove blackheads and whiteheads using sterile tools. While not a long-term solution, extractions can quickly clear congested skin and improve the immediate appearance of the skin.
  • Corticosteroid Injections: For large, painful cysts, a diluted corticosteroid can be injected directly into the lesion to reduce inflammation and pain rapidly, preventing potential scarring.

These professional interventions can significantly accelerate the journey to clear skin, especially when combined with a consistent home skincare regimen.

Building Your Skincare Regimen for Clear Skin

Achieving and maintaining blemish-free skin isn’t just about one miracle product; it’s about a consistent, well-thought-out skincare regimen tailored to your skin’s needs.

Essential Steps for Daily Skin Health

A foundational routine is key to supporting any acne treatment.

  1. Gentle Cleansing: Wash your face twice daily with a mild, pH-balanced cleanser. Avoid harsh scrubbing, which can irritate inflamed skin and worsen breakouts.
  2. Targeted Treatment: Apply your prescribed or recommended topical acne treatment. This might be a serum from a glass dropper bottle or a cream. Give it time to absorb.
  3. Moisturize: Even oily or acne-prone skin needs moisture. Choose a non-comedogenic (won’t clog pores) moisturizer to prevent dryness and support the skin barrier.
  4. Sun Protection: Daily use of a broad-spectrum SPF 30+ sunscreen is non-negotiable, especially when using retinoids, which can increase sun sensitivity. Sun protection also helps prevent the darkening of post-inflammatory marks.

This simple yet effective routine lays the groundwork for improved skin texture and a clearer complexion.

Consistency is Key for Blemish-free Skin

Patience and consistency are paramount when it comes to acne treatment. Skin transformation doesn’t happen overnight. Many treatments take weeks, if not months, to show significant before and after results. Sticking to your skincare regimen every single day, even when you don’t see immediate changes, is essential. Skipping applications or constantly switching products can irritate your skin and prevent any single product from working effectively. Think of it as a marathon, not a sprint, towards healthy skin. The cumulative effect of consistent care is what ultimately leads to visible improvement and a truly clear complexion.

Realistic Expectations and Maintaining Your Clear Complexion

While before and after photos can be incredibly inspiring, it’s important to set realistic expectations for your own skin health journey. Everyone’s skin responds differently, and progress isn’t always linear.

The Journey to Smooth Skin Takes Time

Expect to see initial improvements within 4-6 weeks of starting a new acne treatment, but full results can take 3-4 months or even longer, especially for severe cases. There might be periods where your skin seems to get worse before it gets better, often referred to as “purging,” especially with retinoids. This is a sign that the product is working to bring underlying congestion to the surface. It’s a temporary phase on the path to smoother skin. Remember that achieving blemish-free skin is a process, and celebrating small victories along the way can keep you motivated.

Preventing Future Breakouts and Clogged Pores

Once you’ve achieved a clear complexion, the work isn’t over. Maintaining healthy skin requires ongoing effort. Continue with your effective skincare regimen, even if your acne has cleared. Regular cleansing, targeted treatments (perhaps at a reduced frequency), moisturizing, and sun protection are still vital. Pay attention to lifestyle factors: a balanced diet, adequate sleep, and stress management can all contribute to overall skin health. Avoid picking or squeezing blemishes, as this can worsen inflammation, spread bacteria, and lead to scarring. Regular exfoliation, using gentle chemical exfoliants like salicylic acid, can help prevent new clogged pores from forming.

When to Seek Dermatological Solution

If over-the-counter products aren’t yielding the desired before and after results after several weeks, or if you’re experiencing severe, painful, or cystic acne, it’s time to consult a dermatologist. A professional can accurately diagnose your acne type, recommend prescription-strength medications, or suggest in-office procedures. They can also help manage potential side effects and guide you through the process of achieving and maintaining blemish-free skin. A dermatologist offers a personalized dermatological solution, ensuring your treatment plan is safe and effective for your unique facial skin concerns.

Step-by-Step Guide to the Six Essential Stages of a Morning Skincare Routine

A morning skincare routine focuses on shielding your skin from environmental stressors like pollution and UV rays while maintaining moisture levels throughout the day.

Your skin works hard while you sleep to repair itself, but the moment you step out of bed, its role shifts toward protection. The morning is not the time for heavy resurfacing or aggressive treatments. Instead, your daily regimen should emphasize hydration and defense. Think of your morning products as a lightweight suit of armor that keeps your complexion glowing and resilient against the elements. A consistent facial care habit helps prevent premature aging and maintains overall skin health without requiring hours in front of the mirror.

Consistency beats complexity every single time. You do not need a twenty-step process to see results. By following a structured six-stage approach, you ensure that every product has the chance to absorb properly and perform its specific function. This guide breaks down the essential steps to help you build a routine that feels like self-care rather than a chore.

Stage 1: The Gentle Cleanse

Starting with a clean canvas is the foundation of any effective skincare guide. During the night, your skin produces sebum and sheds dead cells onto your pillowcase. You might also have remnants of thick night creams or overnight masks lingering on the surface. A morning cleanse removes these impurities so your daytime products can penetrate effectively. However, the goal here is a light refresh, not a deep scrub.

Choose a sulfate-free cleanser. Harsh detergents can strip the natural oils that keep your skin barrier intact. If you have very dry or sensitive skin, you might even find that a simple splash of lukewarm water is enough. For oily or combination skin types, a gentle foaming or gel cleanser helps manage excess oil without causing tightness. Avoid hot water at all costs. It dilates capillaries and can lead to unnecessary redness or dehydration. Stick to tepid temperatures to keep your complexion calm.

Massage the cleanser into your skin using circular motions for about thirty to sixty seconds. This brief massage stimulates blood flow and ensures you haven’t missed any spots along the hairline or jaw. Rinse thoroughly and pat your face dry with a clean, soft towel. Never rub. Friction is the enemy of a smooth texture.

Stage 2: The Hydrating Toner

Modern toners are a far cry from the alcohol-heavy astringents of the past. Today, they serve as a bridge between cleansing and treatment. A good toner balances the skin’s pH levels and provides an initial layer of hydration. It prepares the skin to act like a sponge. Damp skin absorbs active ingredients much more efficiently than bone-dry skin.

Look for ingredients like rose water, glycerin, or chamomile. These components soothe the skin and provide an immediate plumping effect. If you struggle with dullness, a toner containing mild AHAs or BHAs can offer very gentle exfoliation, though many experts suggest saving stronger acids for the evening. For most people, a simple hydrating mist or a liquid toner applied with the palms of the hands works best. Press the liquid into your skin rather than using a cotton pad to minimize waste and irritation.

This step also helps remove any trace minerals found in tap water that might sit on the skin’s surface. It creates a smooth, receptive base for the more concentrated products that follow. If you are aiming for a minimalist design in your routine, don’t skip this; it makes every subsequent product work harder.

Stage 3: Targeted Serum Application

Serums are the heavy hitters of your daily regimen. These concentrated formulas contain active ingredients designed to address specific concerns like dark spots, fine lines, or dehydration. In the morning, the primary goal of serum application is antioxidant protection. Antioxidants neutralize free radicals caused by sun exposure and pollution, which are the leading causes of visible skin aging.

Vitamin C is the gold standard for morning serums. It brightens the complexion and boosts the effectiveness of your sun protection. Other excellent options include niacinamide for pore management and redness, or hyaluronic acid for an intense moisture boost. If you choose to layer multiple serums, always apply them from thinnest to thickest consistency. Water-based serums go first, followed by oil-based ones.

  • Apply three to four drops to your fingertips.
  • Press the serum into your face and neck.
  • Wait about sixty seconds for the product to fully absorb before moving to the next step.

Patience is a virtue here. If you rush and apply the next layer too quickly, you might experience “pilling,” where the products clump together into small balls on the skin. Give the actives time to settle so they can do their job effectively at a cellular level.

Stage 4: Specialized Eye Care

The skin around your eyes is significantly thinner and more delicate than the rest of your face. It lacks the oil glands found elsewhere, making it prone to dryness and early signs of aging. Using a dedicated eye cream or gel helps address specific issues like puffiness, dark circles, and crow’s feet. While some people use their regular moisturizer for this area, a specialized product is often formulated to be less irritating to the eyes.

For morning use, look for lightweight formulas. Caffeine-infused eye gels are excellent for constricting blood vessels and reducing morning puffiness. If your main concern is brightness, look for eye creams with light-reflecting particles or stable Vitamin C derivatives. These can provide an immediate aesthetic improvement while working on long-term skin health.

Use your ring finger to apply the product. It is the weakest finger, which ensures you won’t pull or tug on the fragile tissue. Gently tap a pea-sized amount along the orbital bone, starting from the inner corner and moving outward. Avoid getting too close to the lash line to prevent irritation or blurred vision. This small step makes a massive difference in how your makeup sits and how awake you look throughout the day.

Stage 5: Moisturizing for Barrier Support

Moisturizing is about more than just feeling soft. It is about sealing in the hydration from your previous steps and reinforcing the skin’s natural moisture barrier. Even if you have oily skin, you need a moisturizer. When skin becomes dehydrated, it often overcompensates by producing even more oil, leading to a cycle of breakouts and shine. The key is finding the right texture for your skin type.

Those with dry skin should look for creams containing ceramides and fatty acids. These ingredients mimic the skin’s natural lipids and help repair any gaps in the barrier. If you have oily or acne-prone skin, a lightweight, oil-free gel moisturizer is the better choice. It provides the necessary water content without clogging pores or feeling greasy. For combination skin, you might even consider using a richer cream on the cheeks and a lighter gel on the T-zone.

Apply your moisturizer while your skin is still slightly damp from your serum. This traps the moisture in the upper layers of the epidermis. Smooth it over your face in upward strokes to encourage lymphatic drainage. Don’t forget your neck and chest. These areas are often the first to show signs of sun damage and aging because they are frequently neglected in daily routines.

Stage 6: Essential Sun Protection

Sun protection is the most important part of any morning routine. Without it, the previous five steps are essentially wasted. UV radiation is responsible for up to 80% of visible skin aging, including wrinkles, leathery texture, and hyperpigmentation. Even on cloudy days or when you are sitting near a window, UVA rays can penetrate the skin and cause long-term damage. This step is a non-negotiable part of dermatological care.

Choose a broad-spectrum sunscreen with at least SPF 30. There are two main types: mineral and chemical. Mineral sunscreens use zinc oxide or titanium dioxide to physically block rays. They are great for sensitive skin but can sometimes leave a white cast. Chemical sunscreens absorb UV rays and convert them into heat. They often have a more transparent finish and work well under makeup. Many modern beauty products now combine both for maximum efficacy and a pleasant texture.

  1. Use the “two-finger rule”: squeeze two strips of sunscreen along your index and middle fingers to get the correct amount for your face and neck.
  2. Apply it as the final step of your skincare, before any makeup.
  3. Allow it to set for at least fifteen minutes before heading outdoors.

Remember that sunscreen needs to be reapplied if you are spending extended time outdoors. For a standard workday, one thorough application in the morning is a great start, but if you are out in the sun, aim for a refresh every two hours. Your future self will thank you for this commitment to skin health.

Customizing for Your Skin Type

While the six stages provide a solid framework, the specific beauty products you choose should reflect your unique needs. No two complexions are identical. Wellness is about listening to your body and adjusting your daily regimen as the seasons or your hormones change. What works in the humid summer months might not be enough during the dry, cold winter.

If you have sensitive skin, prioritize fragrance-free formulas and avoid harsh botanicals that can trigger a reaction. For those focused on anti-aging, look for peptides and antioxidants that support collagen production. If you are dealing with active breakouts, look for anti-inflammatory ingredients like centella asiatica or green tea extract to calm the skin while it heals. Skincare is a marathon, not a sprint. It takes time to see the full benefits of a new product, usually about four to six weeks, which is the time it takes for skin cells to turn over.

Pay attention to how your skin feels by mid-afternoon. If it feels tight, you might need a richer moisturizer. If it looks excessively shiny, you might need to swap your cream for a gel or look for a mattifying sunscreen. Adjusting your routine is a sign of a savvy skincare enthusiast.

Common Mistakes to Avoid

Many people sabotage their efforts by making simple errors in application or timing. One frequent mistake is using too much product. Your skin can only absorb so much at once. Using a mountain of expensive serum won’t make it work faster; it will just waste money and potentially cause irritation. Stick to the recommended pea-sized amounts for most treatments.

Another pitfall is ignoring the expiration dates on products. Active ingredients like Vitamin C and certain sunscreens can degrade over time, especially if they are exposed to light and air. If your serum has changed color or your sunscreen smells off, it is time to toss it. Using expired products can lead to breakouts or, in the case of SPF, leave you completely unprotected from the sun.

Finally, avoid the temptation to constantly switch products. It is exciting to try the latest viral beauty trend, but your skin needs stability to thrive. Introduce one new product at a time and give it several weeks to work before deciding if it is right for you. This “slow and steady” approach allows you to identify exactly which ingredients are helping and which might be causing issues.

The Role of Lifestyle in Skin Health

External products are only one piece of the puzzle. Your complexion is a reflection of your internal health and daily habits. Drinking enough water throughout the day helps maintain skin elasticity from the inside out. While topical hydration is vital, it cannot replace the benefits of staying hydrated at a systemic level. Similarly, a diet rich in fruits, vegetables, and healthy fats provides the vitamins and minerals your skin needs to repair itself.

Sleep is another major factor. While this guide focuses on the morning, the quality of your rest the night before dictates how your skin looks when you wake up. Lack of sleep increases cortisol levels, which can lead to inflammation and breakouts. Try to get seven to nine hours of quality rest to give your body the time it needs for cellular regeneration. When you combine a solid morning skincare routine with healthy lifestyle choices, the results are much more dramatic and long-lasting.

Stress management also plays a part. High stress levels can trigger skin conditions like eczema or acne. Taking a few minutes during your morning routine to breathe deeply and focus on the present can turn your skincare steps into a meditative practice. This mental shift transforms a mundane task into a moment of genuine self-care that sets a positive tone for the rest of your day.

Final Thoughts on Morning Maintenance

A morning skincare routine is an investment in your long-term confidence. By following these six stages—cleansing, toning, serum application, eye care, moisturizing, and sun protection—you provide your skin with everything it needs to stay healthy and vibrant. It doesn’t have to be expensive or overly complicated. Focus on quality ingredients and consistent application.

Your skin is your body’s largest organ. It protects you from the world, so it deserves a few minutes of your time every morning. Whether you are a minimalist or someone who enjoys a full ritual, the goal remains the same: a healthy, protected, and glowing complexion. Start tomorrow morning with a fresh perspective and a gentle touch. The results will speak for themselves as you move through your day with a radiant and resilient face.

Exit mobile version