Muscles Stretched in Forward Fold Pose (Uttanasana) Explained

The Forward Fold Pose, a fundamental yoga and stretching exercise, primarily targets and lengthens the entire posterior chain of the body, from the heels up through the spine, promoting significant flexibility in the hamstrings, glutes, and spinal extensors.

Understanding the Forward Fold Pose

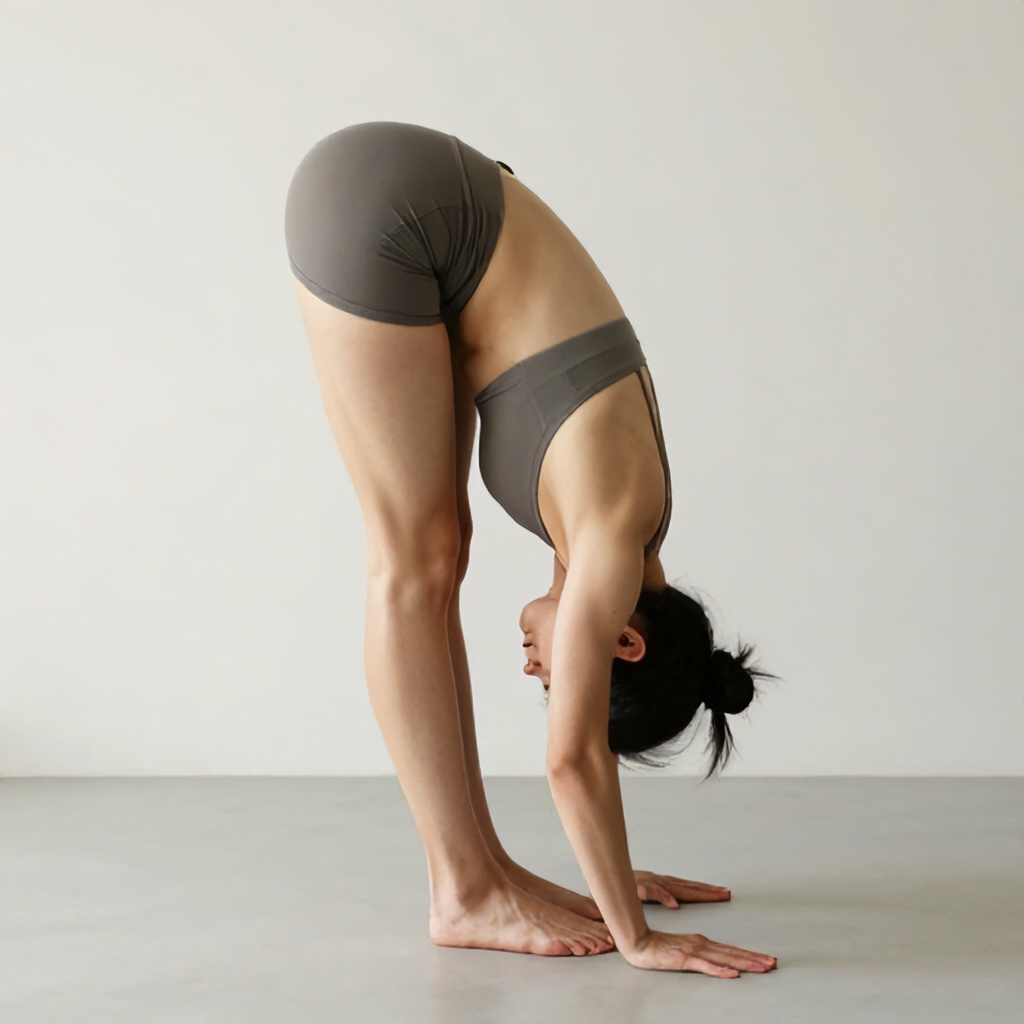
The Forward Fold Pose, often called Uttanasana in yoga, involves bending forward from the hips, bringing your torso towards your legs. It’s a classic posture found in many flexibility training routines because of its profound effects on the back of the body. This pose is more than just touching your toes; it’s a deep stretch that encourages spinal flexion and releases tension throughout the posterior muscle groups.

Practicing this forward-folding pose regularly helps improve overall body alignment and can be a powerful tool for stress reduction. It’s a physical exercise that requires both strength and surrender, allowing gravity to assist in lengthening tight areas. Many people find it to be a calming and grounding posture, making it a staple in a balanced yoga practice.

Key Muscle Groups Stretched in Forward Fold

An anatomical illustration of the human body in a forward fold would highlight several key muscle groups undergoing significant lengthening. Understanding which muscles are at work helps you perform the pose more effectively and safely. This visual guide details the primary and secondary muscles stretched.

The Hamstrings: The Stars of the Show

When you bend into a Forward Fold, your hamstrings are arguably the most intensely stretched muscle group. These powerful muscles run along the back of your thigh, from your sitting bones down to just below your knee. They consist of three distinct muscles: the biceps femoris, semitendinosus, and semimembranosus.

The primary function of the hamstrings includes hip extension and knee flexion. In the Forward Fold Pose, your hips are in deep flexion, and if your knees are straight (or only slightly bent), these muscles are stretched significantly. Tight hamstrings are a common issue, often contributing to lower back discomfort and limiting overall flexibility. A consistent hamstring stretch from poses like the forward fold is essential for maintaining healthy movement patterns and relieving tension.

As you hinge at your hips, the hamstrings are elongated. This lengthening is what creates that sensation of stretch in the back of your thighs. It’s important to feel this stretch evenly across all three hamstring muscles, which can be achieved by keeping your weight balanced in your feet and maintaining a gentle engagement of your quadriceps to protect your knees.

Gluteal Muscles: Supporting the Stretch

The gluteal muscles, commonly known as the glutes, are another significant muscle group engaged and stretched in the Forward Fold Pose. Comprising the gluteus maximus, medius, and minimus, these muscles form the bulk of your buttocks. Their main roles include hip extension, abduction, and external rotation.

In a forward fold, as your hips flex deeply, the gluteus maximus, in particular, undergoes a substantial stretch. This muscle is a powerful hip extensor, so when you move into the opposite action (hip flexion), it lengthens considerably. The glutes work in tandem with the hamstrings, and often, tightness in one group can impact the other. Releasing tension in the glutes can contribute to a deeper and more comfortable forward fold.

While the gluteus maximus is the most prominent, the deeper gluteal muscles also experience some lengthening, especially if there’s any slight internal rotation of the thighs. This deep stretch helps improve hip mobility and can alleviate stiffness in the lower back and hips.

Erector Spinae: The Spinal Extensors

The erector spinae muscles are a group of muscles that run vertically along your spine, from your sacrum all the way up to your skull. This group includes the iliocostalis, longissimus, and spinalis muscles. Their main job is to extend the spine, allowing you to stand upright, and to provide stability for your torso.

In the Forward Fold Pose, as you perform spinal flexion, these muscles are lengthened along the entire length of your back. This is a passive stretch for the erector spinae, meaning they are relaxing and elongating rather than actively contracting. A gentle release in these muscles can significantly reduce tension in the upper and lower back, improving overall posture.

For many individuals, chronic back pain is linked to tightness in these spinal muscles. The Forward Fold offers a therapeutic stretch, helping to decompress the spine and create more space between the vertebrae. It’s a fantastic way to counteract the effects of prolonged sitting or standing, which can shorten and stiffen the back muscles.

Calf Muscles: Gastrocnemius and Soleus

While not the primary focus, the calf muscles also receive a beneficial stretch in the Forward Fold, particularly if your heels remain grounded and your knees are relatively straight. The calves consist of two main muscles: the gastrocnemius (the larger, more superficial muscle) and the soleus (a deeper muscle underneath the gastrocnemius).

Both muscles are responsible for plantarflexion (pointing your toes). The gastrocnemius also assists in knee flexion because it crosses the knee joint. In the Forward Fold, especially if you actively press your heels down and lift your toes slightly, you’ll feel a stretch through the back of your lower legs. This stretching technique helps improve ankle flexibility and can alleviate tightness that might travel up into the hamstrings.

This secondary stretch is important for overall lower body flexibility. Tight calves can restrict ankle movement, which in turn can affect knee and hip mechanics. Including the calves in your overall flexibility exercise routine, even passively through a forward fold, contributes to better movement and reduced risk of injury.

Adductors: Inner Thigh Muscles

The adductor muscles are located on the inner thigh and include the adductor magnus, longus, brevis, pectineus, and gracilis. Their main function is to bring the legs towards the midline of the body (adduction). They also play a role in hip flexion and extension, depending on the specific muscle.

In a Forward Fold, especially if your feet are hip-width apart or slightly wider, the adductors receive a stretch as your hips flex and your legs might subtly abduct (move away from the midline) to accommodate the fold. This stretch is often more pronounced if you have particularly tight inner thighs. Releasing tension in the adductors can improve hip mobility and contribute to a more open and balanced lower body.

The adductors are often overlooked but are crucial for hip health and stability. A gentle stretch in these muscles can prevent imbalances that might affect walking, running, and other daily movements. The Forward Fold, while primarily a posterior chain stretch, still offers a valuable release for these inner thigh muscles.

Achieving Proper Body Alignment for a Safe Stretch

To truly benefit from the Forward Fold Pose and ensure a safe, effective deep stretch, proper body alignment is paramount. It’s not about how far down you can go, but how mindfully you move into the pose.

  • Hinge from the Hips: The movement should initiate from your hip joints, not your lower back. Imagine your pelvis tilting forward, leading with your chest. This ensures the stretch primarily targets your hamstrings and glutes, rather than putting strain on your lumbar spine.

  • Micro-Bend Your Knees: Always maintain a slight bend in your knees, especially if your hamstrings are tight. This protects your knee joints from hyperextension and allows for a more accessible and deeper stretch in the hamstrings without overstretching the connective tissue around the knees. As your flexibility improves, you might straighten your legs more, but never lock your knees.

  • Lengthen Your Spine: Initially, focus on lengthening your spine as you fold, keeping your back relatively flat. Only when your torso is parallel to the floor or you feel a significant stretch in your hamstrings should you allow your upper back to round gently. This two-part movement ensures you get the most out of the spinal flexion without compressing your vertebrae.

  • Engage Your Core: Lightly drawing your navel towards your spine helps support your lower back and deepens the stretch. Core engagement provides stability and prevents excessive rounding in the lumbar region, which can be detrimental over time.

  • Relax Your Neck and Shoulders: Once you are in the deepest part of your fold, allow your head to hang heavy, releasing any tension in your neck. Your shoulders should be relaxed, away from your ears. This helps to further release tension throughout the upper back and neck, contributing to the overall calming effect of the pose.

Benefits of Regular Forward Folding

Consistent practice of the Forward Fold Pose offers a wealth of physical and mental benefits, extending far beyond simple muscle lengthening. This flexibility exercise is a holistic tool for well-being.

  • Increased Flexibility: The most obvious benefit is improved flexibility in the hamstrings, glutes, and back muscles. This enhanced range of motion can make everyday movements easier and reduce the risk of injury.

  • Improved Posture: By lengthening the posterior chain, the Forward Fold helps counteract the effects of prolonged sitting, which often leads to tight hamstrings and a rounded upper back. Releasing these muscles can help you stand taller and with better alignment.

  • Stress Reduction and Calming Effect: Inversions, even partial ones like a forward fold where the head is below the heart, can stimulate the parasympathetic nervous system, promoting relaxation. The act of folding inward can be very grounding and meditative.

  • Relief from Back Pain: For many, tightness in the hamstrings and glutes contributes to lower back pain. Stretching these muscles can alleviate pressure on the lumbar spine, offering significant relief. The spinal flexion also helps decompress the vertebrae.

  • Enhanced Body Awareness: Paying attention to the sensations in your body as you stretch helps cultivate greater proprioception, your body’s sense of its position in space. This heightened awareness is valuable both on and off the yoga mat.

  • Improved Digestion: The gentle compression of the abdominal organs in a forward fold can stimulate digestion and relieve constipation. This internal massage is a subtle but beneficial aspect of the pose.

Tips for a Deeper, Safer Forward Fold

To deepen your Forward Fold safely and effectively, consider these practical tips. Remember, progress is gradual, and listening to your body is always the best approach.

  1. Warm Up First: Never go into a deep forward fold with cold muscles. A few minutes of gentle movement, like sun salutations, cat-cow stretches, or walking, will prepare your body for the stretch.

  2. Use Props: Yoga blocks can be your best friend. If your hands don’t comfortably reach the floor, place them on blocks. This allows you to maintain a long spine and focus on the hamstring stretch without straining your back. A strap can also be used around your feet to gently pull yourself deeper into the pose, again, keeping the spine long.

  3. Breathe Deeply: Use your breath as a guide. Inhale to lengthen your spine, and as you exhale, allow yourself to fold a little deeper, releasing tension. Never hold your breath in this pose; shallow breathing can create tension rather than release it.

  4. Hold for Time: For a significant flexibility gain, hold the Forward Fold for 30 seconds to a minute or even longer, if comfortable. Static stretching, where you hold a stretch for an extended period, is effective for increasing muscle length.

  5. Focus on Sensation, Not Depth: Instead of striving to touch your toes, focus on the sensation of the stretch in your hamstrings and along your spine. If you feel a sharp pain, ease out of the pose immediately. A healthy stretch should feel intense but never painful.

  6. Engage Antagonist Muscles: Actively engaging your quadriceps (the muscles on the front of your thighs) can help your hamstrings relax and lengthen more effectively. This reciprocal inhibition is a powerful stretching technique.

Common Mistakes to Avoid in Forward Fold

While the Forward Fold is a beneficial yoga pose, certain common mistakes can hinder your progress or even lead to discomfort. Being aware of these pitfalls helps ensure a safer and more effective stretching experience.

  • Rounding the Lower Back Excessively: This is perhaps the most common mistake. Folding from the lower back instead of hinging at the hips puts undue pressure on the lumbar spine and can lead to injury. Always prioritize a long spine over reaching the floor.

  • Locking the Knees: Hyperextending your knees can strain the ligaments and tendons around the knee joint. Always maintain a soft micro-bend in your knees to protect them and allow for a deeper, safer hamstring stretch.

  • Forcing the Stretch: Pushing too hard, too fast, can lead to muscle strains or tears. Flexibility is built gradually. Listen to your body’s signals and respect its current limits. The goal is release, not aggression.

  • Holding Your Breath: Tension often manifests as held breath. Holding your breath increases tension in the body, making it harder for muscles to relax and lengthen. Continuous, deep breathing is essential for releasing into the pose.

  • Ignoring Discomfort: While a stretch should feel intense, it should never be sharp or painful. Any sharp pain indicates you’ve gone too far or are stretching incorrectly. Back off immediately if you feel this.

  • Not Warming Up: Attempting a deep forward fold with cold muscles significantly increases the risk of injury. Always precede your deep stretches with a proper warm-up to prepare your muscles and connective tissues.

The Forward Fold Pose is a powerful and accessible flexibility exercise that offers profound benefits for your entire body. By understanding the anatomical diagram of muscles stretched and applying proper stretching technique, you can cultivate greater physical ease, improve your posture, and enhance your overall well-being. Incorporating this deep stretch into your regular yoga practice or daily routine, perhaps on a comfortable yoga mat while wearing activewear, will yield lasting positive results for your human anatomy.

12 Yoga Poses for Effective Back Pain Relief

Yoga provides a gentle yet powerful pathway to back pain relief, offering a holistic approach that targets not just the symptoms but also the underlying causes of discomfort. Regular practice can significantly improve flexibility, strengthen the muscles that support your spine, and encourage better posture, leading to lasting comfort.

Why Yoga Offers Real Back Pain Relief

Back pain, whether it’s a dull ache or a sharp, persistent discomfort, often stems from a combination of factors: muscle imbalances, poor posture, lack of flexibility, and even stress. Yoga addresses these issues directly, providing effective pain management without relying solely on medication.

One of the primary benefits of incorporating yoga into your routine is enhanced flexibility. Tight hamstrings, hip flexors, and glutes can pull on the pelvis, contributing to lower back pain. Gentle stretching exercises found in yoga lengthen these muscles, easing tension and allowing for a more natural spinal alignment. This increased range of motion helps your body move more freely and with less strain on the vertebral column.

Beyond stretching, yoga builds essential muscle strength. Many poses engage the core muscles – your abdominal and back muscles – which are absolutely vital for providing stable lumbar support. A strong core acts like a natural corset, protecting your spine and preventing excessive strain. This muscle strengthening is key for long-term posture correction and preventing future episodes of chronic pain.

Yoga also fosters mindful movement and stress reduction. The practice encourages you to tune into your body, noticing areas of tension and learning to release them. Stress often manifests as physical tightness in the shoulders, neck, and back, exacerbating existing pain. By integrating breathwork and focused awareness, yoga helps calm the nervous system, reducing muscle tension and offering a powerful pain relief technique.

Important Considerations Before You Begin

While yoga is widely beneficial for back pain, it’s essential to approach your practice with awareness and caution. Always listen to your body; pain is a signal to ease off, not push through. Some movements might feel uncomfortable initially, but they should never cause sharp or increasing pain.

If you have severe or acute back pain, or a diagnosed spinal condition like a herniated disc, consult with a doctor or physical therapist before starting any new exercise regimen. They can advise on appropriate movements and help you understand any limitations. Many find therapeutic yoga or gentle yoga practices to be excellent complements to traditional physical therapy.

Consistency is more important than intensity. Even short, regular sessions of mindful movement can yield significant benefits for your musculoskeletal system and contribute to overall wellness practices. Focus on proper form rather than how deeply you can get into a pose. Using props like blankets, blocks, or straps can help you achieve poses safely and comfortably, allowing for deeper relaxation and stretch.

12 Yoga Poses for Effective Back Pain Relief

These yoga poses are chosen for their ability to gently stretch, strengthen, and release tension in the back, hips, and core. Practice them slowly, breathing deeply, and holding each pose for several breaths.

1. Cat-Cow Pose (Marjaryasana-Bitilasana)

This dynamic duo gently warms up the spine, improving flexibility and promoting spinal alignment. It’s excellent for both lower back pain and upper back stiffness, encouraging the vertebral column to move fluidly.

  1. Start on your hands and knees, with wrists directly under shoulders and knees under hips. Your spine should be neutral.
  2. As you inhale, drop your belly towards the mat, lift your chest and tailbone towards the ceiling, gently arching your back (Cow Pose).
  3. As you exhale, round your spine towards the ceiling, tuck your chin to your chest, and draw your navel towards your spine (Cat Pose).
  4. Flow between these two poses for 5-10 breaths, coordinating your movement with your breath.

Tips: Keep your neck long and avoid collapsing into your shoulders. Focus on articulating each vertebra.

2. Child’s Pose (Balasana)

Child’s Pose is a restorative yoga staple, offering a gentle stretch for the lower back and hips while calming the mind. It’s a wonderful pose for stress reduction and finding a moment of peace.

  1. Kneel on your mat with your big toes touching and knees wide apart, or together if that feels better for your lower back.
  2. Sit your hips back towards your heels.
  3. Fold forward, resting your torso between or on top of your thighs.
  4. Extend your arms forward with palms down, or rest them alongside your body with palms up.
  5. Rest your forehead on the mat.

Tips: If your forehead doesn’t comfortably reach the mat, place a block or folded blanket underneath it. If your hips don’t reach your heels, place a blanket between them.

3. Thread the Needle Pose (Urdhva Mukha Pasasana variation)

This pose targets the upper back and shoulders, releasing tension that often contributes to neck and upper back pain. It’s a fantastic gentle stretch for the thoracic spine.

  1. Start on your hands and knees, similar to Cat-Cow.
  2. Inhale and lift your right arm towards the ceiling, opening your chest to the right.
  3. Exhale and “thread” your right arm under your left armpit, palm facing up.
  4. Lower your right shoulder and the right side of your head to the mat.
  5. You can keep your left hand on the mat, extend it forward, or wrap it around your back for a deeper shoulder stretch.
  6. Hold for 5-8 breaths, then slowly unravel and repeat on the other side.

Tips: Keep your hips relatively stacked over your knees. Avoid putting too much weight on your head.

4. Sphinx Pose (Salamba Bhujangasana)

Sphinx Pose is a mild backbend that gently strengthens the back muscles and stretches the abdominal area. It’s a safer alternative to deeper backbends for those with lower back pain, offering gentle lumbar support.

  1. Lie on your stomach with your legs extended straight back, tops of your feet on the mat.
  2. Bring your forearms to the mat, elbows directly under your shoulders, palms flat.
  3. Gently press into your forearms and lift your chest, keeping your neck long and gaze forward.
  4. Keep your hips and lower body relaxed on the mat.
  5. Hold for 5-10 breaths, feeling a gentle compression in your lower back.

Tips: Avoid shrugging your shoulders towards your ears. Keep a gentle engagement in your core to protect your lower back.

5. Cobra Pose (Bhujangasana)

Cobra Pose is a slightly deeper backbend than Sphinx, further strengthening the back muscles and increasing spinal flexibility. It’s excellent for posture correction and can help counteract the effects of prolonged sitting.

  1. Lie on your stomach with your legs extended, tops of your feet on the mat.
  2. Place your hands flat on the mat under your shoulders, fingers pointing forward.
  3. Press your pubic bone and the tops of your feet into the mat.
  4. Inhale and slowly lift your head and chest off the mat, using your back muscles more than your hands.
  5. Keep your elbows close to your body. You don’t need to straighten your arms fully; keep a slight bend.
  6. Hold for a few breaths, then exhale to lower back down.

Tips: Imagine lengthening your spine as you lift. Keep your gaze soft and slightly forward to avoid crunching your neck.

6. Downward-Facing Dog (Adho Mukha Svanasana)

Downward Dog is a foundational yoga pose that lengthens the entire spine, stretches the hamstrings and calves, and strengthens the arms and shoulders. It helps decompress the vertebral column and improves overall body mechanics.

  1. Start on your hands and knees.
  2. Tuck your toes under and lift your hips up and back, forming an inverted V shape with your body.
  3. Press firmly through your hands, spreading your fingers wide.
  4. Straighten your arms and legs as much as possible, sending your heels towards the mat (they don’t need to touch).
  5. Let your head hang loosely between your arms, gazing towards your navel or thighs.

Tips: If your hamstrings are tight, keep a generous bend in your knees to prioritize lengthening your spine. Focus on externally rotating your upper arms.

7. Supine Spinal Twist (Supta Matsyendrasana)

Gentle twists are fantastic for releasing tension in the lower back and promoting spinal alignment. This restorative pose also aids in stress reduction and can improve digestion.

  1. Lie on your back with your knees bent and feet flat on the floor.
  2. Extend your arms out to a T-shape, palms facing up or down.
  3. Lift your hips slightly and shift them a few inches to the right.
  4. Let both knees fall over to the left side, keeping them stacked or allowing the top knee to rest slightly forward.
  5. If comfortable, turn your head to the right, looking over your right shoulder.
  6. Hold for several breaths, then return to center and repeat on the other side.

Tips: If your shoulders lift too much, place a blanket under them. A block or cushion between your knees can provide extra support.

8. Knees-to-Chest Pose (Apanasana)

This simple, soothing pose offers immediate relief for the lower back by gently stretching the lumbar spine and massaging the abdominal organs. It’s a great pain relief technique for acute lower back pain.

  1. Lie on your back with your legs extended.
  2. On an exhale, draw both knees towards your chest.
  3. Wrap your arms around your shins or the backs of your thighs.
  4. Gently hug your knees in, keeping your tailbone pressing down towards the mat.
  5. You can stay still or gently rock from side to side to massage your lower back.

Tips: If it’s uncomfortable to hug both knees, hug one knee at a time. Keep your shoulders relaxed and away from your ears.

9. Bridge Pose (Setu Bandhasana)

Bridge Pose strengthens the glutes, hamstrings, and back muscles, providing excellent lumbar support. It also opens the chest and shoulders, counteracting slouching and improving overall posture correction.

  1. Lie on your back with your knees bent and feet flat on the floor, hip-width apart, heels close to your glutes.
  2. Press into your feet and lift your hips off the mat, engaging your glutes and hamstrings.
  3. You can keep your arms alongside your body, palms down, or interlace your fingers underneath your back and press your arms into the mat for a deeper shoulder opening.
  4. Keep your thighs parallel and avoid letting your knees splay out.
  5. Hold for 5-8 breaths, then slowly lower your hips back down.

Tips: Imagine a block between your knees to keep them from splaying. For a restorative version, place a block under your sacrum (lower back) and relax.

10. Figure Four Stretch (Supine Pigeon Prep)

Tight hips are a common contributor to lower back pain, as they can pull on the pelvis and spine. This pose deeply stretches the outer hips and glutes, offering indirect but significant back pain relief.

  1. Lie on your back with your knees bent and feet flat on the floor.
  2. Cross your right ankle over your left thigh, just above the knee.
  3. Flex your right foot to protect your knee.
  4. Gently lift your left foot off the floor and interlace your fingers behind your left thigh.
  5. Draw your left knee towards your chest, feeling the stretch in your right outer hip.
  6. Hold for 5-8 breaths, then release and repeat on the other side.

Tips: Keep your head and shoulders relaxed on the mat. If the stretch is too intense, keep your left foot on the floor and gently press your right knee away from you.

11. Reclined Hand-to-Big-Toe Pose (Supta Padangusthasana)

Tight hamstrings can pull on the pelvis, flattening the natural curve of the lower back and contributing to discomfort. This pose offers a deep, controlled hamstring stretch without straining the back.

  1. Lie on your back with both legs extended.
  2. Bend your right knee and draw it towards your chest.
  3. Loop a strap or towel around the ball of your right foot, holding both ends with your hands.
  4. Slowly extend your right leg towards the ceiling, keeping a micro-bend in the knee if needed.
  5. Keep your left leg grounded and straight, pressing your left heel away from you.
  6. Gently pull on the strap to deepen the hamstring stretch, keeping your tailbone rooted.
  7. Hold for 5-8 breaths, then release and repeat on the other side.

Tips: Prioritize keeping your lower back flat on the mat over straightening your leg completely. Relax your shoulders.

12. Corpse Pose (Savasana)

Often underestimated, Savasana is a crucial restorative yoga pose for pain management and overall wellness. It allows your body to integrate the benefits of the practice, calms the nervous system, and promotes deep stress reduction, which is vital for back pain relief.

  1. Lie on your back with your legs extended, feet falling open naturally.
  2. Let your arms rest alongside your body, palms facing up, slightly away from your torso.
  3. Close your eyes and allow your body to feel heavy and relaxed on the mat.
  4. Release any tension in your face, jaw, and shoulders.
  5. Breathe naturally and deeply, allowing yourself to completely surrender.
  6. Stay in Savasana for 5-10 minutes.

Tips: If your lower back feels strained, place a rolled blanket or bolster under your knees. Cover yourself with a blanket for warmth and comfort.

Beyond the Poses: Holistic Healing for Your Back

While these yoga poses are incredibly effective, true back pain relief often comes from a broader approach to your health. Consistent practice is paramount; even 10-15 minutes daily can make a significant difference. Mindful movement extends beyond your mat – pay attention to your body mechanics throughout your day, from how you sit at your desk to how you lift objects.

Stress reduction through meditation, deep breathing, or even just quiet time, plays a vital role in managing chronic pain. Consider other wellness practices like adequate sleep, proper hydration, and a balanced diet to support your musculoskeletal system. Yoga is a powerful tool within a larger framework of holistic healing.

When to Seek Professional Help

Yoga is a fantastic tool for managing and preventing many types of back pain. However, it’s important to recognize when professional medical advice is needed. If you experience sudden, severe back pain, numbness or tingling in your legs, weakness, loss of bladder or bowel control, or pain that doesn’t improve with rest and gentle movement, consult a healthcare provider immediately. Your doctor can help diagnose the cause of your pain and recommend appropriate treatment, which may include physical therapy or other interventions.

Exit mobile version