Understanding Your Body in Seated Forward Fold
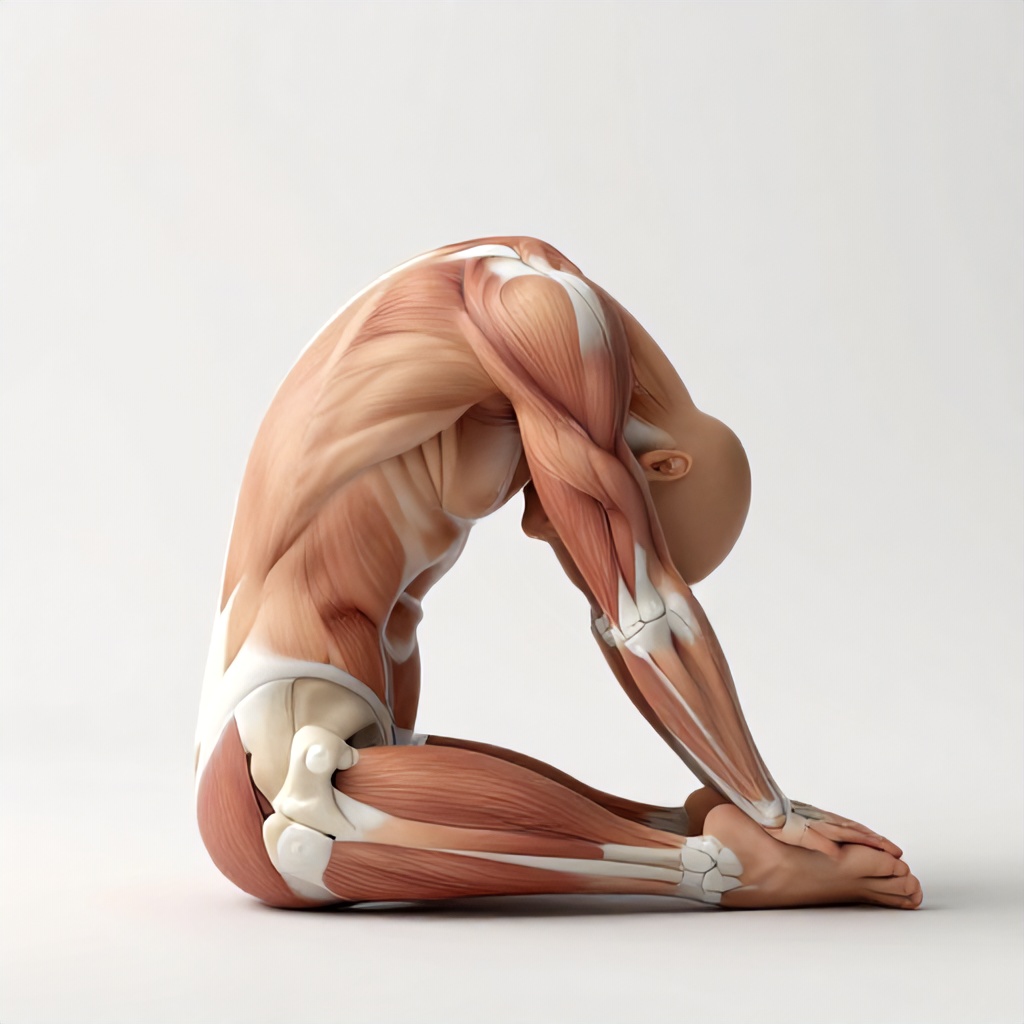
The seated forward fold, known in yoga as Paschimottanasana, is a popular stretch that targets the posterior chain of your body. It’s more than just touching your toes; it’s a complex interplay of muscles and joints working together to create a deep physiological stretch. Understanding the mechanics behind this pose can help you practice it more safely and effectively, maximizing its benefits for flexibility and well-being.

This pose involves bending forward from the hips while keeping the legs extended. It’s a fundamental movement that requires significant flexibility, particularly in the hamstrings and lower back. When performed correctly, it can release tension, improve posture, and promote a sense of calm. However, improper form can lead to strain or injury, especially in the lumbar spine.
The key to a beneficial seated forward fold lies in understanding which muscles are lengthening, which are stabilizing, and how your joints are articulating. It’s a dynamic process, not a static hold, and involves a conscious engagement of your musculoskeletal system. We’ll break down the anatomy and biomechanics involved, making this complex movement accessible for everyday practitioners.
The Posterior Chain: Your Body’s Powerhouse
The posterior chain refers to the group of muscles that run along the back of your body. This includes the muscles of your back, glutes, and hamstrings. These muscles are crucial for posture, movement, and generating force. In the seated forward fold, the posterior chain is the primary focus of the stretch.
Think of your posterior chain as a kinetic chain, where each link is connected and influences the others. When you initiate a forward fold, the muscles in this chain begin to lengthen. This lengthening is what creates the sensation of a stretch. The hamstrings, located at the back of your thighs, are often the tightest part of this chain for many people, limiting their ability to fold deeply.
The erector spinae muscles, which run along your spine, also play a vital role. While they are lengthening in a forward fold, they also work to stabilize your spine and prevent excessive rounding. This balance between lengthening and stabilization is critical for a safe and effective stretch. The gluteal muscles, your buttock muscles, are also engaged to help control the movement and maintain anatomical alignment.
Hamstring Flexibility: The Main Event
The hamstrings are a group of three muscles: the biceps femoris, semitendinosus, and semimembranosus. They originate at the ischial tuberosity (your sit bones) and insert below the knee. Their primary actions are to extend the hip and flex the knee. In a seated forward fold, the hip is extended (or rather, the torso is moving away from the thigh), and the knee is kept straight, which places a significant stretch on these muscles.
When you feel a stretch in the back of your legs during Paschimottanasana, it’s primarily your hamstring muscle tissue being elongated. This physiological stretch is what helps to improve hamstring flexibility over time. It’s important to remember that flexibility is not just about how far you can move, but also about the health and resilience of your muscle tissue and connective tissue.
Tight hamstrings can contribute to a variety of issues, including lower back pain and poor posture. By consistently and safely stretching them, you can improve your range of motion, reduce muscle tension, and support better overall movement patterns. This is where the practice of flexibility training becomes so valuable.
The Role of the Glutes
Your gluteal muscles, particularly the gluteus maximus, are also involved in the seated forward fold. While the primary action is hip flexion (bending forward), the glutes help to control the descent and prevent the pelvis from tilting too far backward, which could otherwise lead to an excessive rounding of the lumbar spine. They act as a stabilizing force, ensuring that the movement originates from the hips rather than the lower back.
Engaging your glutes slightly can help you maintain better anatomical alignment and protect your spine. It’s a subtle engagement, not a forceful contraction, but it’s important for creating a balanced stretch. This mindful muscle engagement is a key aspect of developing somatic awareness in your practice.
Spinal Flexion: Navigating the Curve
Seated forward fold is a classic example of spinal flexion, which is the forward bending of the spine. This movement involves the articulation of the vertebral column, allowing your torso to curve towards your legs. However, the way you achieve this flexion is critical for safety and effectiveness.
Ideally, the forward fold should begin with a hinge at the hips. This means your pelvis tilts forward, and your torso folds over your legs. As you continue to fold, your spine will naturally begin to flex. The goal is not to force your head to your knees by rounding your upper back excessively, but rather to allow a gentle, even curve through the entire spine.
The lumbar spine, the lower part of your back, is particularly vulnerable. Excessive rounding here can put undue pressure on the intervertebral discs. A well-executed forward fold allows for a controlled spinal flexion, where the movement is distributed along the entire vertebral column, from the sacrum to the cervical spine.
The Lumbar Spine’s Delicate Balance
The lumbar spine is designed for a certain degree of flexion, extension, and lateral bending, but it also needs to maintain stability. In Paschimottanasana, the erector spinae muscles, which normally help to extend and stabilize the spine, are lengthening. This lengthening needs to be controlled to avoid injury.
If you find yourself rounding your lower back significantly to get deeper into the stretch, it’s a sign that your hamstrings or hip flexors might be too tight, or you’re not hinging effectively at the hips. In such cases, it’s better to keep your back straighter and focus on the hip hinge, even if it means not going as deep. This approach prioritizes postural integrity.
Think of your spine as a series of stacked blocks. You want them to be able to move and articulate, but also to be supported. A rounded lower back in a forward fold can be like leaning those blocks too far forward without adequate support, increasing the risk of strain.
The Erector Spinae: More Than Just Straightening
While the erector spinae muscles are primarily known for their role in extending the spine (keeping you upright), they also play a crucial role in controlled flexion. During a forward fold, they lengthen eccentrically, meaning they are lengthening under tension. This controlled lengthening helps to decelerate the forward movement and maintain the integrity of the spinal column.
They act as a dynamic stabilizer, preventing a sudden collapse into the fold. This is why even in a deep stretch, there’s a subtle engagement of these muscles. They are working to support your spine as it lengthens. Understanding this dual role highlights the complexity of the musculoskeletal system.
Joint Articulation: The Body’s Hinges
The seated forward fold involves the coordinated movement of several joints. The primary joints involved are the hips and the spine. The knees remain extended, but their slight flexion or hyperextension can also influence the stretch.
The hip joint, a ball-and-socket joint, allows for a wide range of motion, including flexion. In Paschimottanasana, the hip joint flexes as your torso moves towards your thighs. The quality of this hip flexion is paramount. A good hip hinge means the movement originates from the hip socket, allowing the spine to maintain a more neutral or gently curved position.
The vertebral joints in the spine also articulate. Each vertebra can move slightly relative to the one above and below it. In a forward fold, these joints allow for the spinal flexion. The goal is to have this articulation be smooth and distributed, rather than concentrated in one area, especially the lumbar spine.
The Hip Hinge vs. The Spinal Roll
The distinction between a hip hinge and a spinal roll is fundamental to practicing the seated forward fold safely. A hip hinge is when the movement primarily comes from the bending at the hip joint, with the spine maintaining a relatively straight or gently curved line. Imagine pushing your hips backward and then folding your torso forward over your legs.
A spinal roll, on the other hand, involves rounding the spine significantly, particularly the upper back, to bring the torso closer to the legs. While this might allow you to go deeper, it places more stress on the spinal discs and ligaments. It bypasses the intended stretch in the hamstrings and posterior chain, and instead emphasizes spinal compression.
For beginners, or those with tight hamstrings or lower back issues, focusing on the hip hinge is highly recommended. This might mean keeping your back straighter and not reaching as far down. Using props like a folded blanket under your sit bones can help tilt the pelvis forward, facilitating a better hip hinge.
Knee Position and Its Impact
While the seated forward fold is typically practiced with straight legs, the position of the knees can subtly affect the stretch. If your hamstrings are very tight, trying to keep your knees perfectly straight might force you to round your lower back. In such cases, a slight bend in the knees can be beneficial.
A slight knee bend allows the pelvis to tilt forward more easily, promoting a better hip hinge and reducing the strain on the lumbar spine. As your hamstring flexibility improves over time, you can gradually work towards straightening the legs more. This is a gradual process of flexibility training.
Conversely, if you have hyperextended knees (knees that bend backward beyond a straight line), you might need to consciously soften them slightly to avoid locking them out. This ensures that the stretch is focused on the hamstrings and not on the knee joint itself.
Physiological Stretch vs. Forced Position
It’s important to differentiate between a physiological stretch and a forced position. A physiological stretch is a gentle lengthening of muscle tissue and connective tissue that occurs when you move within your body’s natural range of motion. It should feel like a comfortable tension, not sharp pain.
A forced position is when you push your body beyond its current capacity, often through brute force or by compensating with other body parts. In the seated forward fold, this might look like rounding your back excessively, straining your neck, or holding your breath. This can lead to injury and does not promote long-term flexibility.
The goal of Paschimottanasana is to create a sustained, gentle stretch that encourages the muscle tissue to lengthen over time. This is how true flexibility is built. It requires patience and listening to your body’s signals. Myofascial release, which can be achieved through sustained stretching, helps to release tension in the fascia, the connective tissue surrounding muscles.
The Importance of Breath
Your breath is an integral part of the seated forward fold. Deep, conscious breathing can help you relax into the stretch and deepen your range of motion. As you inhale, you can lengthen your spine slightly, creating space. As you exhale, you can allow your body to soften and fold a little deeper.
Holding your breath signals to your body that it’s under stress, causing muscles to tighten. By breathing deeply and smoothly, you encourage your nervous system to relax, allowing the muscles to release. This is a key aspect of therapeutic exercise and promoting relaxation.
The breath also helps to increase blood flow to the working muscles, aiding in recovery and promoting tissue health. It’s a powerful tool for enhancing the benefits of any stretch.
Listen to Your Body: The Ultimate Anatomical Guide
The most important anatomical guide you have is your own body. Pay attention to the sensations you feel. A mild to moderate stretch in the hamstrings and perhaps the lower back is normal. Sharp pain, pinching, or numbness are warning signs that you need to ease up.
If you feel strain in your lower back, it’s likely due to excessive spinal rounding or a lack of hip hinge. Try bending your knees, sitting on a cushion, or simply not folding as deeply. The aim is to create a stretch that feels beneficial, not painful. This practice builds somatic awareness, helping you understand your body’s unique needs and limitations.
Remember that flexibility is a journey, not a destination. Some days you’ll feel more open than others. Be consistent with your practice, be patient, and always prioritize safety and proper anatomical alignment. This mindful approach ensures that your flexibility training contributes positively to your overall health and well-being.
Safe Practice and Next Steps
To practice the seated forward fold safely and effectively, consider these points:
- Begin by sitting on the floor with your legs extended in front of you.
- Place a folded blanket or cushion under your sit bones to help tilt your pelvis forward. This encourages a better hip hinge.
- Inhale and lengthen your spine, imagining your torso growing taller.
- As you exhale, hinge at your hips, leading with your chest, and fold your torso forward over your legs. Keep your back as straight as possible initially.
- Allow your head and neck to relax.
- Hold the pose for several breaths, focusing on deep, even breathing.
- To come out of the pose, inhale and slowly lengthen your spine back to an upright position.
If you experience any discomfort, ease out of the pose immediately. Never force yourself into a deeper stretch. Consistency and patience are key to improving hamstring flexibility and spinal mobility. This form of therapeutic exercise, when done correctly, can be incredibly beneficial for the musculoskeletal system.
Consider incorporating other stretches that target the posterior chain, such as downward-facing dog or gentle hamstring stretches lying on your back. This holistic approach to flexibility training can support your overall range of motion and postural integrity. If you have pre-existing conditions or concerns, consulting with a healthcare professional or a qualified yoga instructor is always a good idea.