Essential Yoga Poses for Daily Flexibility and Overall Wellness Guide

Essential Yoga Poses for Daily Flexibility and Wellness Guide

Incorporating a few key yoga poses into your daily routine can dramatically improve your flexibility and overall wellness, offering a simple yet powerful way to move your body and find a sense of calm.

This isn’t about contorting yourself into pretzel shapes or dedicating hours to the mat. It’s about finding accessible, effective postures that can be done almost anywhere, anytime, to gently awaken your muscles, release tension, and foster a deeper connection with your physical self. Think of these as your foundational building blocks for a more supple and resilient body.

Why Daily Yoga Poses Matter

Our modern lives often involve a lot of sitting, repetitive movements, or prolonged static positions. This can lead to stiffness, aches, and a general feeling of being “stuck” in our bodies. Regular yoga practice, even in short bursts, acts as an antidote. It encourages mindful movement, promoting better body alignment and increasing your range of motion.

The benefits extend beyond the physical. These postures are designed to calm the nervous system, reduce stress, and enhance mental clarity. It’s a holistic approach to physical well-being, touching on both how you feel physically and mentally. Even a few minutes of dedicated stretching exercises can make a noticeable difference in your day.

Your Go-To Yoga Poses for Flexibility

Here are some fundamental yoga poses, often referred to as asanas, that are excellent for building daily flexibility. They are chosen for their accessibility and the broad range of benefits they offer. Imagine these presented with minimalist icons on a clean white background – a visual guide for easy reference.

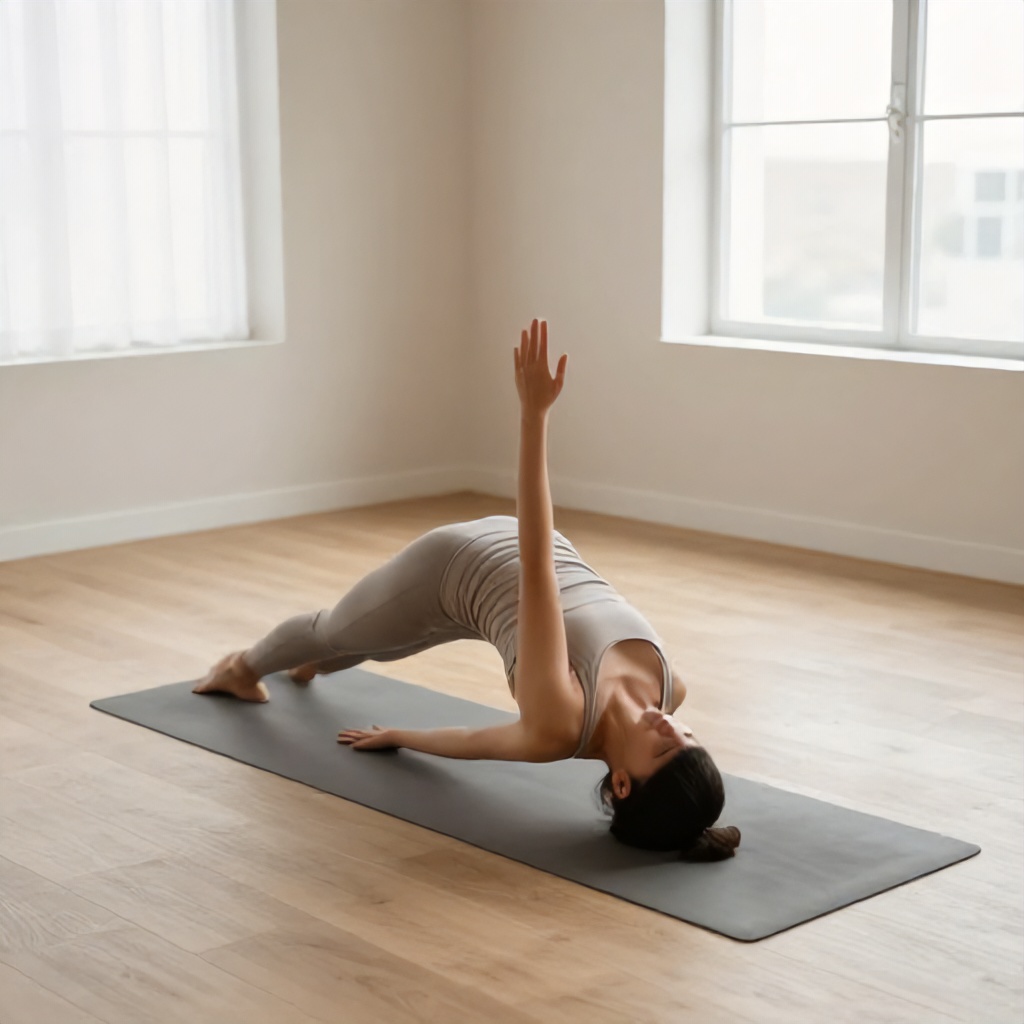
1. Downward-Facing Dog (Adho Mukha Svanasana)

This is a cornerstone pose that offers a full-body stretch. It’s fantastic for lengthening the spine, stretching the hamstrings, calves, and shoulders. It also helps to build strength in the arms and legs.

How to do it: Start on your hands and knees, with your wrists directly under your shoulders and your knees under your hips. Tuck your toes under and lift your hips up and back, forming an inverted ‘V’ shape. Press firmly through your palms, spreading your fingers wide. Keep your head relaxed between your arms. You can keep a slight bend in your knees if your hamstrings are tight, focusing on lengthening your spine. Aim to press your heels towards the floor, but don’t worry if they don’t touch.

Benefits: Stretches the entire back body, strengthens arms and legs, calms the mind, can relieve mild back pain.

2. Cat-Cow Pose (Marjaryasana-Bitilasana)

This gentle flow is perfect for warming up the spine and improving its mobility. It’s a wonderful way to connect your breath with movement and release tension in the back and neck.

How to do it: Begin on your hands and knees, as in Downward-Facing Dog preparation. As you inhale, drop your belly towards the floor, lift your chest and tailbone, and gaze slightly upward (Cow pose). As you exhale, round your spine towards the ceiling, tuck your chin to your chest, and draw your navel towards your spine (Cat pose). Flow between these two poses, synchronizing your breath with each movement.

Benefits: Increases spinal flexibility, massages abdominal organs, relieves stress, gently warms up the body.

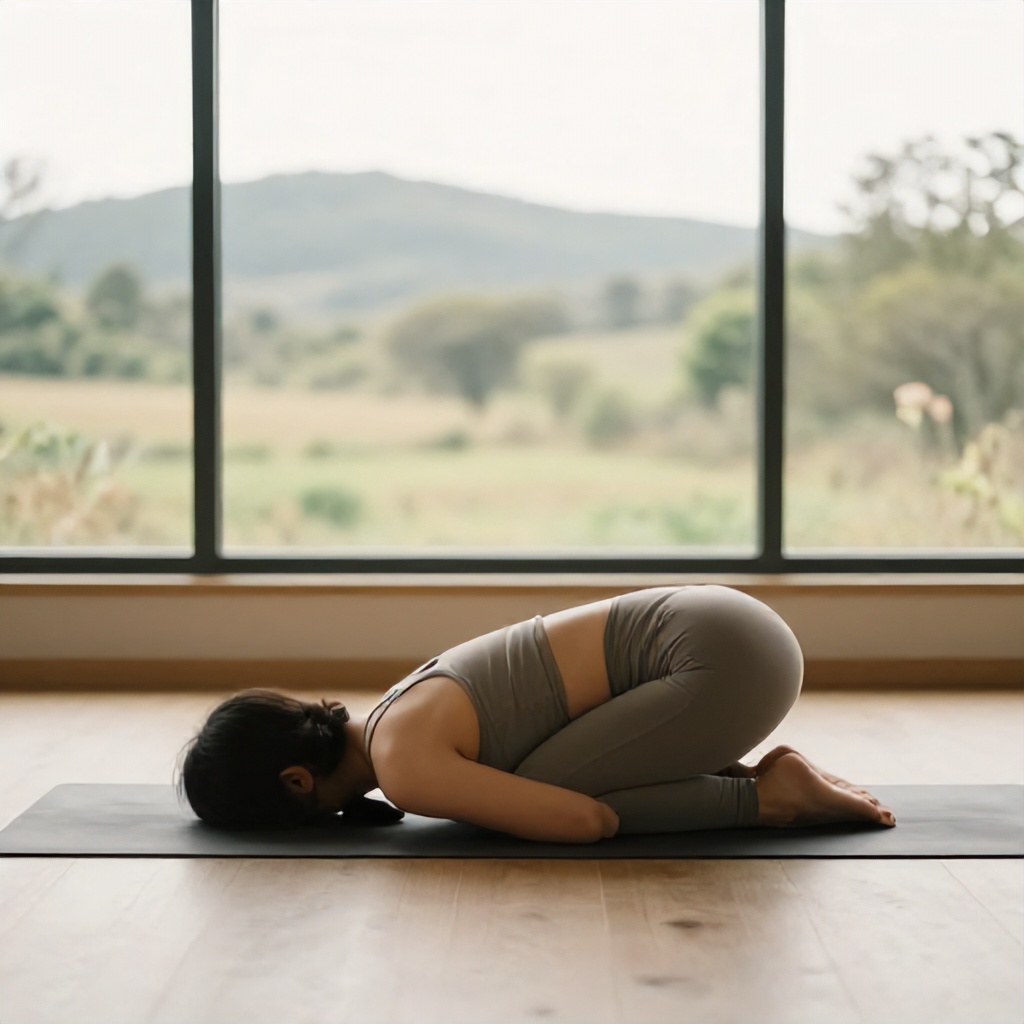
3. Child’s Pose (Balasana)

A restorative and grounding pose, Child’s Pose is your go-to for a moment of rest and deep relaxation. It gently stretches the hips, thighs, and ankles while releasing tension in the back and neck.

How to do it: Kneel on the floor with your big toes touching and your knees hip-width apart (or wider if more comfortable). Sit back on your heels and fold your torso forward, resting your forehead on the mat. Your arms can be stretched out in front of you, palms down, or relaxed alongside your body, palms up. Breathe deeply and allow your body to sink into the pose.

Benefits: Calms the brain, relieves stress and fatigue, gently stretches the hips, thighs, and ankles, promotes relaxation.

4. Low Lunge (Anjaneyasana)

This pose is excellent for opening up the hips and stretching the hip flexors, which can become tight from prolonged sitting. It also stretches the quadriceps and can improve balance.

How to do it: From a kneeling position, step one foot forward, placing it flat on the floor directly under your knee. Your front thigh should be parallel to the floor. Slide your back knee further back until you feel a stretch in the front of your hip. Keep your torso upright. You can rest your hands on your front thigh for support or extend them overhead for a deeper stretch. Repeat on the other side.

Benefits: Stretches hip flexors and quadriceps, opens the chest and shoulders, improves balance, can relieve sciatica pain.

5. Warrior II (Virabhadrasana II)

Warrior II is an empowering pose that builds strength and stamina while opening the hips and chest. It’s a great pose for improving focus and concentration.

How to do it: Stand with your feet about 3-4 feet apart. Turn your right foot out 90 degrees and your left foot in slightly. Align your right heel with the arch of your left foot. Bend your right knee so it is directly over your right ankle, forming a 90-degree angle. Keep your left leg straight. Extend your arms out to the sides, parallel to the floor, with your palms facing down. Gaze over your right fingertips. Ensure your torso is stacked over your hips. Repeat on the other side.

Benefits: Strengthens legs and ankles, opens hips and chest, builds stamina and concentration, improves circulation.

6. Triangle Pose (Trikonasana)

Triangle Pose is a standing pose that stretches the legs, hips, and spine. It also opens the chest and shoulders and can help to relieve stress.

How to do it: From Warrior II, straighten your front leg. Hinge at your hips, reaching your front hand forward as far as possible. Then, lower your front hand to your shin, ankle, or a block, and extend your top arm straight up towards the ceiling. Keep both legs engaged and your torso open. Gaze upwards towards your top hand, or forward if that’s more comfortable for your neck. Repeat on the other side.

Benefits: Stretches legs, hips, and spine, opens chest and shoulders, improves digestion, relieves stress.

7. Seated Forward Bend (Paschimottanasana)

This classic seated pose is excellent for stretching the hamstrings, spine, and shoulders. It’s also a calming pose that can help to reduce anxiety.

How to do it: Sit on the floor with your legs extended straight in front of you. You can place a cushion under your hips if needed. Inhale and lengthen your spine. As you exhale, hinge at your hips and fold your torso forward over your legs. Keep your back as straight as possible. Reach for your shins, ankles, or feet. Allow your head to relax. If your hamstrings are very tight, you can keep a slight bend in your knees.

Benefits: Stretches the spine, hamstrings, and shoulders, calms the mind, stimulates abdominal organs, relieves stress.

8. Supine Spinal Twist (Supta Matsyendrasana)

A gentle yet effective pose for releasing tension in the spine and hips. It’s a wonderful way to wind down and promote relaxation.

How to do it: Lie on your back with your knees bent and feet flat on the floor. Draw your knees into your chest. Extend your arms out to the sides, forming a ‘T’ shape. Gently drop your knees to one side, keeping both shoulders grounded on the floor. Turn your head to look in the opposite direction of your knees. Hold for several breaths, then repeat on the other side.

Benefits: Releases tension in the spine and hips, massages abdominal organs, promotes relaxation, aids digestion.

Creating Your Daily Yoga Practice

Consistency is key. Aim to practice these poses for at least 10-15 minutes each day. You can do them all together as a sequence or pick a few that feel most beneficial for your body on any given day. Think of it as a personalized movement ritual.

Consider the environment. A quiet space, perhaps with some calming music, can enhance the experience. Wearing comfortable athletic clothing that allows for a full range of movement is essential. Even simple, stylized flat-vector illustrations can serve as a helpful reminder of the postures.

Listen to your body. Yoga is not about pushing yourself to the point of pain. If a pose feels uncomfortable, modify it or skip it. The goal is to cultivate a positive relationship with your body and its capabilities.

You might find it helpful to create a simple grid layout for your practice, perhaps with a serene aesthetic. This visual guide can make your yoga practice feel more structured and accessible. Remember, the aim is mindful movement that contributes to your overall physical well-being and holistic health.

Even incorporating just a few of these postures can lead to significant improvements in your flexibility and sense of wellness over time. It’s a journey of self-discovery and self-care, one pose at a time. This educational approach to movement can empower you to take charge of your physical health.

5 Step Yoga Progression for Improved Flexibility and Joint Mobility

Building Flexibility Through Systematic Yoga Progression

Consistent yoga practice improves physical mobility by gradually lengthening muscle fibers and increasing the range of motion in your joints. Flexibility training is not about forcing your body into extreme shapes but rather about teaching your nervous system to feel safe while moving through a wider arc. When you approach your stretching exercises with a structured plan, you reduce the risk of injury and encourage long-term muscle elasticity. This five-step progression helps you build a sustainable yoga routine that prioritizes body alignment and functional movement over aesthetic perfection.

Step 1: Establishing a Baseline with Dynamic Warm-ups

Before you attempt deep static holds, your muscles require heat to become pliable. Cold muscles are like cold rubber bands; they are brittle and prone to micro-tears if stretched too quickly. Dynamic movement prepares your body for the upcoming yoga asanas by increasing blood flow to the connective tissues and synovial fluid in your joints.

The Importance of Kinetic Flow

Start your session with five to ten minutes of gentle, rhythmic motion. This is not the time for deep, held stretches. Instead, focus on moving your limbs through their current comfortable range. Think of this as an active recovery period where you wake up your nervous system. Simple movements like neck rolls, shoulder shrugs, and gentle torso twists help establish body awareness before you move into more demanding postures.

  • Perform arm circles to lubricate the shoulder girdle.
  • Use cat-cow stretches to mobilize the spine.
  • Incorporate hip circles to prepare the pelvic region.
  • Walk in place to activate the ankles and calves.

By focusing on kinetic flow, you signal to your brain that it is time to shift from a sedentary state to an active one. This phase of your fitness progression is essential for preventing the stiffness that often leads to compensation patterns, where one muscle group overworks to make up for the lack of mobility in another.

Step 2: Mastering Foundational Yoga Poses

Once your body is warm, move into foundational yoga poses that emphasize stability. Many people assume flexibility training is only about the stretch, but true physical conditioning requires a balance of strength and length. If you lack the strength to support your joints, your body will naturally tighten up to protect itself from instability.

Prioritizing Body Alignment

Focus on the basics like Mountain Pose, Downward-Facing Dog, and Warrior I. These poses teach you how to stack your joints correctly. When your bones are aligned, your muscles do not have to work as hard to keep you upright, which allows them to relax into a deeper stretch. Pay attention to your feet, knees, and hips. Are your toes pointing forward? Is your weight distributed evenly across your heels and the balls of your feet? These small details define the quality of your yoga technique.

Avoid locking your joints. A common mistake is hyperextending the knees or elbows in an attempt to look flexible. Keep a micro-bend in your joints to ensure the work is happening in the muscle belly rather than the ligaments. Ligaments are meant to stabilize, not stretch, so protecting them is vital for your long-term health.

Step 3: Integrating Targeted Stretching Exercises

With a stable foundation, you can now introduce specific stretching exercises designed to target tight areas like the hamstrings, hip flexors, and shoulders. This is where you see the most significant flexibility improvement. Use props like blocks, straps, or folded blankets to bring the floor closer to you. Using props is a sign of a smart practitioner, not a weak one.

Safe Stretching Techniques

When you hold a stretch, aim for a sensation of mild tension rather than sharp pain. If you feel a pinching sensation, back out immediately. Your goal is to reach the edge of your comfort zone and breathe into it. Deep, slow breathing calms the sympathetic nervous system, which is responsible for the fight-or-flight response that causes muscles to contract when they feel threatened.

  1. Hold each static stretch for at least 30 to 60 seconds to allow the muscle spindles to reset.
  2. Focus on exhaling as you move deeper into the pose.
  3. Keep your face and jaw relaxed; tension in the face often mirrors tension in the hips.
  4. Repeat the stretch on both sides, even if one side feels more flexible than the other.

Muscle suppleness develops over weeks and months, not days. If you find your hamstrings are particularly tight, try a seated forward fold with a strap around your feet. This allows you to maintain a straight spine while still getting the benefit of the stretch. A rounded back often hides the fact that you are not actually stretching the hamstrings, but rather just folding at the lumbar spine.

Step 4: Enhancing Mindful Recovery and Body Awareness

Flexibility training is as much a mental practice as a physical one. Mindfulness in motion allows you to notice where you are holding tension before it becomes a chronic issue. During your yoga sequence, check in with your body. Are you clenching your glutes during a lunge? Are you holding your breath during a twist? These unconscious habits prevent your muscles from fully releasing.

The Role of Active Recovery

Integrate days of active recovery into your schedule. This might involve a restorative yoga routine where you hold poses for several minutes using heavy support. This type of practice targets the fascia—the connective tissue that wraps around your muscles—rather than just the muscle fibers themselves. Fascia responds best to long, slow, and gentle pressure.

Listen to your body’s signals. If you feel exhausted or sore, opt for gentle movement instead of pushing for a new personal best. Consistency beats intensity every single time. By showing up to your mat regularly, even for short sessions, you build the habit of body awareness that prevents injury and promotes longevity in your fitness journey.

Step 5: Sustaining Progress Through Consistent Practice

The final step in your progression is maintenance. Once you achieve a certain level of muscle suppleness, you must continue to challenge your range of motion to keep it. If you stop your stretching regimen, your body will naturally return to its previous state of tightness. This is a normal physiological response to disuse.

Building a Sustainable Yoga Routine

Design a yoga sequence that you can realistically stick to three to four times a week. It is better to do fifteen minutes of focused work daily than a two-hour session once a week. Keep a journal of your progress. Note which poses feel easier and where you still feel resistance. This data helps you adjust your practice over time.

  • Vary your routine to include different styles, such as Hatha for alignment and Yin for deep tissue release.
  • Stay hydrated, as muscle tissue is largely composed of water and requires proper hydration to remain elastic.
  • Incorporate strength training alongside your yoga to support the new range of motion you have gained.
  • Prioritize sleep, as this is when your body repairs the micro-tears created during your stretching sessions.

Remember that every body is unique. Your bone structure, previous injuries, and daily habits all influence your flexibility. Do not compare your progress to others on social media. Your yoga discipline is a personal path toward better health and functional movement. By focusing on the process rather than the outcome, you ensure that your body remains capable, strong, and flexible for years to come.

Practical Tips for Long-Term Success

To keep your flexibility training effective, you must remain curious about your own anatomy. Pay attention to how your body feels after a long day of sitting at a desk. Often, the tightness you feel in your lower back is actually a result of tight hip flexors pulling on your pelvis. By addressing the root cause through targeted stretching, you can alleviate discomfort throughout your entire kinetic chain.

Avoid the trap of overstretching. There is a point of diminishing returns where too much stretching can lead to joint laxity. If you feel unstable in your joints, focus more on strength-based yoga poses to build the muscles that support those joints. Balance is the key to a healthy body. When you combine strength, flexibility, and mindfulness, you create a robust system that can handle the demands of daily life with ease.

Finally, be patient with yourself. Some days your body will feel open and fluid, while other days it will feel stiff and resistant. This fluctuation is a natural part of being human. Acknowledge the resistance without judgment and continue with your practice. Over time, the cumulative effect of these small, consistent efforts will result in a body that feels more comfortable, capable, and resilient.

Keep your environment conducive to your practice. A quiet space where you can focus on your breath without distraction makes a significant difference. Whether you practice in the morning to wake up your muscles or in the evening to release the day’s stress, make it a non-negotiable part of your self-care. Your commitment to this process is the most important factor in your success.

As you continue to refine your technique, you will notice that your body awareness improves. You will start to catch yourself slouching or holding tension in your shoulders during the day and be able to correct it instantly. This is the true goal of a yoga practice: taking the lessons from the mat and applying them to your everyday life to move with more grace and ease.

Stay consistent, stay mindful, and keep moving. Your body will thank you for the attention and care you provide through this structured approach to flexibility. With time, you will find that your range of motion expands, your muscles feel more supple, and your overall sense of physical well-being reaches new heights.

Exit mobile version