
Yoga provides a gentle yet powerful pathway to back pain relief, offering a holistic approach that targets not just the symptoms but also the underlying causes of discomfort. Regular practice can significantly improve flexibility, strengthen the muscles that support your spine, and encourage better posture, leading to lasting comfort.

Why Yoga Offers Real Back Pain Relief
Back pain, whether it’s a dull ache or a sharp, persistent discomfort, often stems from a combination of factors: muscle imbalances, poor posture, lack of flexibility, and even stress. Yoga addresses these issues directly, providing effective pain management without relying solely on medication.
One of the primary benefits of incorporating yoga into your routine is enhanced flexibility. Tight hamstrings, hip flexors, and glutes can pull on the pelvis, contributing to lower back pain. Gentle stretching exercises found in yoga lengthen these muscles, easing tension and allowing for a more natural spinal alignment. This increased range of motion helps your body move more freely and with less strain on the vertebral column.
Beyond stretching, yoga builds essential muscle strength. Many poses engage the core muscles – your abdominal and back muscles – which are absolutely vital for providing stable lumbar support. A strong core acts like a natural corset, protecting your spine and preventing excessive strain. This muscle strengthening is key for long-term posture correction and preventing future episodes of chronic pain.
Yoga also fosters mindful movement and stress reduction. The practice encourages you to tune into your body, noticing areas of tension and learning to release them. Stress often manifests as physical tightness in the shoulders, neck, and back, exacerbating existing pain. By integrating breathwork and focused awareness, yoga helps calm the nervous system, reducing muscle tension and offering a powerful pain relief technique.
Important Considerations Before You Begin
While yoga is widely beneficial for back pain, it’s essential to approach your practice with awareness and caution. Always listen to your body; pain is a signal to ease off, not push through. Some movements might feel uncomfortable initially, but they should never cause sharp or increasing pain.
If you have severe or acute back pain, or a diagnosed spinal condition like a herniated disc, consult with a doctor or physical therapist before starting any new exercise regimen. They can advise on appropriate movements and help you understand any limitations. Many find therapeutic yoga or gentle yoga practices to be excellent complements to traditional physical therapy.
Consistency is more important than intensity. Even short, regular sessions of mindful movement can yield significant benefits for your musculoskeletal system and contribute to overall wellness practices. Focus on proper form rather than how deeply you can get into a pose. Using props like blankets, blocks, or straps can help you achieve poses safely and comfortably, allowing for deeper relaxation and stretch.
12 Yoga Poses for Effective Back Pain Relief
These yoga poses are chosen for their ability to gently stretch, strengthen, and release tension in the back, hips, and core. Practice them slowly, breathing deeply, and holding each pose for several breaths.
1. Cat-Cow Pose (Marjaryasana-Bitilasana)
This dynamic duo gently warms up the spine, improving flexibility and promoting spinal alignment. It’s excellent for both lower back pain and upper back stiffness, encouraging the vertebral column to move fluidly.
- Start on your hands and knees, with wrists directly under shoulders and knees under hips. Your spine should be neutral.
- As you inhale, drop your belly towards the mat, lift your chest and tailbone towards the ceiling, gently arching your back (Cow Pose).
- As you exhale, round your spine towards the ceiling, tuck your chin to your chest, and draw your navel towards your spine (Cat Pose).
- Flow between these two poses for 5-10 breaths, coordinating your movement with your breath.
Tips: Keep your neck long and avoid collapsing into your shoulders. Focus on articulating each vertebra.
2. Child’s Pose (Balasana)
Child’s Pose is a restorative yoga staple, offering a gentle stretch for the lower back and hips while calming the mind. It’s a wonderful pose for stress reduction and finding a moment of peace.
- Kneel on your mat with your big toes touching and knees wide apart, or together if that feels better for your lower back.
- Sit your hips back towards your heels.
- Fold forward, resting your torso between or on top of your thighs.
- Extend your arms forward with palms down, or rest them alongside your body with palms up.
- Rest your forehead on the mat.
Tips: If your forehead doesn’t comfortably reach the mat, place a block or folded blanket underneath it. If your hips don’t reach your heels, place a blanket between them.
3. Thread the Needle Pose (Urdhva Mukha Pasasana variation)
This pose targets the upper back and shoulders, releasing tension that often contributes to neck and upper back pain. It’s a fantastic gentle stretch for the thoracic spine.
- Start on your hands and knees, similar to Cat-Cow.
- Inhale and lift your right arm towards the ceiling, opening your chest to the right.
- Exhale and “thread” your right arm under your left armpit, palm facing up.
- Lower your right shoulder and the right side of your head to the mat.
- You can keep your left hand on the mat, extend it forward, or wrap it around your back for a deeper shoulder stretch.
- Hold for 5-8 breaths, then slowly unravel and repeat on the other side.
Tips: Keep your hips relatively stacked over your knees. Avoid putting too much weight on your head.
4. Sphinx Pose (Salamba Bhujangasana)
Sphinx Pose is a mild backbend that gently strengthens the back muscles and stretches the abdominal area. It’s a safer alternative to deeper backbends for those with lower back pain, offering gentle lumbar support.
- Lie on your stomach with your legs extended straight back, tops of your feet on the mat.
- Bring your forearms to the mat, elbows directly under your shoulders, palms flat.
- Gently press into your forearms and lift your chest, keeping your neck long and gaze forward.
- Keep your hips and lower body relaxed on the mat.
- Hold for 5-10 breaths, feeling a gentle compression in your lower back.
Tips: Avoid shrugging your shoulders towards your ears. Keep a gentle engagement in your core to protect your lower back.
5. Cobra Pose (Bhujangasana)
Cobra Pose is a slightly deeper backbend than Sphinx, further strengthening the back muscles and increasing spinal flexibility. It’s excellent for posture correction and can help counteract the effects of prolonged sitting.
- Lie on your stomach with your legs extended, tops of your feet on the mat.
- Place your hands flat on the mat under your shoulders, fingers pointing forward.
- Press your pubic bone and the tops of your feet into the mat.
- Inhale and slowly lift your head and chest off the mat, using your back muscles more than your hands.
- Keep your elbows close to your body. You don’t need to straighten your arms fully; keep a slight bend.
- Hold for a few breaths, then exhale to lower back down.
Tips: Imagine lengthening your spine as you lift. Keep your gaze soft and slightly forward to avoid crunching your neck.
6. Downward-Facing Dog (Adho Mukha Svanasana)
Downward Dog is a foundational yoga pose that lengthens the entire spine, stretches the hamstrings and calves, and strengthens the arms and shoulders. It helps decompress the vertebral column and improves overall body mechanics.
- Start on your hands and knees.
- Tuck your toes under and lift your hips up and back, forming an inverted V shape with your body.
- Press firmly through your hands, spreading your fingers wide.
- Straighten your arms and legs as much as possible, sending your heels towards the mat (they don’t need to touch).
- Let your head hang loosely between your arms, gazing towards your navel or thighs.
Tips: If your hamstrings are tight, keep a generous bend in your knees to prioritize lengthening your spine. Focus on externally rotating your upper arms.
7. Supine Spinal Twist (Supta Matsyendrasana)
Gentle twists are fantastic for releasing tension in the lower back and promoting spinal alignment. This restorative pose also aids in stress reduction and can improve digestion.
- Lie on your back with your knees bent and feet flat on the floor.
- Extend your arms out to a T-shape, palms facing up or down.
- Lift your hips slightly and shift them a few inches to the right.
- Let both knees fall over to the left side, keeping them stacked or allowing the top knee to rest slightly forward.
- If comfortable, turn your head to the right, looking over your right shoulder.
- Hold for several breaths, then return to center and repeat on the other side.
Tips: If your shoulders lift too much, place a blanket under them. A block or cushion between your knees can provide extra support.
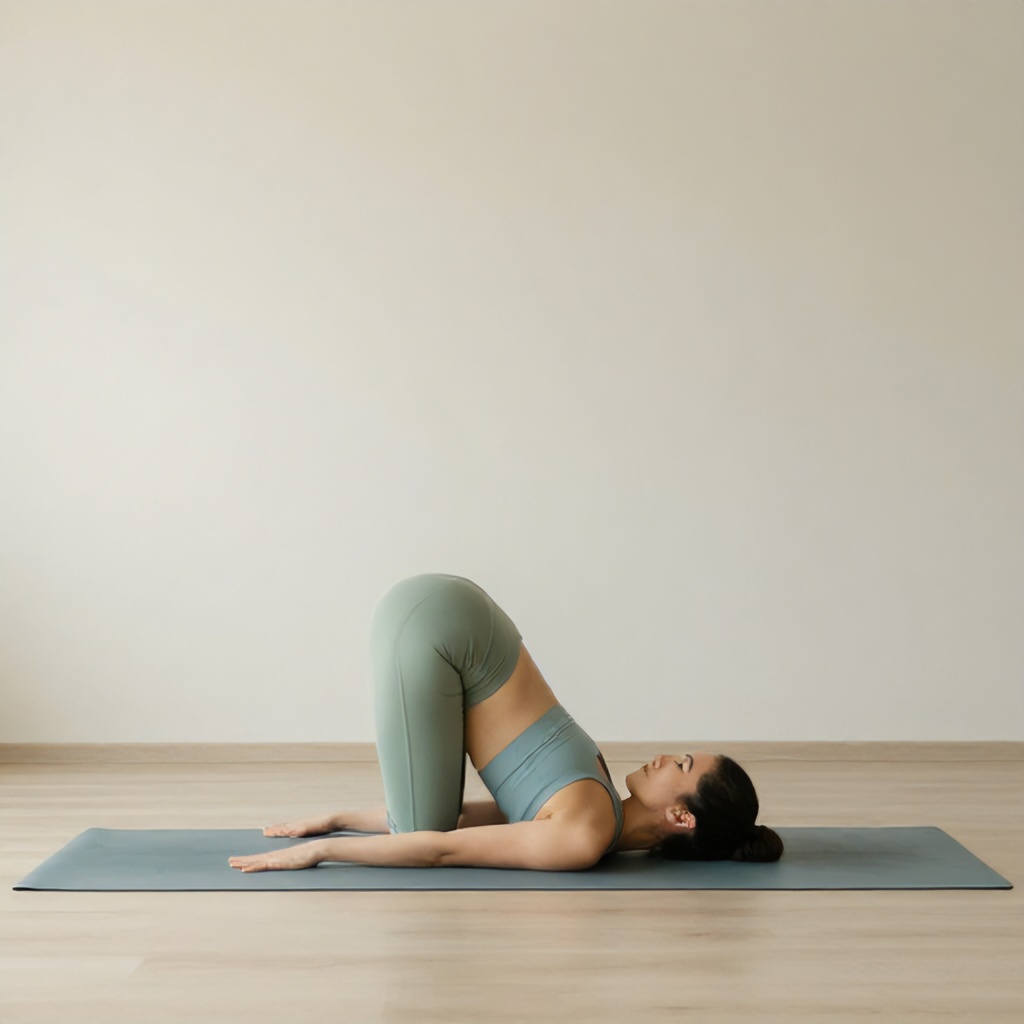
8. Knees-to-Chest Pose (Apanasana)
This simple, soothing pose offers immediate relief for the lower back by gently stretching the lumbar spine and massaging the abdominal organs. It’s a great pain relief technique for acute lower back pain.
- Lie on your back with your legs extended.
- On an exhale, draw both knees towards your chest.
- Wrap your arms around your shins or the backs of your thighs.
- Gently hug your knees in, keeping your tailbone pressing down towards the mat.
- You can stay still or gently rock from side to side to massage your lower back.
Tips: If it’s uncomfortable to hug both knees, hug one knee at a time. Keep your shoulders relaxed and away from your ears.
9. Bridge Pose (Setu Bandhasana)
Bridge Pose strengthens the glutes, hamstrings, and back muscles, providing excellent lumbar support. It also opens the chest and shoulders, counteracting slouching and improving overall posture correction.
- Lie on your back with your knees bent and feet flat on the floor, hip-width apart, heels close to your glutes.
- Press into your feet and lift your hips off the mat, engaging your glutes and hamstrings.
- You can keep your arms alongside your body, palms down, or interlace your fingers underneath your back and press your arms into the mat for a deeper shoulder opening.
- Keep your thighs parallel and avoid letting your knees splay out.
- Hold for 5-8 breaths, then slowly lower your hips back down.
Tips: Imagine a block between your knees to keep them from splaying. For a restorative version, place a block under your sacrum (lower back) and relax.
10. Figure Four Stretch (Supine Pigeon Prep)
Tight hips are a common contributor to lower back pain, as they can pull on the pelvis and spine. This pose deeply stretches the outer hips and glutes, offering indirect but significant back pain relief.
- Lie on your back with your knees bent and feet flat on the floor.
- Cross your right ankle over your left thigh, just above the knee.
- Flex your right foot to protect your knee.
- Gently lift your left foot off the floor and interlace your fingers behind your left thigh.
- Draw your left knee towards your chest, feeling the stretch in your right outer hip.
- Hold for 5-8 breaths, then release and repeat on the other side.
Tips: Keep your head and shoulders relaxed on the mat. If the stretch is too intense, keep your left foot on the floor and gently press your right knee away from you.
11. Reclined Hand-to-Big-Toe Pose (Supta Padangusthasana)
Tight hamstrings can pull on the pelvis, flattening the natural curve of the lower back and contributing to discomfort. This pose offers a deep, controlled hamstring stretch without straining the back.
- Lie on your back with both legs extended.
- Bend your right knee and draw it towards your chest.
- Loop a strap or towel around the ball of your right foot, holding both ends with your hands.
- Slowly extend your right leg towards the ceiling, keeping a micro-bend in the knee if needed.
- Keep your left leg grounded and straight, pressing your left heel away from you.
- Gently pull on the strap to deepen the hamstring stretch, keeping your tailbone rooted.
- Hold for 5-8 breaths, then release and repeat on the other side.
Tips: Prioritize keeping your lower back flat on the mat over straightening your leg completely. Relax your shoulders.
12. Corpse Pose (Savasana)
Often underestimated, Savasana is a crucial restorative yoga pose for pain management and overall wellness. It allows your body to integrate the benefits of the practice, calms the nervous system, and promotes deep stress reduction, which is vital for back pain relief.
- Lie on your back with your legs extended, feet falling open naturally.
- Let your arms rest alongside your body, palms facing up, slightly away from your torso.
- Close your eyes and allow your body to feel heavy and relaxed on the mat.
- Release any tension in your face, jaw, and shoulders.
- Breathe naturally and deeply, allowing yourself to completely surrender.
- Stay in Savasana for 5-10 minutes.
Tips: If your lower back feels strained, place a rolled blanket or bolster under your knees. Cover yourself with a blanket for warmth and comfort.
Beyond the Poses: Holistic Healing for Your Back
While these yoga poses are incredibly effective, true back pain relief often comes from a broader approach to your health. Consistent practice is paramount; even 10-15 minutes daily can make a significant difference. Mindful movement extends beyond your mat – pay attention to your body mechanics throughout your day, from how you sit at your desk to how you lift objects.
Stress reduction through meditation, deep breathing, or even just quiet time, plays a vital role in managing chronic pain. Consider other wellness practices like adequate sleep, proper hydration, and a balanced diet to support your musculoskeletal system. Yoga is a powerful tool within a larger framework of holistic healing.
When to Seek Professional Help
Yoga is a fantastic tool for managing and preventing many types of back pain. However, it’s important to recognize when professional medical advice is needed. If you experience sudden, severe back pain, numbness or tingling in your legs, weakness, loss of bladder or bowel control, or pain that doesn’t improve with rest and gentle movement, consult a healthcare provider immediately. Your doctor can help diagnose the cause of your pain and recommend appropriate treatment, which may include physical therapy or other interventions.