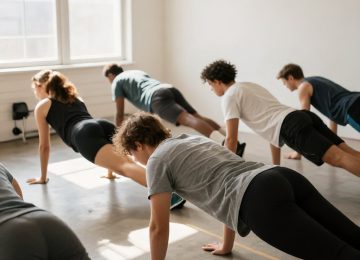
Incorporating deep squats performed on a bench and elevated plank exercises into your fitness training can dramatically enhance lower body strength, core stability, and overall functional fitness, providing a challenging yet accessible way to build a robust physique.

Deep Squats on a Bench: Building Powerful Legs and Glutes
The deep squat on a bench is a fantastic exercise for anyone looking to seriously level up their lower body workout. It’s a variation of the traditional squat that uses a weight bench or a sturdy box as a target, ensuring you hit a consistent, deep range of motion every single time. This method forces you to control the movement through its full extent, engaging more muscle fibers and promoting greater strength gains than shallower squats might.
This exercise is a staple in many advanced workout routines, but it’s also incredibly beneficial for those working on their squat form. By using a bench, you get immediate feedback on your depth, which helps in developing the proprioception needed for unassisted deep squats. It’s an excellent way to build confidence and strength simultaneously.
Why Deep Squats on a Bench Are a Game-Changer for Your Lower Body
There are several compelling reasons to add this specific squat exercise to your regular exercise routine. It’s more than just a squat; it’s a targeted strength training movement that yields significant results.
- Enhanced Range of Motion: The primary benefit is achieving a true deep squat. Going below parallel activates the glutes and hamstrings more effectively, leading to greater muscle development and improved flexibility in the hips and ankles.
- Increased Muscle Activation: Deeper squats mean more work for your quads, glutes, and even your adductors. This comprehensive muscle engagement helps sculpt and strengthen your entire lower body.
- Improved Mobility and Flexibility: Regularly performing deep squats can significantly improve hip and ankle mobility, which is crucial for everyday movements and preventing injuries. It encourages your joints to move through their full, natural range.
- Better Proprioception and Balance: The controlled descent and ascent required for a deep squat on a bench sharpen your body awareness and balance, skills that translate into better performance in other physical activities.
- Foundation for Advanced Lifts: Mastering the deep squat with bodyweight prepares your body for heavier barbell squats and other complex strength training movements, making it an invaluable part of your fitness journey.
How to Master the Deep Squat on a Bench
Proper exercise technique is paramount to getting the most out of this movement and avoiding injury. Pay close attention to each step for an effective and safe execution.
-
Set Up Your Bench: Position a sturdy weight bench or a box behind you. Make sure it’s stable and won’t slide. You want to be able to sit down on it comfortably without it moving.
-
Find Your Stance: Stand facing away from the bench with your feet roughly shoulder-width apart, toes pointed slightly outward (about 10-30 degrees, depending on your natural squat mechanics). Imagine you’re about to sit in a chair.
-
Initiate the Descent: Begin the squat by pushing your hips back as if reaching for the bench. Simultaneously, bend your knees, keeping them tracking in line with your toes. Your chest should remain upright, and your gaze forward.
-
Control Your Movement: Lower yourself slowly and with control until your glutes gently make contact with the bench. It’s not about plopping down; it’s a controlled touch. Maintain tension in your muscles even at the bottom.
-
Maintain Form at the Bottom: When you touch the bench, ensure your back is straight, not rounded. Your core should be engaged, and your knees should still be pushed out, not caving inward.
-
Drive Up: Push through your heels and the midfoot to drive back up to the starting position. Squeeze your glutes at the top, fully extending your hips and knees. Avoid locking your knees forcefully.
-
Breathing: Inhale on the way down, exhale forcefully on the way up. This helps stabilize your core.
Common Mistakes to Avoid
- Rounding Your Back: This puts undue stress on your spine. Keep your chest up and core tight throughout the movement.
- Knees Caving In: Actively push your knees out, ensuring they track over your toes. This protects your knee joints and engages your glutes properly.
- Not Going Deep Enough: The whole point is to hit the bench. Don’t stop short; control your descent all the way down.
- Using Momentum: Avoid bouncing off the bench. The contact should be light and controlled, maintaining muscle tension.
Once you’ve mastered the bodyweight version, you can progress this weight bench workout by holding a dumbbell or kettlebell against your chest for added resistance, transforming it into a more advanced workout.
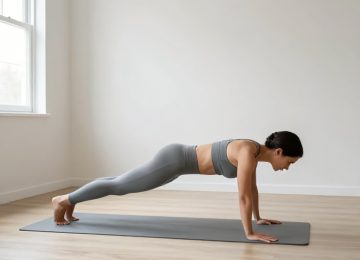
Elevated Plank Exercises: Sculpting a Rock-Solid Core
The plank is a cornerstone of core strength, but the elevated plank takes this foundational exercise to a new level. By raising either your hands or your feet on gym equipment like a weight bench, you increase the challenge to your core muscles, forcing them to work harder against gravity to maintain stability. This variation is a fantastic way to intensify your plank position and build exceptional core stability.
Whether you’re performing a full body workout or focusing specifically on core strength, the elevated plank demands more from your entire body. It’s not just about holding still; it’s about creating tension from head to toe, making it a highly effective exercise demonstration of control and strength.
The Unmatched Benefits of Elevated Planks
Integrating elevated planks into your fitness training offers a host of advantages beyond a standard plank, making them a powerful addition to any exercise routine.
- Increased Core Engagement: Elevating one end of your body shifts your center of gravity, requiring your abdominal muscles, obliques, and lower back to work significantly harder to keep your body in a straight line. This leads to greater core strength development.
- Enhanced Stability Challenge: The instability created by the elevation forces smaller, stabilizing muscles to activate, improving overall core stability and control. This is crucial for functional fitness and injury prevention.
- Greater Full Body Tension: An elevated plank demands tension throughout your entire body – from your shoulders and arms (if hands are elevated) or legs and glutes (if feet are elevated) down to your core. This holistic engagement builds comprehensive strength.
- Improved Posture: A strong core is the foundation of good posture. Regularly performing elevated planks helps strengthen the muscles that support your spine, leading to a more upright and confident stance.
- Progression for Advanced Core Work: Once you can hold a standard plank with ease, the elevated plank provides a natural and effective progression, preparing you for even more challenging core exercises.
How to Perform an Elevated Plank (Hands Elevated)
This variation is often a good starting point for elevated planks, placing less strain on the wrists and shoulders than a floor plank while still increasing core demand.
-
Set Up Your Surface: Place your hands shoulder-width apart on a sturdy, elevated surface like a weight bench, a plyo box, or even a sturdy chair. Ensure the surface is stable and won’t move.
-
Assume Plank Position: Step your feet back until your body forms a straight line from your head to your heels. Your hands should be directly beneath your shoulders.
-
Engage Your Core: Brace your abdominal muscles tightly, as if preparing for a punch. Squeeze your glutes and quads to maintain a rigid body. Avoid letting your hips sag or pike up towards the ceiling.
-
Maintain Alignment: Keep your neck in a neutral position, looking slightly down or straight ahead. Your shoulders should be pulled down and back, away from your ears.
-
Hold: Maintain this strong, straight line for your desired duration. Focus on breathing deeply and consistently.
How to Perform an Elevated Plank (Feet Elevated)
This version is generally more challenging, as it significantly increases the load on your shoulders, arms, and core. It’s a true test of core strength and stability.
-
Set Up Your Surface: Place your feet, either the tops of your feet or your toes, on a sturdy elevated surface like a weight bench or box. The higher the elevation, the more challenging the exercise.
-
Assume Plank Position: Place your hands shoulder-width apart on the floor directly beneath your shoulders. Step your hands out until your body forms a straight line from your head to your heels.
-
Engage Your Core: Actively pull your belly button towards your spine, bracing your entire core. Squeeze your glutes and quads to create full body tension and prevent your hips from sagging or rising too high.
-
Maintain Alignment: Keep your head in line with your spine, looking down at the floor. Your shoulders should be stable and strong, supporting your body weight.
-
Hold: Hold this challenging plank position for your target time, focusing on controlled breathing and maintaining perfect form.
Common Mistakes to Avoid in Elevated Planks
- Sagging Hips: Letting your hips drop towards the floor indicates a weak core engagement and can strain your lower back.
- Piking Hips: Raising your hips too high reduces the core challenge. Keep that straight line.
- Rounded Shoulders: Keep your shoulders engaged and stable, not allowing them to round forward.
- Holding Your Breath: Consistent, controlled breathing is essential for maintaining core tension and endurance.
Integrating These Exercises into Your Modern Fitness Routine
Both the deep squat on a bench and the elevated plank are versatile bodyweight exercises that can be seamlessly incorporated into various fitness training programs. Whether you’re at a gym workout in a fitness facility or working out at home with minimal gym equipment, these movements offer significant benefits.
For a well-rounded exercise routine, consider performing these exercises 2-3 times per week, allowing for adequate rest and recovery. You might include them on a lower body focused day, a core-specific day, or as part of a comprehensive full body workout.
A sample approach could look like this:
- Warm-up: 5-10 minutes of light cardio and dynamic stretches.
- Deep Squats on a Bench: 3 sets of 10-15 repetitions. Focus on controlled movement and full depth.
- Elevated Planks (Hands or Feet): 3 sets, holding for 30-60 seconds each, depending on your current core strength.
- Other Exercises: Complement these with upper body pushing/pulling movements and other leg exercises.
- Cool-down: 5-10 minutes of static stretching, particularly for the hips, hamstrings, and core.
Remember that consistency and proper exercise technique are far more important than the number of reps or how long you hold a plank. As you grow stronger, you can increase the duration of your plank holds, add resistance to your squats, or explore more challenging plank variations like single-arm or single-leg elevated planks.
Important Safety and Performance Considerations
To ensure a safe and effective workout, always keep these points in mind when performing physical activity, especially with advanced workout techniques.
- Listen to Your Body: If you feel any sharp pain, stop the exercise immediately. Soreness is normal; pain is a warning sign.
- Prioritize Form: Never sacrifice good form for more repetitions or a longer hold. Incorrect exercise technique can lead to injury. If your form breaks down, it’s time to rest.
- Start Gradually: If you’re new to these exercises, begin with a shallower squat or a lower elevation for your plank. Progress slowly as your strength and stability improve.
- Stay Hydrated: Drink plenty of water before, during, and after your workout to support muscle function and overall health.
- Wear Appropriate Gear: Comfortable athletic wear and supportive workout gear, including proper footwear, can make a big difference in your performance and comfort during physical activity at the health club or gym.
- Consult a Professional: If you have any pre-existing conditions or concerns, it’s always wise to consult with a doctor or a certified fitness professional before starting a new exercise routine. They can provide personalized guidance and an exercise demonstration tailored to your needs.
These exercises, when performed correctly and consistently, will significantly contribute to a stronger, more stable, and more capable body. They are excellent tools for anyone committed to improving their physical fitness and embracing a more active lifestyle.