Benefits of Home Core Workouts for Stability and Injury Prevention

Strong core muscles are fundamental for almost every movement you make, offering stability, preventing injury, and improving posture, making a consistent home core workout an incredibly valuable part of any young person’s fitness routine.

Why Core Strength Matters for Everyone

Many people associate core strength solely with visible abdominal muscles, but its importance extends far beyond aesthetics. Your core is the powerhouse of your body, encompassing not just your abs, but also your back muscles, pelvic floor, and diaphragm. It acts as a central link, connecting your upper and lower body and providing a stable foundation for nearly all physical activity.

A robust core supports your spine, significantly reducing the risk of lower back pain, a common complaint even among young individuals. It improves balance and coordination, which is essential for everything from walking and standing to participating in sports and everyday tasks. When your core is strong, movements become more efficient, requiring less effort and minimizing strain on other body parts. This foundational strength enhances athletic performance, whether you’re running, jumping, lifting, or performing complex movements.

Beyond injury prevention and performance, a well-conditioned core contributes to better posture. It helps you stand taller and sit straighter, which can alleviate tension in the neck and shoulders, especially for those who spend a lot of time at desks or looking at screens. Developing this core strengthening early in life sets a positive trajectory for long-term health and fitness, fostering an active lifestyle and overall wellness activity that benefits you for years to come.

Setting Up Your Personal Training Space at Home

One of the best aspects of a home core workout is how little equipment you actually need. You don’t require a fancy home gym setup to achieve effective results. The primary requirement is simply a dedicated, clear space where you can move freely without bumping into furniture or tripping over objects. Even a small corner of a room can suffice for your fitness session.

The most important piece of equipment for any indoor workout, particularly core exercises performed on the floor, is a good exercise mat. A quality mat provides cushioning for your spine and joints, making exercises performed in a supine position or on your elbows much more comfortable. It also offers a non-slip surface, which is vital for maintaining stability and preventing accidental slips during dynamic movements. Look for a mat that is thick enough to provide adequate padding but not so soft that it compromises your balance.

Beyond the mat, consider your workout attire. Comfortable athletic wear that allows for a full range of motion is ideal. Loose-fitting clothes or stretchy fabrics are perfect, ensuring nothing restricts your movement or causes discomfort. While shoes aren’t always necessary for mat-based core work, especially if you prefer to feel the ground with your feet, ensure you have a stable, non-slip surface if you choose to go barefoot. Having a water bottle nearby is also a smart idea to stay hydrated throughout your core engagement.

Essential Core Exercises for a Stronger You

Building a powerful core involves a variety of movements that target different abdominal and back muscles. These bodyweight exercise options are perfect for an at-home fitness regimen, requiring no special equipment beyond your exercise mat.
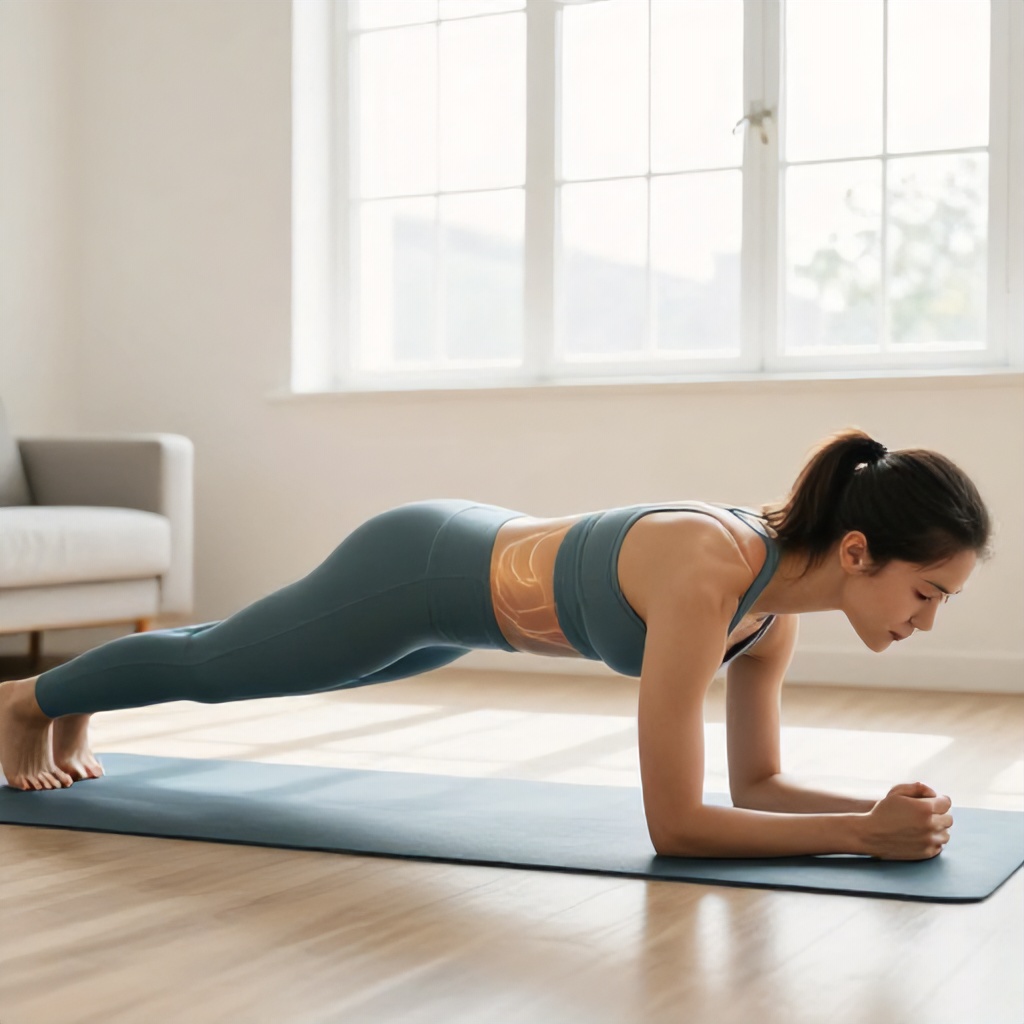
1. The Plank

The plank is a cornerstone of core strengthening, engaging almost every muscle in your torso. It’s an isometric exercise, meaning you hold a static position, which builds incredible endurance and stability. To perform a plank, start in a push-up position, then lower down onto your forearms. Your elbows should be directly beneath your shoulders, and your body should form a straight line from your head to your heels. Avoid letting your hips sag or rise too high. Pull your belly button towards your spine, actively engaging your core muscles. Hold this position for as long as you can maintain perfect form, aiming for 30 seconds to a minute initially, gradually increasing your hold time as you get stronger. This exercise participant targets the entire abdominal wall, lower back, and even shoulders and glutes.

2. Abdominal Crunches

The classic abdominal crunch effectively targets the rectus abdominis, the muscle responsible for the “six-pack” look. Lie on your back in a supine position on your exercise mat with your knees bent and feet flat on the floor, hip-width apart. Place your hands lightly behind your head, or cross them over your chest. Engage your core, then slowly lift your head, neck, and shoulders off the mat, curling your upper body towards your knees. Focus on using your abdominal muscles to lift, rather than pulling with your neck. Exhale as you lift and inhale as you slowly lower back down. Perform 10-15 repetitions, focusing on controlled movement rather than speed. This bent-knee exercise is a fundamental movement for torso engagement.

3. Bicycle Crunches

Bicycle crunches are a dynamic exercise that targets both the rectus abdominis and the obliques, the muscles on the sides of your torso. Lie on your back with your knees bent and feet off the floor, as if you’re about to pedal a bicycle. Place your hands lightly behind your head. Bring your right elbow towards your left knee while simultaneously extending your right leg straight. Then, switch sides, bringing your left elbow towards your right knee as you extend your left leg. Keep your lower back pressed into the mat throughout the movement, focusing on a controlled trunk rotation. This oblique crunch variation is excellent for rotational core strength and coordination. Aim for 10-15 repetitions on each side.

4. Leg Raises

Leg raises are fantastic for targeting the lower abdominal muscles. Lie flat on your back on your mat, with your legs extended straight. You can place your hands under your lower back for support if needed, or keep them by your sides. Keeping your legs straight (a slight bend in the knee is okay if your hamstrings are tight), slowly lift them towards the ceiling until they are perpendicular to the floor, or as high as you can go without arching your lower back. Control the movement as you slowly lower your legs back down, stopping just before they touch the mat to maintain core engagement. Avoid letting your back arch off the floor. Perform 10-15 slow and controlled repetitions.

5. Bird-Dog

The bird-dog exercise is excellent for improving core stability, balance, and coordination, while also strengthening the lower back. Start on your hands and knees in a tabletop position, with your wrists directly under your shoulders and knees directly under your hips. Keep your back flat and your core tight. Slowly extend your right arm straight forward and your left leg straight back simultaneously, maintaining a stable torso. Imagine a straight line from your extended hand to your extended foot. Hold for a moment, then slowly return to the starting position. Alternate sides, extending your left arm and right leg. Perform 8-12 repetitions on each side, focusing on slow, controlled movements and minimal rocking of your body.

6. Russian Twists

Russian twists are another effective exercise for targeting the obliques and improving rotational strength. Sit on your mat with your knees bent and feet flat on the floor. Lean back slightly, keeping your back straight and your core engaged. Lift your feet off the floor, balancing on your sit bones. You can keep your hands clasped in front of your chest or hold a light weight (like a water bottle) for added resistance. Twist your torso from side to side, bringing your hands or the weight towards the mat on each side. Keep the movement controlled and focus on rotating from your core, not just your arms. Aim for 10-15 twists on each side, ensuring your spine remains elongated throughout the trunk rotation.

7. Side Plank

The side plank is a powerful exercise for strengthening the oblique muscles and improving lateral core stability. Lie on your side on your mat, with your forearm on the floor directly beneath your shoulder. Stack your feet one on top of the other, or place your top foot slightly in front of the bottom one for more stability. Lift your hips off the floor, forming a straight line from your head to your heels. Engage your core and glutes, ensuring your hips don’t sag. Hold this position for 20-45 seconds, then switch to the other side. This exercise requires significant torso engagement and builds strength that protects your spine from side-to-side forces.

Building Your At-Home Fitness Routine

Consistency is key when it comes to any fitness routine. For core strengthening, aim to perform these abdominal exercises 3-4 times per week, allowing a day of rest in between sessions for muscle recovery. You don’t need to do every exercise every time; you can pick 3-5 exercises and perform 2-3 sets of each.

Always start your fitness session with a brief warm-up, like marching in place or gentle arm circles, to prepare your muscles. Conclude with a cool-down, including some light stretching for your abs and back. Listen to your body and never push through sharp pain. Proper form is always more important than the number of repetitions you complete. As you get stronger, you can increase the number of sets, repetitions, or the duration of your holds.

Common Mistakes to Avoid During Your Core Workout

Even with simple bodyweight exercises, it’s easy to fall into common traps that can reduce effectiveness or even lead to injury. Being aware of these pitfalls will help you maximize your home core workout.

  • Rushing Through Movements: Speed often compromises form. Slow, controlled movements ensure your muscles are doing the work, not momentum.
  • Holding Your Breath: Remember to breathe deeply and consistently throughout each exercise. Exhale on the exertion phase and inhale on the release. Holding your breath can raise blood pressure and reduce core engagement.
  • Arching Your Lower Back: This is a very common mistake, especially in exercises like leg raises or planks. An arched back indicates your core isn’t fully engaged, putting strain on your spine. Always aim to keep your lower back pressed towards the mat or maintain a neutral spine.
  • Pulling on Your Neck: During crunches or bicycle crunches, avoid pulling your head forward with your hands. Your hands are there for support, not to lift your head. Focus on lifting with your abdominal muscles.
  • Neglecting Full Core Engagement: It’s not just about moving. Actively think about “bracing” your core, as if preparing for a punch to the stomach. This ensures deep muscle activation.
  • Overdoing It: More isn’t always better. Overtraining can lead to fatigue, poor form, and injury. Stick to your planned sets and reps, and allow for rest days.

Progression and Consistency for Lasting Results

As you become stronger, the exercises that once challenged you will start to feel easier. This is a sign of progress, and it’s also your cue to introduce new challenges to continue building strength. There are several ways to progress your home core workout.

You can increase the duration of holds for isometric exercises like planks and side planks. For dynamic movements like crunches or leg raises, you can increase the number of repetitions or add more sets. Another excellent method is to introduce variations of the exercises. For example, once regular planks are easy, try plank jacks or planks with hip dips. For crunches, you might move to decline crunches if you have an appropriate setup, or add a small weight to your chest. Leg raises can become even more challenging by performing them with perfectly straight legs, or by slowing down the lowering phase even further.

The most important factor, however, is consistency. Showing up for your personal training space sessions, even on days when you don’t feel entirely motivated, is what builds lasting strength and an active lifestyle. Small, regular efforts accumulate into significant gains over time. Don’t get discouraged by slow progress; every wellness activity session contributes to your overall health and fitness journey.

Tips for Staying Motivated with Your Core Routine

Maintaining motivation for any physical activity can be tough, but a few simple strategies can keep you engaged with your home core workout.

  • Set Realistic Goals: Instead of aiming for a “six-pack in a week,” focus on achievable goals like “hold a plank for 60 seconds” or “complete 3 core sessions this week.”
  • Track Your Progress: Keep a simple journal or use a fitness app to log your exercises, reps, sets, and hold times. Seeing your improvements over time is a powerful motivator.
  • Vary Your Exercises: Don’t stick to the exact same routine every time. Introduce new core exercises from time to time to keep things fresh and challenge your muscles in different ways.
  • Create a Positive Environment: Put on your favorite upbeat music, ensure your personal training space is tidy, and wear comfortable workout attire. A pleasant environment makes you more likely to start.
  • Focus on How You Feel: Remember the non-aesthetic benefits of core strength: better posture, less back pain, improved balance, and enhanced overall physical activity. These internal rewards can be more motivating than external appearances.

Minimalist Inspirational Quote Designs Boost Daily Motivation and Wellness

Minimalist Inspirational Quote Design for Daily Motivation and Wellness

Simple, elegant quote designs can powerfully boost your daily motivation and support your mental health wellness, transforming your living space into a sanctuary of positivity.

The Power of Visual Motivation

We often think of inspiration as something we hear or read, but what we see has a profound impact too. Minimalist inspirational quote design leverages the power of visual communication to create a constant, gentle reminder of your goals and values. It’s not about overwhelming your space with clutter; it’s about strategic placement of art that speaks to your soul.

Think about your environment. Does it energize you, or does it drain you? A well-chosen piece of motivational wall art, featuring a powerful quote in a clean design layout, can shift the entire mood of a room. It acts as a visual anchor, grounding you when you feel adrift and propelling you forward when you need a nudge.

This approach to decor is deeply connected to daily wellness inspiration. By surrounding yourself with messages that resonate, you’re actively cultivating a positive mindset. It’s a form of self-care, a way to infuse your everyday life with intention and encouragement. The minimalist aesthetic, with its emphasis on simplicity and intentionality, is perfectly suited for this purpose. It strips away the noise, allowing the message itself to shine through.

Understanding Minimalist Typography

At the heart of effective minimalist quote design lies typography. It’s not just about choosing a font; it’s about selecting lettering that enhances the message and contributes to the overall aesthetic. The goal is clarity and impact, without unnecessary embellishment.

Serif vs. Sans-Serif: Making the Right Choice

When you’re exploring typography trends, you’ll encounter two main categories: serif and sans-serif fonts. Serif fonts have small decorative strokes, or “feet,” at the ends of the letters. Think of classic fonts like Times New Roman or Garamond. They often convey a sense of tradition, authority, and elegance. For inspirational messaging, a serif font can lend a timeless quality to a quote, making it feel more profound and enduring.

Sans-serif fonts, on the other hand, are clean and modern, lacking those decorative strokes. Popular examples include Arial, Helvetica, and Open Sans. They are known for their readability and contemporary feel. In a minimalist graphic style, sans-serif lettering is often a go-to choice because it aligns perfectly with the clean design layout and uncluttered aesthetic. It feels direct and approachable.

Serif Font Pairing for Balance

Sometimes, the most compelling designs come from pairing different typographic styles. A beautiful serif font pairing can create visual interest and hierarchy. For instance, you might use a bold, elegant serif for the main quote and a lighter, simpler sans-serif for a secondary phrase or the author’s name. This contrast adds depth without sacrificing the minimalist aesthetic. The key is to ensure the fonts complement each other and don’t compete for attention. The overall graphic design composition should feel harmonious and balanced.

Consider the mood you want to evoke. A quote about resilience might benefit from a strong, grounded serif. A quote about creativity might feel more dynamic with a sleek sans-serif. The chosen typography is a critical element in conveying the intended emotion and message. It’s a form of visual communication that speaks volumes.

Crafting Your Aesthetic Quote Design

Creating your own minimalist inspirational quote design or selecting pre-made digital art prints involves a few key considerations. It’s about more than just the words; it’s about the visual presentation that makes those words resonate.

Choosing the Right Quote

The foundation of any inspirational piece is the quote itself. What messages do you need to hear most often? Are you looking for affirmations to boost confidence, reminders of gratitude, or calls to action for personal growth? Think about your daily wellness journey and what themes are most relevant to you right now. Positive affirmations are powerful tools for mental health wellness, and a well-designed quote can make them even more impactful.

Consider quotes that are:

  • Concise and memorable
  • Action-oriented or empowering
  • Reflective of your personal values
  • Universally relatable

Color Palette and Backgrounds

Minimalism often embraces a restrained color palette. This doesn’t mean boring, though! Soft, muted tones can be incredibly calming and sophisticated. A peach color palette, for example, can evoke warmth, creativity, and gentle optimism. Think blush pinks, soft oranges, and creamy neutrals. These colors create a soothing backdrop that allows the typography and the message to take center stage.

White space is your best friend in minimalist design. Don’t be afraid to let the background breathe. A clean white, off-white, or a very subtle gradient can make the text pop without feeling overwhelming. For a touch of sophistication, consider a textured background that mimics linen or watercolor, but keep it subtle.

Layout and Composition

Graphic design composition is key to a successful minimalist piece. The arrangement of elements—the text, any subtle graphic accents, and the negative space—determines its visual appeal. A common approach is centering the text, but asymmetrical layouts can also be very effective and modern.

When thinking about layout, ask yourself:

  • Is the text easy to read at a glance?
  • Does the arrangement feel balanced and intentional?
  • Is there enough white space to prevent the design from feeling cramped?

For motivational decor, the scale of the artwork matters. A large statement piece can anchor a room, while a series of smaller prints can create a gallery wall effect. The clean design layout ensures that even a large piece remains sophisticated and not overwhelming.

Integrating Minimalist Quotes into Your Space

Once you have your designs, the next step is to strategically place them to maximize their motivational impact. This is where the “lifestyle” aspect truly comes into play.

Where to Display Your Motivational Decor

Think about the moments in your day when you might need a little boost. Your workspace is an obvious choice. A framed quote above your desk can serve as a constant reminder of your purpose and drive. If you work from home, this is especially important for separating work life from personal life and maintaining focus.

The bedroom is another powerful location. Waking up to an uplifting message can set a positive tone for the entire day. Similarly, a quote by your bedside can offer comfort and inspiration before sleep. Consider your entryway or hallway – a welcoming and motivating message as you leave or return home can make a significant difference.

Even the kitchen or bathroom can be spaces for subtle inspiration. A small framed print on a shelf or a waterproof print in the bathroom can add a touch of personality and positivity to everyday routines.

Creating a Gallery Wall of Inspiration

A minimalist gallery wall doesn’t mean a chaotic collection of busy images. Instead, it’s a curated selection of pieces that work together harmoniously. You can mix and match quotes, perhaps with a few abstract minimalist prints or simple line art. The key is consistency in your framing and color palette.

To create a cohesive gallery wall:

  1. Choose a theme or a set of related quotes.
  2. Select frames that are all the same style and color (e.g., all thin black frames, all natural wood frames).
  3. Vary the sizes of the prints slightly, but maintain a consistent aesthetic.
  4. Plan the layout on the floor before hanging to ensure balance.

This approach to motivational decor turns a blank wall into a personalized source of strength and beauty.

Beyond the Wall: Digital and Everyday Inspiration

Minimalist inspirational quote design isn’t limited to physical prints. Digital art prints offer incredible flexibility and accessibility, allowing you to refresh your surroundings with ease.

Digital Art Prints for Modern Living

Digital art prints are perfect for those who love to change their decor frequently or who prefer a tech-forward approach. You can download a file and print it at home, at a local print shop, or even upload it to an online printing service for canvas or framed prints. This makes it easy to experiment with different quotes and designs without a significant investment.

Many artists offer beautiful minimalist designs that you can use as your phone wallpaper, computer background, or even incorporate into digital planners. This provides constant visual motivation throughout your day, wherever you are.

Incorporating Quotes into Your Daily Routine

Think beyond just hanging art. You can integrate inspirational messaging into your daily wellness practices in myriad ways.

  • Write a favorite quote on a sticky note and place it on your mirror.
  • Use a quote as the daily prompt for your journal.
  • Create a digital vision board with inspiring images and quotes.
  • Add a short, powerful quote to your to-do list app.

These small acts can reinforce positive thinking and keep your goals top of mind. The beauty of minimalist design is that it’s subtle; it doesn’t demand attention but rather offers a gentle, consistent presence that supports your mental health wellness. It’s about creating an environment that nurtures your spirit and fuels your journey.

Mental Health Benefits of Morning Nature Photography and Creative Observation

The Mental Health Benefits of Morning Nature Photography

Engaging with nature through a camera lens before the day begins lowers cortisol levels and sharpens your focus. This practice combines the physiological benefits of early morning light with the cognitive demands of creative observation. When you step outside to capture botanical photography, you move from a state of passive observation to active engagement. The brain shifts away from ruminative thought patterns, focusing instead on the immediate technical and aesthetic requirements of capturing natural beauty.

Morning wellness routines often focus on movement or meditation, but photography adds a layer of visual mindfulness. By framing a shot, you force your eyes to scan for details like texture, color, and light. This process, known as soft fascination, allows your attention to rest on the environment without the drain of directed concentration. It is a quiet, deliberate way to reset your nervous system before the pressures of the day take hold.

Establishing a Mindful Morning Ritual

Consistency matters more than technical perfection when using nature therapy for mental well-being. You do not need a professional camera to reap these rewards. A smartphone is often enough to capture the soft lighting of dawn and the delicate details of local flora. The goal is to spend twenty minutes outside, moving slowly through your yard or a nearby park.

Practical Steps for Your First Outing

  1. Set your alarm for fifteen minutes before sunrise to catch the most forgiving light.
  2. Leave your phone on airplane mode to prevent distractions from incoming notifications.
  3. Walk without a destination, allowing your curiosity to dictate your path.
  4. Pause at the first plant or landscape feature that catches your eye.
  5. Take three deep breaths before you even lift your camera to your eye.

The soft lighting found during the golden hour reduces harsh shadows and creates a sense of visual tranquility. This environment is ideal for practicing patience. If a flower is swaying in the breeze, wait for it to settle. This act of waiting is a form of meditation in itself. It teaches you to accept the rhythm of the natural world rather than trying to force your own pace upon it.

Techniques for Capturing Environmental Harmony

Composition is the bridge between seeing and feeling. When you look through the viewfinder, you are making choices about what to include and what to leave out. This process mirrors the way we manage our mental space. By choosing to frame a single spring tulip against a blurred background, you are effectively decluttering your mental field of view.

Refining Your Visual Approach

  • Use a low-angle perspective to make small plants feel like grand subjects.
  • Look for patterns in leaves or petals to create a sense of order and balance.
  • Focus on the space around the subject to emphasize the feeling of environmental harmony.
  • Experiment with macro settings to highlight the intricate textures of vibrant flora.

Landscape composition does not have to be complex to be effective. Rely on the rule of thirds by placing your subject slightly off-center to create a more dynamic image. This technique provides a sense of movement and depth. When you focus on the details of a garden, you are engaging in a form of sensory grounding. You notice the dew on the grass, the temperature of the air, and the specific shades of green that exist in the morning light.

The Connection Between Photography and Emotional Upliftment

Nature-inspired serenity is not just a temporary feeling. It is a cumulative practice that builds emotional resilience over time. Reviewing the images you have captured acts as a journal of your personal growth. When you look back at your gallery, you are reminded of the moments of stillness you carved out for yourself. This visual record serves as a tangible reminder that you can find peace even in the middle of a busy week.

Building a Habit of Reflection

After you return indoors, spend five minutes reviewing your photos. Do not judge the quality of the image. Instead, ask yourself why you chose to photograph that specific subject. Did the color bring you joy? Was the symmetry calming? This simple act of reflection bridges the gap between the outdoor experience and your internal state.

Avoid the temptation to edit your photos immediately. The goal is to capture the essence of the moment, not to create a polished product for social media. If you feel the urge to share your work, do so with the intention of spreading beauty rather than seeking validation. The primary beneficiary of this practice should always be you.

Safe and Sustainable Practices

To keep this practice sustainable, keep your gear simple. Carrying heavy equipment can create physical tension that detracts from the experience. If you find yourself getting frustrated by settings or lighting, stop and put the camera down. The photography is a tool for wellness, not a source of stress. If the process starts to feel like a chore, switch to a simple walk without the camera for a few days.

Respect the environment you are documenting. Stay on marked paths to protect delicate ground cover and avoid disturbing local wildlife. When you practice floral aesthetics in public spaces, leave the area exactly as you found it. This respect for nature deepens your connection to the ecosystem and reinforces the idea that you are a visitor in a shared, living space.

Integrating Nature Therapy into Your Lifestyle

Mental well-being is not a destination but a series of small, intentional choices. By dedicating time to morning photography, you are prioritizing your own peace. The benefits extend beyond the time you spend outside. You will likely find that your ability to concentrate on tasks improves throughout the day. You may also notice that you become more observant of the small, beautiful details in your everyday life, even when you do not have a camera in your hand.

Start small. Even a ten-minute session on your balcony or in a small corner of your garden can provide the necessary reset. The key is to be present. When you focus on the vibrant flora, you are giving your brain a break from the analytical, problem-solving mode that dominates most of our waking hours. This is the essence of nature therapy: a gentle, consistent return to the present moment through the lens of appreciation.

As you continue this practice, you will develop a unique visual language. You might find that you are drawn to specific types of light or certain patterns in nature. This is a reflection of your own internal preferences and a sign of your developing mindfulness. Trust your instincts. If a particular scene brings you a sense of calm, that is the right subject for you. Nature is a vast resource for emotional upliftment, and your camera is simply the key to unlocking that potential in a way that is personal, creative, and profoundly grounding.

8 Gentle Yoga Poses to Reduce Stress and Calm Inflammation

Gentle Yoga for a Stronger You: Poses to Ease Stress and Inflammation

Calm inflammation and reduce stress with these gentle immune-boosting yoga poses.

It feels like everyone is catching a bug these days, doesn’t it? And when you add the pressure of daily life to that, it can make you feel even more vulnerable to getting sick. Stress has a way of weakening your immune system and actually ramping up chronic inflammation in your body. That’s a double whammy for your well-being. But here’s the good news: yoga can be a fantastic ally in keeping your immune system humming along nicely. Seriously, a look at 15 different studies revealed that a regular yoga practice can give your immunity a significant boost by tackling both stress and inflammation. And if you’re already feeling under the weather, yoga can even help by lowering those inflammatory markers in your system.

Sidebar: 8 Yoga Poses to Reduce Inflammation and Boost Immunity

Calm inflammation and reduce stress with these gentle immune-boosting yoga poses. As if it isn’t bad enough that every other person you know is catching a bug, adding stress to the mix can make you even more susceptible to getting sick. Stress can actually weaken your immune system and increase chronic inflammation. ( 1 ) Fortunately, yoga can help keep your immune system in tip-top shape. A review of 15 studies showed that yoga can boost immunity by both reducing stress and decreasing inflammation in the body. Yoga can also be beneficial

To truly reap the consistent immune-boosting benefits, a regular yoga practice is key. Aim to practice these yoga poses daily. Before you begin, make sure you have a comfortable yoga mat and perhaps a bolster or a long pillow handy for extra support.

Why Yoga Works Wonders

Think of your body like a finely tuned instrument. When it’s out of tune, things can feel off. Stress causes a cascade of reactions in your body, often leading to increased inflammation. This isn’t just about feeling achy; chronic inflammation is linked to a whole host of health issues. Yoga, on the other hand, offers a powerful antidote. The combination of physical movement, deep breathing, and mindfulness helps to quiet the nervous system, signaling your body to relax. This shift from “fight or flight” to “rest and digest” mode is incredibly beneficial for reducing stress hormones like cortisol. Lower stress levels directly translate to a less inflamed body and a more robust immune system.

Beyond stress reduction, the physical practice of yoga also encourages better circulation. Improved blood flow means that oxygen and nutrients can reach your cells more efficiently, and waste products can be cleared away more effectively. This supports overall cellular health and can help to reduce the inflammatory processes that might be simmering beneath the surface. It’s a holistic approach to well-being, touching on physical health, mental clarity, and emotional balance.

Getting Started with Your Yoga Practice

Starting a yoga practice doesn’t need to be intimidating. The focus here is on gentle, restorative movements that anyone can do. You don’t need to be flexible or have years of experience. All you need is willingness and a little bit of space. Having a yoga mat provides a stable and comfortable surface, preventing slips and adding cushioning. A bolster or a long pillow can be a game-changer, offering support in poses and allowing you to relax more deeply into the stretches. This is about self-care, not performance.

Consistency is more important than intensity. Even a short, daily yoga session can make a significant difference over time. Think of it as a small investment in your overall health and resilience. You might also find that incorporating elements of mindfulness, like focusing on your breath, enhances the benefits of your yoga stretches.

8 Gentle Yoga Poses to Try

These poses are chosen for their ability to gently stretch the body, calm the mind, and support your immune system. Remember to listen to your body and modify poses as needed. The goal is to feel good, not to push yourself into pain.

Wide-Legged Forward Fold with Twist

This pose is wonderful for releasing tension in the hips and spine, while also providing a gentle twist that can aid digestion and detoxification. It’s a great way to unwind after a long day.

  1. Start standing sideways on your mat with your feet wide apart, about three to four feet, and your toes pointing straight ahead.
  2. Place your hands on your hips and gently engage your abdominal muscles.
  3. As you inhale, lengthen your spine. Then, exhale and begin to fold your torso forward from your hips.
  4. Bring your hands to the ground, placing them directly underneath your shoulders. You can bend your knees slightly if your hamstrings feel tight.
  5. Keep your right hand firmly planted on the ground. As you inhale, reach your left arm up towards the sky, opening your chest. Spread your fingers wide and aim to keep your hips level by imagining lifting your right hip up.
  6. Hold this twist for about 5 breaths, focusing on your breath and the gentle stretch.
  7. To release, exhale and bring your left hand back down to the ground.
  8. Inhale to rise halfway up, then switch sides. Place your left hand down, and inhale to lift your right arm towards the sky for 5 breaths.
  9. Exhale to release both hands to the ground and inhale to slowly rise back up to standing.

Plank Pose

Plank Pose might seem simple, but it’s a powerhouse for building core strength, which is essential for good posture and stability. It also engages your entire body, promoting circulation and a sense of grounding.

  1. Begin by getting into a high plank position. Your body should form a straight line from your head to your heels.
  2. Ensure your shoulders are stacked directly over your wrists. Spread your fingers wide to create a stable base.
  3. Lift your heels high, engaging your calf muscles. Keep your hips in line with your shoulders – avoid letting them sag or lift too high.
  4. Actively engage your abdominal muscles by drawing your navel towards your spine, and also engage your quadriceps (the muscles in the front of your thighs).
  5. Hold this strong pose for about 5 breaths, feeling the energy and stability it creates.
  6. To release, gently lower your knees to the mat.

Cobra Pose

Cobra Pose is a gentle backbend that helps to open the chest and shoulders, counteracting the effects of prolonged sitting or slouching. It can also stimulate the abdominal organs and improve respiratory health.

  1. Lie down on your belly on your yoga mat.
  2. Engage your abdominal muscles by gently drawing your navel up and in towards your spine. This protects your lower back.
  3. Bend your elbows and place your hands flat on the mat, positioned next to your ribs, with your fingertips pointing forward.
  4. Keep your thighs and the tops of your feet pressing into the mat.
  5. As you inhale, press gently into your palms and begin to lift your chest off the mat. Keep a slight bend in your elbows and actively squeeze your shoulder blades together, drawing them down your back.
  6. Your gaze should be slightly forward and down, keeping your neck long.
  7. Hold this pose for about 5 breaths, breathing into the expansion of your chest.
  8. To release, exhale and slowly lower your chest back down to the mat.

Low Lunge Prayer Twist

This pose is fantastic for improving hip flexibility and creating a deep twist that can help detoxify the body and stimulate digestion. It also builds strength in the legs and core.

  1. Start on your hands and knees in a tabletop position.
  2. Step your right foot forward between your hands, ensuring your knee is stacked directly over your ankle.
  3. As you inhale, lift your chest and lengthen your spine. Bring your palms together in a prayer position at the center of your chest and engage your abdominal muscles.
  4. On an exhale, begin to twist your torso to the right.
  5. If it feels accessible, you can hook your left tricep (the back of your upper left arm) on the outer right thigh. This deepens the twist.
  6. With each inhale, focus on lengthening your spine, creating space. With each exhale, gently twist a little deeper.
  7. Hold here for five to eight breaths, allowing the twist to work its magic.
  8. To release, bring your hands back to the mat and step your right foot back to tabletop.
  9. Repeat the pose on the other side, stepping your left foot forward and twisting to the left for five to eight breaths.

Dolphin Pose

Dolphin Pose is a wonderful inversion that strengthens the shoulders, arms, and core, while also providing a gentle stretch for the hamstrings and calves. It can help to calm the nervous system and improve circulation.

  1. Begin on your hands and knees in a tabletop position.
  2. Lower down onto your forearms, ensuring your elbows are directly beneath your shoulders and your forearms are parallel.
  3. Step your feet back, coming into a forearm plank position, with your body in a straight line from head to heels.
  4. Take an inhale to prepare. Then, exhale and begin to walk your feet towards your elbows as you lift your hips up and back towards the sky.
  5. Your body should resemble an inverted V shape. You can keep a slight bend in your knees if your hamstrings are tight.
  6. Focus on pressing actively through your forearms and palms, and drawing your shoulder blades away from your ears.
  7. Hold this pose for about 5 breaths, feeling the stretch and the strength building.
  8. To release, exhale and gently lower your hips back down to the mat.

Tree Pose

Tree Pose is a classic balancing pose that cultivates focus, stability, and a sense of groundedness. It’s excellent for improving balance and strengthening the ankles, legs, and core. It also encourages a sense of inner peace.

  1. Stand tall on your yoga mat with your feet together or hip-width apart.
  2. Shift your weight onto your left foot.
  3. Bring the sole of your right foot to your inner left ankle, calf, or inner thigh (avoid pressing directly on your knee joint).
  4. Bring your hands together in prayer position at your heart center.
  5. Find a steady point to focus your gaze on (a “drishti”) to help with balance.
  6. Engage your core muscles to help stabilize your body.
  7. Hold this pose for about 5 breaths, feeling the strength and balance you are cultivating.
  8. To release, gently lower your right foot back to the mat.
  9. Repeat on the other side, shifting your weight onto your right foot and bringing your left foot to your inner leg.

Tip: Don’t worry if you wobble in Tree Pose! It’s a natural part of the process. The goal is to find your balance, not to be perfectly still. You can always use a wall for support if needed.

Child’s Pose

Child’s Pose is a deeply restorative pose that offers a gentle stretch for the back, hips, and thighs. It’s a wonderful pose for calming the nervous system and promoting relaxation, making it perfect for stress reduction.

  1. Start on your hands and knees on your yoga mat.
  2. Bring your big toes to touch and widen your knees apart, as much as is comfortable for your hips.
  3. Exhale and sink your hips back towards your heels.
  4. Rest your torso down between your thighs.
  5. Extend your arms forward on the mat, or rest them alongside your body with your palms facing up.
  6. Rest your forehead on the mat.
  7. Allow your breath to deepen and your body to relax completely. Stay here for as long as you need, letting go of any tension.

Seated Forward Bend

This pose is a soothing way to stretch the hamstrings, spine, and shoulders. It’s also known for its calming effect on the brain, helping to reduce stress and anxiety.

  1. Sit on your yoga mat with your legs extended straight out in front of you.
  2. Flex your feet, drawing your toes towards your shins.
  3. Inhale and lengthen your spine, reaching the crown of your head towards the ceiling.
  4. As you exhale, hinge forward from your hips, keeping your back as straight as possible.
  5. Reach your hands towards your feet, shins, or the floor. If your hamstrings are tight, you can place a bolster or pillow under your knees.
  6. Allow your head and neck to relax.
  7. Hold for 5-10 breaths, breathing into the stretch.
  8. Inhale to slowly rise back up to a seated position.

Tip: If sitting with straight legs is uncomfortable, you can bend your knees slightly or sit on a folded blanket to elevate your hips. The key is to maintain a long spine as you fold forward.

Integrating Yoga into Your Life

Making yoga a consistent part of your routine is where the magic happens. It’s not about perfection; it’s about practice. Even 15-20 minutes a day can yield significant benefits for your immune system and overall well-being. Try to schedule your yoga practice at a time that works best for you, whether it’s first thing in the morning to set a calm tone for the day, or in the evening to unwind and prepare for restful sleep. Your stretching routine doesn’t have to be complicated; these simple poses can form the foundation of a beneficial yoga journey.

Consider exploring different styles of yoga as you progress. While these poses are gentle, there are many other forms of yoga that can offer varied benefits. The important thing is to find a practice that resonates with you and supports your health goals. Remember, physical activity, combined with mindfulness, is a powerful duo for holistic health. You might also find that complementing your yoga practice with mindful eating, such as following an AIP Meal Plan, further supports your body’s natural healing processes and reduces inflammation.

Important Note: Always consult with your healthcare provider before starting any new exercise program, especially if you have any underlying health conditions. Listen to your body and never push yourself into pain.

Turquoise Elastic Strap for Full Body Stretching and Fitness Improvement

The Turquoise Elastic Strap: Your Go-To for Full Body Fitness and Flexibility

This turquoise elastic strap is a surprisingly versatile piece of fitness equipment that can revolutionize your stretching and overall fitness routine, offering a simple yet effective way to improve flexibility, build strength, and aid in recovery.

Why a Turquoise Elastic Strap? It’s More Than Just a Pretty Color

Let’s be honest, the color turquoise is uplifting. But beyond its cheerful hue, this elastic resistance band is a powerhouse for your body conditioning goals. It’s lightweight, portable, and incredibly adaptable, making it the perfect workout accessory whether you’re at home, in the gym, or even on vacation. Forget bulky machines or complicated setups; this simple tool packs a serious punch for anyone looking to enhance their active lifestyle and embrace a more holistic approach to wellness.

Think of it as your personal trainer, always ready to assist. It’s an exercise strap that’s gentle enough for physical therapy and rehabilitation exercises, yet robust enough for serious strength training and muscle toning. This makes it a fantastic addition to any home gym setup, offering a wide range of possibilities for a comprehensive workout.

Unlocking Your Flexibility: Stretching Made Smarter

Full body stretching is fundamental for maintaining a healthy, mobile body. Tight muscles can lead to discomfort, reduced range of motion, and even injury. That’s where the turquoise resistance band truly shines. It acts as an extension of your own limbs, allowing you to deepen stretches safely and effectively.

For example, imagine trying to reach your toes in a hamstring stretch. If you can’t quite get there, looping the strap around your feet provides that extra bit of leverage. You can then gently pull, increasing the stretch in your hamstrings and calves without straining your back or forcing your body into an uncomfortable position. This makes it an invaluable stretching aid for individuals of all flexibility levels.

It’s also a fantastic tool for targeting specific muscle groups. Consider a shoulder stretch; instead of relying on doorframes or walls, you can use the strap to control the intensity and direction of the stretch, promoting better mobility exercises and reducing the risk of injury prevention.

Specific Stretches to Try with Your Turquoise Strap

  • Hamstring Stretch: Lie on your back, loop the strap around the ball of one foot, and gently pull your leg towards you, keeping it as straight as possible.
  • Quad Stretch: Standing or lying on your side, loop the strap around your ankle and gently pull your heel towards your glutes.
  • Chest Opener: Hold the strap with both hands, arms extended behind you, and gently lift your arms away from your body to open up your chest and shoulders.
  • Triceps Stretch: Reach one arm overhead, bend the elbow, and loop the strap around the back of your head. Use your other hand to gently pull the strap downwards, deepening the stretch.
  • Calf Stretch: Stand facing a wall, place the strap around the ball of one foot, and gently pull your toes towards you while keeping your heel on the ground.

Beyond Stretching: Strength and Toning with Elastic Resistance

This isn’t just a stretching aid; it’s a legitimate piece of fitness equipment for building strength and toning muscles. The elastic resistance provided by the band challenges your muscles in a way that free weights or bodyweight exercises might not. It engages stabilizer muscles, leading to more balanced and functional strength.

Think about exercises like bicep curls or shoulder presses. By looping the turquoise resistance band under your feet and holding the ends, you create resistance that works your muscles through the entire range of motion. This is excellent for muscle toning and can be a great addition to a Pilates band routine, offering a different kind of challenge compared to traditional Pilates equipment.

For those focusing on lower body strength, the strap can be used for exercises like leg abductions and adductions. Loop it around your ankles or thighs and perform controlled movements to target your glutes, hips, and inner and outer thighs. This makes it a fantastic workout gear for a comprehensive body workout.

Strength Training Applications

  • Bicep Curls: Stand on the strap, hold the ends, and curl your arms up towards your shoulders.
  • Triceps Extensions: Stand on the strap, hold the ends behind your head, and extend your arms upwards.
  • Squats: Loop the strap around your thighs just above your knees to activate your glutes more intensely during squats.
  • Glute Bridges: Place the strap around your thighs and push your hips up, squeezing your glutes at the top.
  • Lateral Walks: Loop the strap around your ankles or thighs and perform side steps to strengthen your hip abductors.

Rehabilitation and Recovery: A Gentle Helping Hand

The turquoise elastic strap is a valuable tool in physical therapy and rehabilitation exercises. Its controlled resistance allows individuals recovering from injuries to gradually regain strength and mobility without putting excessive stress on the affected areas. It’s a gentle way to reintroduce movement and build confidence in the healing process.

For example, after a shoulder injury, a physical therapist might use the strap to guide a patient through controlled arm movements, helping to restore range of motion and rebuild strength in a safe environment. Similarly, after a knee injury, the strap can be used for gentle leg exercises to improve quadriceps and hamstring strength, crucial for supporting the knee joint. It acts as a reliable recovery tool, supporting your journey back to full fitness.

Even for everyday aches and pains, incorporating gentle stretching with the strap can help alleviate muscle tension and improve circulation, contributing to overall wellness and preventing minor issues from becoming major problems. It’s a proactive approach to maintaining your body’s health.

Portability and Convenience: Fitness On the Go

One of the most significant advantages of this turquoise resistance band is its sheer portability. It’s incredibly lightweight and can be easily rolled up or folded to fit into a backpack, gym bag, or even a large pocket. This means you can take your workout with you wherever you go.

Traveling? No problem. Stuck in a hotel room? You’ve got a full-body workout at your fingertips. Want to get a quick stretch in during your lunch break at the office? The turquoise strap makes it possible. This convenience factor encourages consistency, which is key to achieving any fitness goal. It truly embodies the spirit of portable fitness.

Having this readily available encourages you to incorporate movement into your day, even when time is short or you’re away from your usual gym. It removes barriers and makes it easier to maintain an active lifestyle, no matter your circumstances.

Integrating the Turquoise Strap into Your Routine

Adding this versatile tool to your existing fitness routine is straightforward. You can use it as a warm-up to prepare your muscles for exercise, as a primary tool for a dedicated stretching or strength training session, or as a cool-down to aid in muscle recovery.

Consider dedicating a few minutes each morning to a gentle stretching routine using the strap to wake up your body. Or, incorporate it into your existing workout by adding resistance band exercises between sets of other exercises. Even a short, focused session a few times a week can yield significant results.

Experiment with different exercises and find what works best for you. The beauty of the turquoise elastic strap lies in its adaptability. It can be used for yoga poses to deepen stretches, for Pilates-inspired movements, or for general body conditioning. It’s a workout accessory that grows with you as your strength and flexibility improve.

Making the Most of Your Turquoise Elastic Strap

To get the most out of your turquoise resistance band, remember a few key points. Always start with lighter resistance or fewer repetitions and gradually increase as you get stronger. Focus on controlled movements rather than explosive ones, especially when using it for strength training. Proper form is paramount to avoid injury and maximize effectiveness.

Listen to your body. If you feel sharp pain, stop. The goal is to challenge your muscles and improve flexibility, not to cause harm. Regular use is more beneficial than infrequent, intense sessions. Consistency is your best friend when it comes to fitness.

Finally, don’t be afraid to get creative! There are countless exercises you can do with an elastic strap. Look for inspiration online, consult with a fitness professional, or simply experiment and discover new ways to use this fantastic fitness equipment. It’s a simple investment that offers a wealth of benefits for your body and your overall well-being.

Gentle Morning Yoga Stretches to Improve Flexibility and Reduce Stiffness

Starting your day with a gentle morning yoga stretch routine can significantly enhance your flexibility, setting a positive tone for hours ahead and easing stiffness that builds overnight.

Why Morning Yoga is a Game-Changer for Flexibility

Many people wake up feeling stiff, a natural result of hours spent in one position. A dedicated morning stretch routine helps to gently warm up your muscles, lubricate your joints, and increase blood flow throughout your body. This isn’t just about feeling less “creaky”; it’s about actively improving your range of motion over time.

Beyond the physical benefits, morning yoga offers a valuable mental reset. It provides a quiet moment before the day’s demands begin, allowing you to connect with your breath and body. This mindful practice can reduce stress, improve focus, and cultivate a sense of calm that carries you through your busy schedule. Consistency is often easier to achieve in the morning, before other commitments derail your plans.

Getting Started: Your Simple Setup

You don’t need much to begin a morning yoga practice. The beauty of these stretches is their accessibility.

  • A Yoga Mat: While not strictly necessary, a mat provides cushioning and grip, making poses more comfortable and stable. If you don’t have one, a soft rug or even a towel on a non-slip floor works just fine.
  • Comfortable Clothing: Choose clothes that allow for a full range of movement without restricting your breath or pinching your skin. Think soft, stretchy fabrics.
  • A Quiet Space: Find a corner where you won’t be disturbed for 15-30 minutes. Natural light can be invigorating, but any peaceful spot will do.
  • No Equipment Needed: Forget about fancy blocks, straps, or bolsters for now. Your body is all you need.

Essential Principles for Your Morning Stretch

Approaching your morning routine with intention makes all the difference. Keep these guidelines in mind as you move.

  • Listen to Your Body: This is perhaps the most important rule. Never force a stretch or push into pain. Your body’s sensations are your best guide. Some days you’ll feel more open, other days less so. Honor that.
  • Breath is Key: Connect your movement with your breath. Inhale to lengthen, exhale to deepen. Deep, steady breaths, often through the nose, oxygenate your muscles and calm your nervous system. Try to make your inhales and exhales roughly equal in length.
  • Hold Poses Gently: Aim to hold each stretch for 3-5 slow breaths. This gives your muscles time to relax and lengthen without triggering a “stretch reflex” that can cause them to contract.
  • Be Gentle, Not Aggressive: Morning muscles are often cooler and less pliable. Approach your stretches with kindness and patience. Think of it as waking up your body, not conquering it.
  • Consistency Over Intensity: A short, regular practice is far more effective than sporadic, intense sessions. Even 10-15 minutes daily will yield noticeable results over time.

Your Morning Yoga Stretch Routine for Enhanced Flexibility

This routine is designed to be gentle yet effective, progressively opening your body from head to toe. Remember to move slowly and mindfully through each pose.

1. Gentle Awakening: Grounding and Spinal Mobility

Child’s Pose (Balasana)

Start your practice here, grounding yourself. Kneel on your mat, bringing your big toes to touch and spreading your knees wide, or keep them hip-width apart for a more restorative feel. Sink your hips back towards your heels. Extend your arms forward, resting your forehead on the mat. Allow your shoulders to relax and your spine to lengthen. Breathe deeply into your back body, feeling your rib cage expand with each inhale. This pose calms the mind and gently stretches the hips, thighs, and ankles.

Cat-Cow Stretch (Marjaryasana-Bitilasana)

From Child’s Pose, shift onto your hands and knees, aligning your wrists directly under your shoulders and your knees under your hips. Your fingers should be spread wide. This dynamic movement warms up the spine.

  1. Cow Pose: As you inhale, drop your belly towards the mat, lift your chest and tailbone towards the ceiling. Gaze gently forward or slightly up, without crunching your neck.
  2. Cat Pose: As you exhale, round your spine towards the ceiling, tucking your chin to your chest and drawing your navel towards your spine. Imagine pressing the mat away from you.

Flow between Cat and Cow for 5-8 rounds, coordinating each movement with your breath. Feel the articulation of each vertebra. This improves spinal flexibility and mobility.

Gentle Supine Spinal Twist

Lie on your back with your knees bent and feet flat on the floor, hip-width apart. Extend your arms out to a “T” shape, palms facing up or down.

  1. Lift your hips slightly and shift them a few inches to the right.
  2. Let both knees fall slowly to the left, keeping your right shoulder grounded as much as possible.
  3. You can gaze to the right, opposite your knees, for a deeper neck stretch.

Hold for 5 breaths, feeling the gentle twist in your lower back and the stretch across your chest and shoulder. Bring your knees back to center, recenter your hips, then repeat on the other side, letting your knees fall to the right and gazing left. This pose releases tension in the spine and hips.

2. Standing Stretches: Building Warmth and Lengthening

Standing Forward Fold (Uttanasana)

Stand at the top of your mat with your feet hip-width apart.

  1. Inhale, lengthen your spine.
  2. Exhale, hinge from your hips, folding forward. Keep a slight bend in your knees, especially if your hamstrings are tight. The goal is to lengthen your spine, not necessarily to touch your toes with straight legs.
  3. Let your head hang heavy. You can grab opposite elbows, let your hands dangle, or place them on your shins or the floor.

Hold for 5 breaths, feeling the stretch in your hamstrings and along your spine. This pose calms the brain and helps relieve stress, while stretching the hamstrings and calves.

Low Lunge (Anjaneyasana)

From a Standing Forward Fold, step your right foot back into a lunge position, dropping your right knee to the mat. You can place a blanket under your knee for comfort.

  1. Ensure your left knee is stacked directly over your left ankle.
  2. Keep your left hand on the floor or a block for balance, or bring both hands to your left thigh.
  3. Gently press your hips forward and down, feeling the stretch in the front of your right hip and thigh (hip flexor).
  4. For an added stretch, inhale and sweep your arms overhead, palms facing each other.

Hold for 5 breaths, then release and switch sides. This pose is excellent for opening tight hip flexors, which often become stiff from prolonged sitting.

Triangle Pose (Trikonasana)

Step your feet wide apart, about 3-4 feet. Turn your right foot out 90 degrees, and your left foot slightly in.

  1. Extend your arms out to a “T” shape, parallel to the floor.
  2. Inhale, reach forward with your right hand, lengthening your right side.
  3. Exhale, hinge at your right hip, bringing your right hand to your shin, ankle, or a block. Your left arm reaches straight up towards the ceiling.
  4. Keep your chest open and stacked. Imagine you’re between two panes of glass.
  5. Gaze up at your left thumb, forward, or down at your right foot for neck comfort.

Hold for 3-5 breaths, feeling the stretch in your hamstrings, groin, and along the side of your torso. Inhale to come back up, then repeat on the other side. Triangle Pose strengthens the legs and core while stretching the hamstrings, groin, hips, and spine.

3. Floor Stretches: Deepening Flexibility and Release

Seated Forward Fold (Paschimottanasana)

Sit on your mat with your legs extended straight out in front of you, feet flexed (toes pointing up).

  1. Inhale, sit tall, lengthening your spine.
  2. Exhale, hinge from your hips, folding forward over your legs. Keep your spine long, avoiding rounding your back.
  3. Rest your hands on your shins, ankles, or feet.
  4. Keep a micro-bend in your knees if your hamstrings are very tight.

Hold for 5-8 breaths, allowing your body to soften into the stretch. This pose deeply stretches the hamstrings, calves, and back, and can calm the brain.

Bound Angle Pose (Baddha Konasana)

From Seated Forward Fold, bring the soles of your feet together, letting your knees fall open to the sides. You can bring your heels closer to your groin for a deeper stretch, or further away for a gentler one.

  1. Hold onto your feet, ankles, or shins.
  2. Inhale, sit tall, lengthening your spine.
  3. Exhale, gently fold forward from your hips, allowing your elbows to press lightly into your inner thighs if you wish to deepen the stretch.

Hold for 5-8 breaths, feeling the opening in your inner thighs and hips. This pose stimulates abdominal organs, improves general circulation, and stretches the inner thighs, groin, and knees.

Happy Baby Pose (Ananda Balasana)

Lie on your back.

  1. Bend your knees and draw them towards your chest.
  2. Grab the outside edges of your feet with your hands, keeping your knees bent and stacked over your ankles.
  3. Open your knees wider than your torso, drawing them towards your armpits.
  4. Keep the soles of your feet parallel to the ceiling.
  5. Gently press your lower back into the mat. You can rock gently side to side for a massage.

Hold for 5-8 breaths. This pose gently stretches the inner groins and back, and calms the brain and helps relieve stress.

Reclined Pigeon Pose (Eka Pada Rajakapotasana Variation)

Lie on your back with your knees bent and feet flat on the floor.

  1. Cross your right ankle over your left thigh, just above the knee.
  2. If you already feel a stretch in your right hip, stay here.
  3. For a deeper stretch, lift your left foot off the floor and interlace your fingers behind your left thigh.
  4. Gently draw your left thigh towards your chest, keeping your right foot flexed to protect your knee.

Hold for 5-8 breaths, feeling the deep stretch in your outer right hip and glute. Release and repeat on the other side. This is an excellent stretch for the outer hips and piriformis muscle.

4. Cool-down and Relaxation: Integrating Your Practice

Savasana (Corpse Pose)

Extend your legs long on the mat, letting your feet fall open naturally. Let your arms rest alongside your body, palms facing up, slightly away from your torso. Close your eyes. Allow your entire body to relax and surrender to the mat. Feel the effects of your practice. Let your breath be natural. Stay here for 5-10 minutes, allowing your body and mind to fully integrate the benefits of the stretches. This final pose is essential for relaxation and absorbing the practice.

Making It a Consistent Habit

Building a new routine takes time and patience. Don’t expect perfection from day one.

  • Start Small: Even 5-10 minutes of gentle stretching is better than nothing. You can gradually increase the duration as you feel more comfortable and dedicated.
  • Set a Specific Time: Waking up 15-30 minutes earlier and dedicating that time to your yoga practice can create a powerful anchor for your day.
  • Be Patient with Progress: Flexibility doesn’t happen overnight. Celebrate small improvements, like reaching a little further or feeling less tension in a particular area.
  • Focus on How it Feels: Shift your attention from how a pose looks to how it feels in your body. This internal focus makes the practice more personal and sustainable.
  • Listen to Your Body’s Signals: Some days you might feel more flexible than others. Adjust your practice accordingly.

Common Mistakes to Avoid

Even with the best intentions, it’s easy to fall into habits that hinder progress or risk injury.

  • Holding Your Breath: Restricting your breath creates tension. Always focus on smooth, steady breathing to help your muscles relax and lengthen.
  • Forcing Stretches: Pushing past your body’s natural limits can lead to muscle strains or injury. A gentle pull is good; sharp pain is a warning sign to back off.
  • Comparing Yourself to Others: Everyone’s body is different. Your flexibility journey is unique. Focus on your own progress and sensations, not on what others can do.
  • Skipping Warm-up or Cool-down: These phases are crucial. The warm-up prepares your muscles, and the cool-down allows your body to relax and integrate the benefits.
  • Ignoring Discomfort: While some sensation is normal during a stretch, sharp or shooting pain is not. Always adjust or back out of a pose if you feel pain.

Benefits Beyond Flexibility

While enhanced flexibility is a primary goal, a morning yoga routine offers a cascade of other positive effects that ripple through your entire day.

  • Improved Posture: By lengthening your spine and strengthening your core, yoga helps counteract the slouching that often comes from sitting at desks or looking at screens.
  • Reduced Stress and Anxiety: The combination of mindful movement and deep breathing actively calms the nervous system, providing a natural antidote to daily stressors.
  • Increased Energy Levels: Moving your body and increasing blood flow in the morning can be more invigorating than a cup of coffee, without the jitters.
  • Better Sleep Quality: Even a morning practice can contribute to better sleep by regulating your body’s rhythms and reducing overall stress throughout the day.
  • Stronger Mind-Body Connection: Regular practice fosters a deeper awareness of your physical sensations and emotional states, leading to greater self-understanding and presence.

Embracing a morning yoga stretch routine is a simple yet profound act of self-care. It doesn’t require hours of dedication, just a willingness to show up for yourself, even for a few minutes. Over time, you’ll discover not only a more flexible body but also a calmer, more focused mind ready to meet the day with renewed energy and grace.

Exit mobile version