Macro photography of the human integumentary system reveals a complex landscape of dermal ridges, fine vellus hairs, and varying pore structure that is invisible to the naked eye. Capturing these details requires more than just a camera; it demands an understanding of light, focus, and the natural topography of the skin surface anatomy. When you zoom in close enough to see the epidermal layer in high resolution, you move away from the airbrushed perfection seen in advertisements and toward the authentic reality of human skin morphology.

Essential Gear for High-Resolution Skin Capture
You cannot achieve professional-grade results with a standard kit lens. The goal is to isolate microscopic skin analysis without introducing motion blur or distortion. A dedicated macro lens with a 1:1 magnification ratio remains the standard for this work. This allows the sensor to record the subject at its actual size, which is necessary for highlighting the subtle peaks and valleys of the skin grain.
Lighting serves as the most significant factor in how skin texture appears in a photograph. Harsh, direct light flattens the image and washes out the natural contours. Instead, use soft, diffused light sources positioned at an angle to create shadows that define the dermal microstructure. These shadows provide the depth needed to make pores and ridges pop, turning a flat surface into a three-dimensional map.
- Macro lens with at least 90mm or 100mm focal length to avoid casting shadows on the subject.
- External flash with a large softbox or diffuser to mimic natural, directional light.
- A sturdy tripod to eliminate micro-vibrations, as even a millimeter of movement ruins focus at high magnification.
- Circular polarizing filter to manage the natural oils and moisture on the skin surface.
Techniques for Sharp Macro Photography
Focusing at this level is notoriously difficult. Because the depth of field is razor-thin when shooting at a 1:1 ratio, the camera must remain perfectly parallel to the skin surface. If the angle is off by even a few degrees, one side of your frame will be tack-sharp while the rest of the image dissolves into a blur.
Manual focus is your best friend. Relying on autofocus systems often leads to the camera hunting for a point of contrast that might not exist on a smooth patch of skin. Use the live-view zoom feature on your camera screen to manually adjust the focus ring until the tiny fine vellus hairs are crisp. Take multiple frames, shifting the focus slightly between each one, to ensure you capture the entire depth of the pore structure.
Managing Skin Reflectivity
Human skin contains natural oils that create hot spots under bright lights. These highlights can obscure the epidermal texture you are trying to document. A polarizing filter helps cut through this glare, but it does not remove it entirely. You should also consider the preparation of the skin before the shoot. A light dusting of translucent powder can reduce excessive shine, allowing the camera to record the actual skin topography rather than just reflected light.
Understanding Skin Morphology in Images
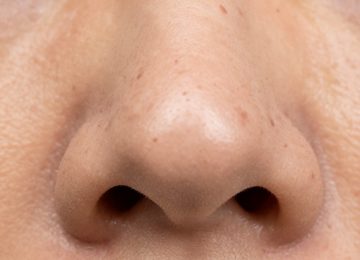
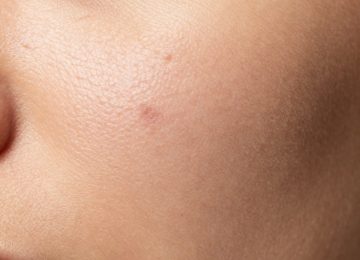
When you look at high-resolution skin capture, you see a world of patterns. Dermal ridges form unique prints, while the distribution of skin pores changes significantly depending on the area of the body. The nose and forehead typically show larger, more active pore structures, while the cheeks often display a finer grain. Recognizing these differences helps you decide how to frame your shots.
Clinical imaging often highlights skin blemishes or irregularities that are usually ignored in casual photography. If you are aiming for an aesthetic result, you might choose to focus on the geometric beauty of the ridges. If your goal is a more scientific or dermatological examination, you will want to capture the skin exactly as it is, including any hyperpigmentation or unevenness in the epidermal layer.
Common Mistakes to Avoid
Many beginners attempt to shoot macro skin photography in low-light conditions without proper support. This leads to high ISO settings, which introduce digital noise. Noise is the enemy of fine detail; it mimics the texture of the skin and makes it impossible to distinguish between the actual pore structure and the grain of the sensor. Keep your ISO as low as possible and compensate with longer exposure times or more light.
- Do not use the built-in pop-up flash on your camera, as it creates harsh, unflattering light that destroys texture.
- Avoid shooting in a room with mixed light sources, such as daylight from a window and warm indoor lamps, which makes color correction nearly impossible.
- Do not over-sharpen your images in post-production. Over-processing creates halos around the vellus hairs and makes the skin look unnatural or plastic.
- Avoid using heavy moisturizers or oils right before the shoot unless you are specifically trying to capture that “dewy” look, as they will cause light to bloom in a way that hides the pores.
Post-Processing for Natural Results
The editing process should be minimal. Your goal is to enhance what is already there, not to create a fake version of the subject. Start by adjusting the contrast to bring out the shadows in the dermal ridges. Use the clarity or texture sliders in your editing software sparingly. A little goes a long way, and too much will make the skin look jagged and harsh.
Check your white balance carefully. Skin tones are notoriously difficult to get right, and even a slight shift toward green or magenta can make the subject look unwell. Use a gray card if you are working in a controlled studio environment to ensure the colors are accurate. Once the color is balanced, you can refine the exposure to ensure the highlights on the skin surface anatomy remain soft and natural.
Viewing Skin as an Artistic Subject
Macro photography of the human integumentary system is a practice in patience and observation. It forces you to look at the body with a new level of scrutiny. You will notice how the skin grain changes with age, hydration, and environmental exposure. This perspective shifts the focus from the idea of “perfect” skin to the reality of healthy, functioning tissue.
By documenting the cutaneous features with honesty, you create images that feel grounded and real. Whether you are interested in the clinical side of dermatological detail or the artistic potential of the human form, these techniques provide a solid foundation for capturing the intricate beauty hidden in plain sight. Keep your equipment clean, your light soft, and your focus steady, and the details of the skin will reveal themselves in every frame.